
Table of Contents >> Show >> Hide
- Can You Really Grow Pumpkins Indoors?
- Step 1: Choose the Right Pumpkin Variety
- Step 2: Pick the Biggest Container You Can Realistically Manage
- Step 3: Use a Loose, Rich Potting Mix
- Step 4: Give Your Pumpkin Strong Light and Warmth
- Step 5: Plant Seeds the Smart Way
- Step 6: Water Consistently and Fertilize With Restraint
- Step 7: Train the Vine and Manage the Space
- Step 8: Hand-Pollinate the Flowers
- Step 9: Limit the Fruit and Harvest at the Right Time
- Common Problems When Growing Pumpkins Indoors
- Best Indoor Pumpkin Growing Tips at a Glance
- What Growing Pumpkins Indoors Actually Feels Like: Real-World Experience
- Conclusion
Growing pumpkins indoors sounds a little like inviting a golden retriever into a studio apartment: possible, charming, and occasionally chaotic. But it can be done if you choose the right variety, give the plant serious light, and accept one important truth: indoor pumpkins are not a “set it and forget it” houseplant. They are more like leafy roommates with dramatic needs.
The secret is to stop thinking about giant jack-o’-lantern pumpkins and start thinking small, compact, and manageable. Mini pumpkins, pie pumpkins, and semi-bush types stand the best chance indoors, especially when grown in a large container near strong supplemental lighting. With the right setup, you can grow pumpkin vines, pollinate flowers by hand, and harvest adorable fruit without ever marching into a backyard patch in muddy shoes.
This guide walks through exactly how to grow pumpkins indoors in 9 practical steps, plus common mistakes to avoid, troubleshooting tips, and real-life growing experiences that make the process much easier to understand before you commit half your living room to a vine with autumn ambitions.
Can You Really Grow Pumpkins Indoors?
Yes, but with a big asterisk. Full-size carving pumpkins are usually too large, too sprawling, and too demanding for normal indoor spaces. If your dream is a colossal front-porch pumpkin grown beside your couch, your couch may file a complaint. Indoor growing works best with miniature pumpkins, small pie types, or compact bush and semi-bush varieties.
Indoors, the plant will not get help from bees, long summer sunlight, or unlimited soil volume. That means you have to replace those things yourself with grow lights, a roomy container, hand pollination, and careful watering. The payoff is wonderfully satisfying: bright yellow blossoms, curling tendrils, and tiny orange pumpkins forming where your living room used to feel ordinary.
Step 1: Choose the Right Pumpkin Variety
Variety choice is the difference between “What a fun project” and “Why is this vine trying to annex my bookshelf?” Start with mini or compact pumpkins. Good examples include Jack-Be-Little, Munchkin, and Sweetie Pie. If you have a bit more room, a semi-bush type such as Funny Face is more realistic than a long-vining giant.
What you want is a pumpkin plant with one or more of these traits: smaller fruit, shorter maturity time, compact growth, and manageable vines. Tiny pumpkins are especially useful indoors because the plant can put its energy into ripening fruit without needing a football field of roots and sunlight. They are also easier to support on a trellis and far less likely to turn your home into a botanical obstacle course.
Before buying seeds, read the packet for days to maturity and growth habit. If the description sounds heroic, sprawling, or county-fair ready, keep walking.
Step 2: Pick the Biggest Container You Can Realistically Manage
Pumpkins are greedy about root space. Indoors, use a deep, wide container with excellent drainage. For miniature varieties, think in terms of a very large pot, sturdy grow bag, or half-barrel-sized container rather than a cute decorative planter. A practical minimum is a container in the 15-gallon range for a truly small type, and bigger is better.
The container should have several drainage holes. No drainage means soggy roots, and soggy roots mean your pumpkin will begin composing its own sad violin soundtrack. Elevating the container slightly on pot feet or a tray stand also helps water drain more freely.
Put the container in its permanent location before filling it. Once it is full of moist potting mix, it will weigh roughly the same as your regret after buying the wrong size couch online.
Step 3: Use a Loose, Rich Potting Mix
Do not scoop dirt out of the yard and call it a day. Use a high-quality potting mix that is light, fluffy, and drains well. Pumpkins like moisture, but they do not like sitting in heavy, compacted soil that starves roots of oxygen.
A good indoor pumpkin mix usually contains potting soil or soilless mix plus ingredients such as peat moss or coco coir, perlite, and compost. You want a medium that holds enough moisture to keep the plant hydrated but still lets excess water move out quickly. If your mix does not already include fertilizer, blend in a slow-release vegetable fertilizer at planting time.
Rich soil matters because pumpkins are long-season feeders. They build lots of leaves first, then flowers, then fruit, and each stage costs the plant energy. Think of the potting mix as the pantry. A pumpkin with an empty pantry will still try to grow, but it will do so with the enthusiasm of a teenager asked to do chores before breakfast.
Step 4: Give Your Pumpkin Strong Light and Warmth
This is where most indoor pumpkin attempts succeed or fail. A bright window alone is often not enough. Pumpkins want the kind of light that makes them feel like summer showed up on purpose. Set the plant in the sunniest location you have and add full-spectrum grow lights above the plant. As the pumpkin grows, keep the lighting setup adjustable.
Seedlings and flowering plants both benefit from long light periods each day. Aim for roughly 14 to 16 hours of light from a combination of sun and supplemental grow lighting. Warm temperatures help too. Pumpkins are warm-season plants, so a chilly room or drafty window is not doing them any favors.
If your seedling becomes tall, pale, and floppy, that is your plant politely screaming, “I need more light.” Move the light closer, increase intensity, or improve exposure. Indoors, pumpkins should look sturdy and vigorous, not like they are trying to escape upward in search of better real estate.
Step 5: Plant Seeds the Smart Way
You can either start seeds directly in the final container or begin them in a smaller biodegradable pot and transplant carefully. Direct sowing is often easier because pumpkins dislike root disturbance. Plant seeds about 1 inch deep in pre-moistened mix, then water gently.
Many gardeners plant two or three seeds and thin to the strongest seedling once true leaves appear. If more than one seed sprouts, resist the urge to let them all stay. One strong pumpkin in a container is much better than three plants competing like siblings over the last slice of pizza.
Keep the soil evenly moist during germination but not soaked. Warmth helps speed sprouting. Once seedlings emerge, remove any humidity dome, improve airflow, and get them under strong light immediately.
Step 6: Water Consistently and Fertilize With Restraint
Indoor pumpkins need steady moisture, especially once they start growing fast. Water deeply whenever the top inch or so of the potting mix starts to feel dry. Then let excess water drain away. Do not keep the soil wet all the time, and do not wait until the plant wilts like a Victorian heroine.
Since containers dry out faster than in-ground beds, check moisture often. During active growth, your pumpkin may drink more than expected, especially under grow lights. Bottom watering or careful watering at the soil level can help keep foliage drier, which is useful for disease prevention.
Fertilizer matters, but more is not better. Start with a balanced fertilizer or a slow-release vegetable blend. Once vines and flowers begin developing, avoid going heavy on nitrogen. Too much nitrogen can encourage lush leaf growth while delaying female flowers and fruit set. In plain English, you get a dramatic jungle and no pumpkins.
Step 7: Train the Vine and Manage the Space
Even compact pumpkins like to wander. Indoors, that means you need to guide the plant before it decides that your lamp, curtain rod, and office chair are all natural landscape features. Install a sturdy trellis, cage, or support structure early. Gently tie vines as they grow using soft plant ties or strips of cloth.
Small pumpkins can be trained vertically, but fruit support matters. Once baby pumpkins start enlarging, use soft slings made from fabric, mesh, or old T-shirt material to cradle the fruit. That prevents the stem from bearing all the weight.
You can also pinch back overly ambitious vine growth if the plant is getting unruly. The goal indoors is not maximum sprawl. The goal is a healthy plant with enough leaves to feed a few fruits without converting your home into a low-budget greenhouse.
Step 8: Hand-Pollinate the Flowers
This is the make-or-break step for indoor pumpkins. Outdoors, bees handle pollination. Indoors, congratulations, you are now the bee. The good news is that it is simple once you know what to look for.
Male flowers grow on thin stems. Female flowers have a swollen base behind the bloom that looks like a tiny baby pumpkin. Pumpkins usually produce male flowers first, so do not panic if blossoms appear and fall off without making fruit. That is normal. Female flowers typically arrive a bit later.
Pollinate early in the morning when flowers are freshly open. Use a small artist’s paintbrush or pick a male flower, peel back the petals, and gently brush pollen onto the center of the female flower. One good transfer can do the job. If pollination works, the little pumpkin behind the flower begins to swell instead of yellowing and dropping.
It feels oddly official the first time you do this. One moment you are making coffee. The next, you are performing precision pumpkin matchmaking in your kitchen.
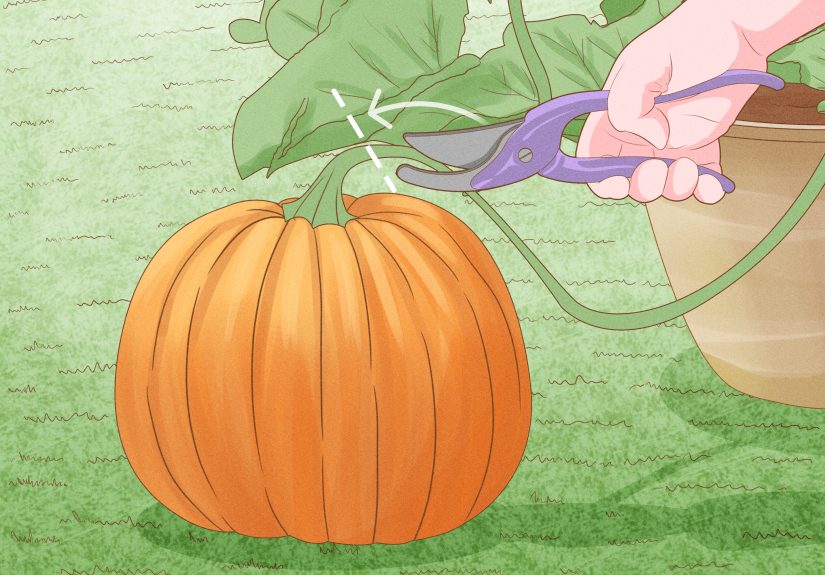
Step 9: Limit the Fruit and Harvest at the Right Time
Indoor pumpkin plants should not be asked to ripen a huge number of fruits. In most cases, it is smarter to let the plant mature one to three pumpkins, depending on the variety and vigor. If too many fruits set, remove the extras while they are still small. This allows the plant to size up and ripen the remaining pumpkins more successfully.
Harvest when the fruit reaches full color and the rind feels hard. The stem will also begin to toughen and dry. Use clean pruners and leave a few inches of stem attached. Do not carry the pumpkin by the stem unless you enjoy preventable disappointment.
Once harvested, cure the fruit in a warm, dry place if needed, then store it somewhere cool and dry. And yes, at that point you are fully allowed to look at your indoor pumpkin and feel absurdly proud.
Common Problems When Growing Pumpkins Indoors
No Fruit After Lots of Flowers
This usually means one of three things: only male flowers have opened so far, pollination did not happen, or the plant is stressed by poor light, temperature swings, or irregular watering. Hand pollination and stronger light usually fix the issue.
Leaves Look Big but the Plant Feels “All Vine, No Pumpkin”
Too much nitrogen is often the culprit. Dial back fertilizer, especially high-nitrogen feeding, and focus on balanced nutrition. Make sure the plant is also getting enough light to support flowering and fruiting.
Powdery Mildew or Fungal Problems
Crowded foliage, poor airflow, and wet leaves create the perfect setting for mildew. Use a small fan nearby, water at the soil line, and avoid splashing foliage late in the day. Remove badly affected leaves and give the vine more breathing room.
Tiny Pumpkins Shrivel and Fall Off
That often points to incomplete pollination or plant stress. Revisit your hand-pollination routine and make sure watering stays even. Extreme dryness followed by soaking can also interrupt fruit development.
Best Indoor Pumpkin Growing Tips at a Glance
If you want the shortest version possible, here it is: choose a miniature or bush variety, grow it in a very large container, use loose potting mix, add strong grow lights, water consistently, feed moderately, train the vines, hand-pollinate the flowers, and limit the number of fruits. That is the whole game.
Indoor pumpkin growing is less about luck and more about replacing what nature normally provides outdoors. When you do that well, the plant responds surprisingly fast.
What Growing Pumpkins Indoors Actually Feels Like: Real-World Experience
The first week is all optimism. You plant the seed, mist the soil, and imagine a tasteful little vine politely producing a pumpkin or two by the window. Then the real pumpkin personality shows up. The seedling emerges quickly, throws out large leaves, and begins growing with the confidence of a plant that has never heard the phrase “limited square footage.”
One of the most common experiences people have is underestimating how fast the plant wants to move. At first, it seems compact. A few days later, the vine is leaning into nearby objects like it pays rent there. This is usually the moment when growers realize a trellis should have been installed yesterday. The plant is not being difficult. It is simply being a pumpkin.
Another familiar experience is the emotional roller coaster of flowers. Male blooms often arrive first, bright and cheerful, then drop off. If you are new to pumpkins, this can feel like a botanical betrayal. But once you learn that female flowers come later, the process gets much less stressful. In fact, spotting that first female flower with a tiny pumpkin at the base feels like finding a hidden level in a video game.
Hand pollination also sounds intimidating until you do it once. Then it becomes weirdly satisfying. Many growers describe checking flowers in the morning with coffee in hand, brush ready, like they have been promoted from houseplant owner to assistant pollinator. The next few days are full of suspense. If the tiny pumpkin starts swelling, you feel like a genius. If it yellows and drops, you suddenly become a detective reviewing every recent watering decision.
Lighting is another big reality check. People often assume a sunny window is enough until the plant starts stretching. Once a proper grow light is added, the difference is obvious. Leaves become sturdier, growth gets more compact, and the whole plant looks less like it is begging to be rescued. Indoors, good light changes everything.
The best part of the experience is how dramatic the transformation feels. A seed becomes a vine, the vine throws out giant leaves, and then one day there is an unmistakable pumpkin forming in your home. Not outside. Not in a garden bed. In your house. It is delightfully ridiculous and deeply rewarding at the same time.
Most successful indoor growers also mention that restraint matters. Letting the plant carry too many fruits usually backfires. Once they start limiting the crop to one or two pumpkins, results improve. The fruit colors up better, the plant stays healthier, and the whole project feels manageable instead of chaotic.
In the end, growing pumpkins indoors is not the easiest edible project, but it is one of the most memorable. It teaches patience, observation, and a little humility. It also gives you a very fun sentence to say out loud: “I grew this pumpkin in my living room.” And honestly, that sentence is worth a lot.
Conclusion
Growing pumpkins indoors is absolutely possible when you treat the project like indoor fruit production rather than casual windowsill gardening. Start with the right variety, use a large container, give the plant strong light and warm conditions, and be ready to hand-pollinate. Those are the non-negotiables.
The rest is rhythm: water, watch, train, pollinate, thin, and harvest. If you stay attentive, even a small indoor space can produce charming mini pumpkins that look like they belong in a fall photo shoot but were actually raised a few feet from your coffee table. That is not just gardening. That is bragging rights with leaves.


