
Table of Contents >> Show >> Hide
- Before You Harvest Aloe: What You Need to Know
- Tools You’ll Need to Harvest Aloe
- How to Harvest Aloe: 8 Steps
- How Much Aloe Can You Harvest at Once?
- How to Care for Aloe After Harvesting
- Common Aloe Harvesting Mistakes
- Practical Uses for Fresh Aloe Gel
- Can You Eat Fresh Aloe Gel?
- How to Tell If Your Aloe Plant Is Ready Again
- Experience-Based Tips for Harvesting Aloe Better
- Conclusion
Aloe vera is the houseplant equivalent of that calm friend who never asks for much, looks good in every corner, and somehow shows up when you have a minor kitchen mishap. Its thick, green leaves store clear gel that many people use topically for simple skin-soothing routines. But harvesting aloe is not the same as grabbing a leaf like you are picking basil for pasta. Done carelessly, you can stress the plant, waste the gel, or accidentally mix in the yellow latex layer you should treat with caution.
The good news? Learning how to harvest aloe is simple once you understand the plant’s structure. Aloe leaves grow from the center outward, meaning the older, larger leaves sit around the outside. Those are the leaves you want. The young inner leaves are the plant’s future, so leave them alone unless you enjoy upsetting succulents, which is not a personality trait anyone needs.
This guide explains how to harvest aloe in 8 steps, from choosing the right leaf to storing fresh aloe vera gel safely. You will also learn common mistakes, plant-care tips after cutting, and practical experience-based advice for getting cleaner gel with less mess.
Before You Harvest Aloe: What You Need to Know
Aloe vera is a succulent, which means it stores water in its leaves and prefers dry, well-draining conditions. A healthy aloe plant usually has firm, plump leaves, a strong center rosette, and no mushy base. If your plant is yellow, limp, wrinkled, or sitting in soggy soil, harvesting should wait. A stressed aloe plant needs recovery, not a haircut.
For the best results, harvest from a mature plant. Many growers wait until the plant is at least two to three years old or has several thick outer leaves. A tiny aloe plant on a windowsill may look adorable, but it does not have much gel to spare. Harvesting too early can slow growth and make the plant look like it lost a fight with a salad spinner.
It is also important to understand the difference between aloe gel and aloe latex. The clear inner gel is the part most people want for topical use. The yellow sap found just under the outer leaf skin is aloe latex, which can irritate skin for some people and is not something to casually consume. When preparing aloe at home, draining and rinsing the leaf helps separate the clear gel from the yellow latex.
Tools You’ll Need to Harvest Aloe
You do not need fancy gardening equipment to harvest aloe vera gel. In fact, a clean, sharp knife is usually better than a dramatic tool collection. Gather these items before you start:
- A clean, sharp knife or pruning blade
- A cutting board
- A clean bowl or glass
- A spoon
- A vegetable peeler or small paring knife
- Paper towels or a clean cloth
- An airtight container for storage
Clean tools matter. Aloe leaves are full of moisture, and dirty blades can introduce bacteria to both the harvested gel and the plant. Before cutting, wash your knife with hot, soapy water and dry it well. If you want to be extra careful, wipe the blade with rubbing alcohol and let it air-dry before use.
How to Harvest Aloe: 8 Steps
Step 1: Choose a Mature, Healthy Aloe Plant
Start by inspecting the whole plant. Look for firm, upright leaves with a rich green color. Some aloe plants naturally have pale speckles or slightly reddish tips when exposed to strong light, but avoid harvesting leaves that are yellowing, mushy, brown, or badly wrinkled. Those leaves may be stressed, damaged, or low in usable gel.
A mature aloe plant should have enough leaves to keep growing after harvest. As a general rule, avoid cutting from plants with only a few leaves. If the plant has a strong center and several large outer leaves, it is a better candidate. Think of it like trimming hair: a small snip from a full head is fine; shaving a seedling is rude.
Step 2: Pick the Right Outer Leaf
The best aloe leaves to harvest are the older, thicker leaves around the outside of the plant. These leaves usually contain more gel and can be removed without disturbing the tender new growth in the center. Choose one leaf at a time unless your plant is large and vigorous.
A good harvest leaf should be thick from base to tip, not hollow-feeling or floppy. Longer leaves often hold more gel, but size is not everything. A fat, firm medium leaf can be better than a long, thin leaf that has been underwatered. If the leaf feels like a deflated pool toy, let the plant recover with proper care before harvesting.
Step 3: Cut the Leaf Close to the Base
Hold the chosen leaf gently and cut it as close to the base as possible. Use one clean, confident cut instead of sawing back and forth. A smooth cut helps the plant heal faster and reduces unnecessary tissue damage.
Do not cut the leaf in the middle while leaving a stump attached to the plant. Aloe does not regrow from a half-cut leaf the way some herbs bounce back after trimming. A chopped leaf tip will usually scar, dry, and look sad. Removing the entire leaf at the base gives the plant a cleaner wound and a better chance to seal itself naturally.
Step 4: Let the Yellow Latex Drain
After cutting, place the aloe leaf upright in a glass or bowl with the cut end facing down. Let it drain for about 10 to 20 minutes. You may see yellow liquid seeping out. That is aloe latex.
This draining step is easy to skip, but it is worth doing. Aloe latex can have a bitter smell and may cause irritation for some people. If your goal is clean gel for topical use, draining the latex first makes the final gel clearer and more pleasant to handle.
After draining, rinse the leaf under cool running water and pat it dry. The leaf will be slippery, so do not rush. Aloe has a way of launching itself off cutting boards like it has somewhere urgent to be.
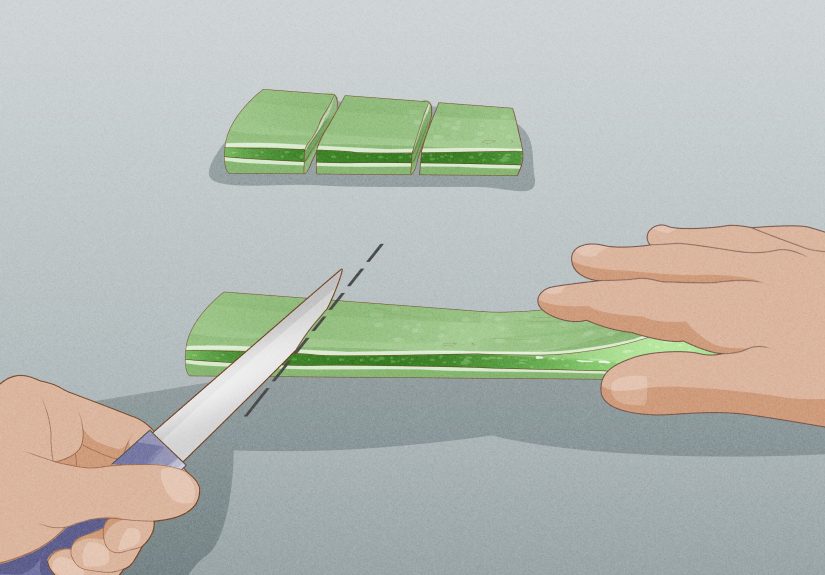
Step 5: Trim Away the Spiny Edges
Lay the rinsed leaf flat on a cutting board. Use your knife to slice off both spiny side edges. These edges are not dangerous like cactus needles, but they are tough and not useful for gel extraction.
Try to remove only the narrow thorny strips so you keep as much inner gel as possible. If the leaf is curved, press it gently with your fingertips, keeping them away from the knife path. Slow, steady cutting beats fast, heroic cutting every time.
Step 6: Remove the Top Leaf Skin
Now peel away the top green layer of the leaf. You can use a small knife or vegetable peeler. Slide the blade just under the surface and remove the skin in strips. Underneath, you will see the clear, jelly-like aloe gel.
Do not worry if your first attempt looks a little messy. Aloe gel is slippery, and the plant does not care about your Instagram standards. The goal is to separate the clear gel from the green rind and any remaining yellow residue.
If you see yellow staining on the gel, rinse it gently. For cleaner gel, you can soak the pieces briefly in cool water and then drain them. This is especially useful if you are sensitive to plant saps.
Step 7: Scoop or Slice Out the Clear Gel
Once the top skin is removed, use a spoon to scoop the clear gel into a clean bowl. You can also flip the leaf over and carefully slice away the bottom skin, leaving a slab of gel. Cut the gel into small cubes if you want easy portions.
Fresh aloe gel can be used as-is for simple topical applications, but always patch-test first. Apply a small amount to a small area of skin and wait to see whether irritation develops. Do not use homemade aloe gel on deep wounds, serious burns, infected skin, or allergic reactions that need medical care. Aloe is a useful plant, not a tiny green doctor with a license.
Step 8: Store the Gel Properly
Fresh aloe vera gel is best used soon after harvesting. Place it in a clean, airtight container and refrigerate it. For longer storage, freeze gel cubes in an ice cube tray, then move the frozen cubes to a sealed freezer-safe container.
Label the container with the date. This may sound overly organized, but future you will appreciate not having to sniff a mystery jar and ask, “Is this skincare or soup?” Homemade aloe gel does not contain commercial preservatives, so freshness matters. If it changes color, smells strange, or develops mold, throw it away.
How Much Aloe Can You Harvest at Once?
For most houseplants, harvest one large outer leaf at a time. A very mature, vigorous aloe may handle two or three leaves occasionally, but avoid removing too many leaves at once. Aloe uses its leaves to store water and make energy, so heavy harvesting can weaken the plant.
Never remove the center leaves unless you are dealing with damage or disease. The center is where new growth emerges. If you cut into it, the plant may recover slowly or become misshapen. A good rule is to take less than you think you can. With aloe, restraint is not boring; it is plant insurance.
How to Care for Aloe After Harvesting
After cutting a leaf, leave the plant alone for a while. Do not water immediately unless the soil is completely dry and the plant already needs it. Aloe prefers soil that dries between waterings. Overwatering after harvest can increase the risk of rot, especially if the plant has a fresh cut near the base.
Keep your aloe in bright light. Indoors, a sunny window with bright indirect light often works well. Outdoors, aloe can enjoy sun, but sudden exposure to harsh direct light may scorch leaves if the plant has been living indoors. Gradual transitions are best.
Use a pot with drainage holes and a cactus or succulent mix. Heavy, wet soil is one of the fastest ways to turn a proud aloe plant into a tragic green pudding. If the plant becomes top-heavy, repot it into a slightly larger container, not a giant pot. Too much extra soil holds moisture longer than aloe likes.
Common Aloe Harvesting Mistakes
Cutting Young Inner Leaves
Inner leaves are new growth. They are smaller, softer, and important for the plant’s future shape. Harvesting them reduces the plant’s ability to keep producing strong outer leaves.
Using Dirty Tools
Aloe gel is moist and delicate. Dirty tools can contaminate the gel and the plant wound. Always clean your knife before harvesting.
Skipping the Latex Drain
The yellow latex layer is bitter and may irritate some people. Draining the cut leaf before extracting gel gives a cleaner result.
Harvesting Too Often
Aloe grows slowly compared with leafy herbs. If you harvest more quickly than the plant can replace leaves, you will end up with a tired-looking plant and less gel over time.
Expecting Homemade Gel to Last Forever
Fresh aloe gel does not have the stabilizers found in many store-bought products. Refrigerate it, freeze it if needed, and discard it if anything seems off.
Practical Uses for Fresh Aloe Gel
Fresh aloe gel is most commonly used topically. People apply it to skin for a cooling, hydrating feel, especially after sun exposure or minor irritation. It can also be blended into simple DIY skin masks, mixed with a plain moisturizer, or frozen into small cubes for quick cooling use.
Keep the use simple. Avoid mixing fresh aloe with harsh exfoliating acids, strong essential oils, or random pantry ingredients just because a social media video said it was “life-changing.” Skin is not a chemistry lab with eyebrows.
If you have sensitive skin, allergies, eczema, or a medical skin condition, patch-test carefully and consider asking a healthcare professional before using homemade plant gel. Stop using aloe if it causes burning, itching, rash, or discomfort.
Can You Eat Fresh Aloe Gel?
Some commercially prepared aloe products are made for oral use, but harvesting aloe at home for eating or drinking requires caution. The clear gel and the yellow latex are easy to mix accidentally, and aloe latex has known safety concerns. For that reason, this guide focuses on harvesting aloe gel for topical use.
If you are considering aloe for internal use, speak with a qualified healthcare professional first, especially if you are pregnant, breastfeeding, taking medication, managing a medical condition, or preparing aloe for a child. Natural does not automatically mean harmless. Poison ivy is natural, and nobody invites it to brunch.
How to Tell If Your Aloe Plant Is Ready Again
After harvesting, give the plant time to grow. New leaves should continue forming from the center, and the remaining outer leaves should stay firm. If the plant looks smaller but healthy, wait until it has produced more growth before cutting again.
Signs your aloe is ready for another harvest include several plump outer leaves, stable upright growth, and no mushiness at the base. Signs it needs a break include drooping leaves, pale color, soft spots, slow growth, or soil that stays wet too long.
Experience-Based Tips for Harvesting Aloe Better
After you harvest aloe a few times, you start noticing small details that make the process cleaner, easier, and less wasteful. The first lesson is that timing matters. Harvesting in the morning is often more comfortable because the plant is firm, the room is cooler, and you are less likely to rush. A rushed aloe harvest usually ends with gel on the counter, gel on your fingers, and one suspiciously slippery knife handle.
Another helpful habit is to water the plant a few days before harvesting, not right before. If the plant has been extremely dry for weeks, the leaves may be thinner and contain less gel. However, watering immediately before cutting is not necessary and can make an already moisture-filled plant messier to handle. A balanced plant with firm leaves gives the best harvest.
When choosing a leaf, look at the whole shape of the plant. Removing one outer leaf from the back or side can keep the aloe looking attractive in its pot. If you always cut leaves from the front, your plant may eventually look lopsided, like it is trying to leave the windowsill. Rotating the pot every week also encourages more even growth.
For cleaner gel, use the “drain, rinse, peel, rinse again” method. First, drain the latex from the cut end. Second, rinse the whole leaf. Third, peel and scoop the gel. Finally, rinse the gel pieces once more in cool water. This extra rinse can remove leftover yellow residue and bits of green rind. The finished gel looks clearer and feels fresher.
If you plan to freeze aloe, portion it before freezing. Large frozen slabs are annoying to cut later and tend to thaw unevenly. Small cubes are much more practical. You can use one cube at a time for cooling skin care or thaw a few cubes for a DIY gel blend. Use a dedicated ice cube tray, not the same one you use for drinks, unless you want your lemonade to taste faintly like a greenhouse.
Blending aloe gel can make it smoother, but it also adds air, which may shorten freshness. If you blend it, use clean equipment and store it right away. Some people strain blended gel through a fine mesh sieve for a smoother texture. This is optional, but it helps if you dislike the stringy texture of fresh aloe.
One of the biggest experience-based lessons is not to overharvest just because the plant looks tough. Aloe is hardy, but it is not unlimited. If you use aloe gel often, consider growing two or three plants and rotating harvests. This gives each plant time to recover and keeps you from turning one heroic aloe into a botanical skeleton.
Pay attention to your plant after each cut. A healthy aloe will seal the cut area naturally. If the base becomes soft, dark, or smelly, check your watering routine and soil drainage. Most post-harvest problems are not caused by the cut itself; they are caused by too much moisture afterward.
Finally, keep expectations realistic. Fresh aloe gel is wonderful for simple topical use, but it is not a miracle cure, sunscreen replacement, or emergency treatment for serious skin injuries. Use it wisely, keep it clean, and respect both the plant and your skin. That is the secret to harvesting aloe without drama.
Conclusion
Harvesting aloe is easy when you take the right leaf, use clean tools, drain the yellow latex, and store the clear gel properly. The most important rule is to protect the plant’s center and harvest only mature outer leaves. With a little patience, your aloe can keep growing while giving you fresh gel when you need it.
Aloe vera is low-maintenance, but it responds best to thoughtful care: bright light, well-draining soil, careful watering, and gentle harvesting. Treat it well, and it will reward you with plump leaves instead of passive-aggressive drooping. That is a pretty fair deal from a plant that also makes your windowsill look smarter.
Note: This article is an original, fully rewritten guide synthesized from reputable horticulture, plant-care, and health-safety references, including university extension guidance, government health resources, and established gardening publications. It is intended for general educational use and focuses on topical aloe gel preparation, not medical treatment or internal consumption.


