
Table of Contents >> Show >> Hide
- Why Soft Close Drawer Slides Are Worth the Upgrade
- Before You Start: Know Which Drawer Slide You Have
- Tools and Materials You’ll Need
- Step 1: Measure the Drawer and Cabinet Opening
- Step 2: Remove the Old Drawer and Hardware
- Step 3: Check Whether the Cabinet Is Face-Frame or Frameless
- How to Install Side-Mount Soft Close Drawer Slides
- How to Install Undermount Soft Close Drawer Slides
- Common Mistakes to Avoid
- Troubleshooting a Drawer That Won’t Behave
- Real-World Installation Experiences and Lessons Learned
- Conclusion
Installing soft close drawer slides sounds like one of those projects people confidently describe as “super easy” right before spending 45 minutes looking for a missing screw. The good news is that this job really is manageable for most DIYers, as long as you measure carefully, pick the right slide type, and install everything level and parallel. Do that, and you get drawers that glide smoothly, close quietly, and stop sounding like tiny kitchen cabinets are picking a fight with your house.
This guide walks you through the full process in plain American English, with no mystery jargon and no magical thinking. Whether you are upgrading worn-out kitchen drawers, fixing a bathroom vanity, or making a dresser feel more expensive than it actually is, the steps are mostly the same: remove the drawer, confirm the cabinet style, measure correctly, install the cabinet members, install the drawer members, test, adjust, and only then tighten everything down for good.
Let’s get your drawers closing like they have manners.
Why Soft Close Drawer Slides Are Worth the Upgrade
Soft close drawer slides do exactly what the name promises: they slow the drawer down at the end of its travel so it shuts gently instead of slamming. That means less noise, less wear on the drawer box, and a much nicer feel in everyday use. It also helps protect cabinet frames, drawer fronts, and whatever random objects your household tends to toss into a junk drawer with all the care of a meteor strike.
They are especially useful in kitchens, bathrooms, laundry rooms, and home offices where drawers get opened and closed constantly. If you are upgrading from older roller slides or worn-out metal tracks, the difference is immediate. A soft close slide can make an average cabinet feel newer, smoother, and a lot less annoying.
Before You Start: Know Which Drawer Slide You Have
Before buying anything, figure out what style of slide your cabinet can actually use. This is the part people skip, and it is usually the exact part that causes regret.
Side-Mount Soft Close Slides
These attach to the sides of the drawer and the inside walls of the cabinet. They are common, sturdy, and beginner-friendly. You can usually see them when the drawer is open. Many side-mount slides need about 1/2 inch of clearance on each side of the drawer, so the drawer box must be narrow enough to fit the hardware properly.
Undermount Soft Close Slides
These mount underneath the drawer and are hidden from view when the drawer is open. They give a cleaner, more high-end look, but they usually require a specific drawer box design, including precise drawer dimensions, notches or holes at the back, and front locking clips. In other words, beautiful, but slightly fussier.
Retrofit Soft-Close Adapters
If your current drawer slides are still in decent shape, some systems let you add a soft-close adapter instead of replacing the whole slide set. That can be a smart shortcut for light-duty drawers, but for the smoothest long-term result, a full replacement is often the better move.
Tools and Materials You’ll Need
- Soft close drawer slides sized for your drawer
- Measuring tape
- Pencil
- Drill or driver
- Screwdriver
- Level or small torpedo level
- Combination square or speed square
- Mounting screws recommended by the manufacturer
- Shims if your cabinet interior is uneven
- Optional: drawer slide jig, clamps, and safety glasses
A jig is not mandatory, but it can make installation much easier, especially if you are working alone or installing several drawers in a row.
Step 1: Measure the Drawer and Cabinet Opening
This is the most important step in the whole project. Not the most glamorous. Not the most Instagrammable. But definitely the most important.
Measure the length of the existing drawer box first. Most drawer slides are sold in standard lengths such as 12, 14, 16, 18, 20, or 22 inches. In general, choose a slide length that matches the drawer length or the cabinet depth, according to the manufacturer’s instructions.
Then measure the cabinet opening width and the actual outside width of the drawer box. For many side-mount slides, you need a total of 1 inch of space, which usually means 1/2 inch on the left and 1/2 inch on the right. For example, if the cabinet opening is 21 inches wide, the drawer box often needs to be about 20 inches wide for a standard side-mount setup. Always verify this with the hardware you buy because not every system uses the exact same clearance.
If you are switching to undermount slides, pay attention to height, bottom thickness, drawer depth, back notch requirements, and clip placement. Undermount systems reward precision and punish optimism.
Step 2: Remove the Old Drawer and Hardware
Take the drawer out and remove the old slides, tracks, or rollers from both the cabinet and the drawer box. Keep the screws separate if you think you may reuse them, though using the hardware supplied with the new slides is usually the smarter move.
Once the old hardware is off, clean out dust, crumbs, and mystery debris from inside the cabinet. A perfectly installed slide can still feel terrible if it is riding over old grit or hitting a rogue screw head.
Step 3: Check Whether the Cabinet Is Face-Frame or Frameless
This matters because installation can change depending on cabinet construction.
Face-frame cabinets have a front frame around the opening. They may require rear mounting brackets or spacer blocks so the slide sits level from front to back.
Frameless cabinets have flat cabinet sides with no front frame, which often makes slide installation more direct.
If the cabinet walls are not perfectly square or the interior has bows, you may need shims. That is not a sign of failure. That is just home improvement reminding you that houses are weird.
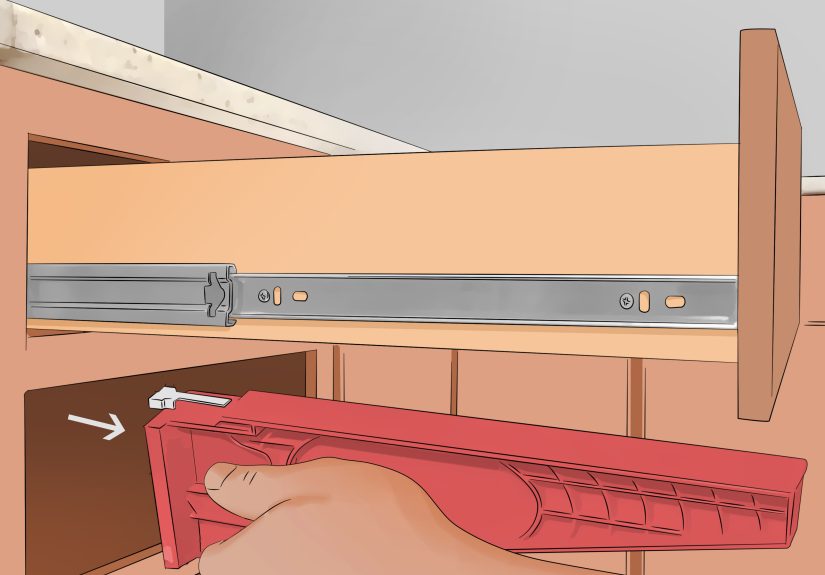
How to Install Side-Mount Soft Close Drawer Slides
Step 4: Separate the Slide Members
Most ball-bearing side-mount slides separate into two parts: one member mounts to the drawer, and the other mounts to the cabinet. Use the release lever to separate them if needed.
Step 5: Mount the Drawer Members First
Position each drawer-side member flush with the front of the drawer box and aligned near the bottom edge, unless your hardware instructions say otherwise. Drive the first screw into an elongated slot rather than a round hole. This gives you room to make small adjustments later. Add a second screw near the back, but do not fully lock everything down yet.
Repeat on the other side. Check that both members are installed at the same height and are perfectly parallel. If one side is even slightly crooked, the drawer will let you know in the form of grinding, sticking, or dramatic passive resistance.
Step 6: Mount the Cabinet Members
Place the cabinet members inside the cabinet, one on each side. Start at the front, keeping each slide level and square to the cabinet opening. On face-frame cabinets, use mounting brackets or spacers if needed so the slide sits properly from front to back.
Again, use elongated slots for the first screws. Check that the slides are level, parallel to each other, and at the same height on both sides. A small torpedo level is helpful here, and so is measuring from the cabinet floor or opening edge instead of trusting your eyeballs. Your eyeballs are talented, but they are not precision tools.
Step 7: Insert the Drawer and Test the Action
Slide the drawer into place and push it in until the members engage. Some soft-close ball-bearing slides feel a little stiff on the first insertion. That can be normal. Push steadily, not violently.
Open and close the drawer several times. It should move smoothly, stay level, and pull itself gently shut during the last few inches. If it rubs, sags, binds, or looks crooked, remove it and adjust the slide positions before tightening all remaining screws.
Step 8: Final Tightening and Alignment
Once the drawer works properly, add the remaining screws to the round holes and tighten everything securely. This locks the hardware in its final position and helps prevent drift over time.
How to Install Undermount Soft Close Drawer Slides
Undermount slides follow the same basic logic, but the details are more exact. If your slide kit includes templates, clips, rear hooks, or drilling guides, use them. They exist because the manufacturer would like you to keep your blood pressure at survivable levels.
Step 1: Confirm Drawer Box Compatibility
Make sure the drawer box matches the slide requirements for width, bottom thickness, side thickness, and back configuration. Many undermount systems need notches or holes at the back of the drawer box and locking clips at the front underside.
Step 2: Install the Cabinet Runners
Mount the runners level and parallel on each side of the cabinet interior or onto the cabinet structure specified by the manufacturer. Some systems for face-frame cabinets need rear brackets. Double-check the front setback and runner position before drilling all the holes.
Step 3: Install Front Locking Devices or Clips
Attach the locking clips to the underside front of the drawer exactly where the instructions indicate. These clips secure the drawer to the runners and often allow height or side adjustment later.
Step 4: Fit the Drawer on the Runners
Set the drawer onto the runners and push it inward until it clicks or locks in place. Then test the movement. Many undermount systems allow fine adjustments for height, tilt, and side-to-side alignment. Use those features to get an even reveal and a clean drawer front line.
Common Mistakes to Avoid
- Buying the wrong slide length: Too short wastes extension, too long may not fit the cabinet depth.
- Ignoring required clearances: A drawer that is too wide or too tall for the hardware will never glide correctly.
- Installing slides out of level: Even a small tilt can cause sticking or self-opening.
- Using all final screws too soon: Start with adjustable slots first, then fine-tune, then tighten.
- Forgetting cabinet type: Face-frame cabinets often need brackets, shims, or spacers.
- Overloading the drawer: A soft-close slide is smooth, not magical. Respect the weight rating.
Troubleshooting a Drawer That Won’t Behave
The Drawer Won’t Close All the Way
Check for obstructions, incorrect slide engagement, or misalignment. Also confirm the drawer box is square. A racked drawer can fight the soft-close mechanism and lose every time.
The Drawer Feels Rough or Sticks
Look for slides that are not parallel, screws that are too tight in the wrong position, or drawer members mounted at slightly different heights. Loosen, adjust, retest, repeat.
The Soft-Close Action Doesn’t Kick In
Make sure the slides are fully compatible as a matched set and that the drawer is installed correctly. If the drawer is overloaded, crooked, or not fully engaging the track, the soft-close feature may not work as intended.
The Drawer Front Looks Uneven
Use the adjustment features on the slide system if available. Many undermount systems offer height, side, and tilt adjustments. Side-mount systems usually need position changes at the screw slots.
Real-World Installation Experiences and Lessons Learned
In real homes, installing soft close drawer slides is rarely a perfectly staged workshop moment with spotless wood, ideal lighting, and a camera-ready cabinet box. It is usually more like this: you remove one old drawer, discover the previous hardware was installed by someone with a grudge against geometry, then spend ten minutes measuring an opening that somehow changes by a fraction of an inch depending on where you place the tape. That is normal.
A common experience is that the first drawer takes the longest by far. You measure twice, then a third time because somehow the math now looks suspicious. You hold a slide in place, step back, decide it looks right, use a level, and realize it absolutely does not look right. Then you reposition it by a hair, drive one screw, test fit the drawer, remove it again, and suddenly understand why professional cabinet installers are so calm: they have already had this argument with drawer slides many times before.
Kitchen drawers are often the biggest confidence builders. Once you get one working smoothly, the project starts to make sense. The slides stop feeling like mysterious metal puzzles and start behaving like what they are: a system that rewards patience. The trick most DIYers learn quickly is not to fully tighten everything too early. The elongated slots are your best friend. They let you make small corrections without starting over, which is excellent news for both your schedule and your vocabulary.
Bathroom vanity drawers tend to introduce a different kind of challenge: cramped working space. You are on the floor, half inside a cabinet, holding a drill at a weird angle, wondering whether furniture designers have ever met a human shoulder. In those moments, a compact driver, a headlamp, and a deep respect for pre-drilling become life-improving technologies.
Dresser upgrades often reveal another practical truth: old furniture is not always square anymore. Wood moves, joints loosen, and drawers develop personalities. One side may fit beautifully while the other side insists on rubbing. When that happens, soft close slides can still work well, but you may need to shim, adjust, and accept that “perfect” sometimes means “smooth, aligned, and not worth losing your weekend over.”
There is also a satisfying moment nearly every installer experiences when the soft-close feature works for the first time. You push the drawer in, it catches, glides the last bit on its own, and closes with a gentle hush. It feels far more luxurious than the effort would suggest. Suddenly that old cabinet seems upgraded, civilized, maybe even a little smug.
The best long-term lesson from these projects is simple: careful prep beats brute force every time. Measuring accurately, checking for level, understanding the cabinet style, and leaving room for adjustment will solve most problems before they start. And if you do have to remove the drawer three times before it works perfectly, congratulations, you are having the authentic soft close drawer slide installation experience. That is not failure. That is just DIY with character.
Conclusion
If you want drawers that feel smoother, quieter, and more polished, installing soft close drawer slides is one of the best small upgrades you can make. The job is not difficult so much as it is detail-sensitive. Measure carefully, match the slide type to the cabinet, keep everything level and parallel, and use the adjustment slots before locking the hardware down. Do that, and even older cabinets can get a surprisingly modern upgrade.
In other words, the secret is not fancy tools or superhero carpentry skills. It is patience, accuracy, and a willingness to admit that the drawer was not the problem until the tape measure proved otherwise.


