Table of Contents >> Show >> Hide
- Why People Paint Whitewall Tires in the First Place
- Before You Start: Know When Painting Is Fine and When It Is a Bad Idea
- What You’ll Need
- Simple Ways to Paint Whitewall Tires
- How to Paint Whitewall Tires Step by Step
- Mistakes That Ruin Painted Whitewall Tires
- How Long Will Painted Whitewall Tires Last?
- When It Makes More Sense to Buy Real Whitewalls
- Real-World Experiences With DIY Whitewall Tires
- Conclusion
Whitewall tires have a talent for making almost any car look cooler. A sleepy old sedan suddenly has diner-date charm. A custom cruiser looks like it belongs in a parade. Even a humble project car can pick up serious vintage attitude with one clean white ring around the sidewall. The problem, of course, is that true whitewalls can be expensive, hard to find, or unavailable in the exact size your ride needs.
That is why so many DIYers look for simple ways to paint whitewall tires. And yes, it can be done. But it only looks good when you treat the job like tire customization, not like a random arts-and-crafts ambush in your driveway. Rubber flexes. Sidewalls pick up grime. Tires heat up, cool down, and live a rough life. So if you want painted whitewalls that look crisp instead of tragic, prep matters more than bravado.
In this guide, I’ll walk through the easiest DIY methods, the products that make the most sense, the mistakes that cause peeling, and the situations where painting is not the smartest move. Think of it as your shortcut to a classic look without accidentally giving your tires the automotive version of smeared Halloween makeup.
Why People Paint Whitewall Tires in the First Place
Most people paint whitewall tires for one of three reasons: cost, style, or fitment. Genuine whitewall tires are the most durable option, but they are not always cheap, and they are not always available in the size or look you want. If you are building a budget cruiser, restoring a project car, or dressing up a motorcycle, a painted whitewall can be a fast visual upgrade.
The appeal is obvious. Whitewalls add contrast, make wheels pop, and instantly push a car toward a vintage, lowrider, hot rod, or retro custom vibe. The look can be subtle with a thin stripe or dramatic with a wide band. Either way, it is one of the simplest ways to change the whole personality of a vehicle without repainting the body.
Before You Start: Know When Painting Is Fine and When It Is a Bad Idea
Do not customize a damaged tire
If the sidewall has cuts, cracks, splits, bruises, or bulges, skip the paint and deal with the tire itself. Cosmetic work should never cover up a safety issue. A tire that is already damaged does not need a makeover. It needs inspection or replacement.
Understand that paint is cosmetic, not permanent magic
Painted whitewalls can look great, but they usually will not match the long-term durability of a true whitewall tire manufactured with white rubber from the start. On a show car, weekend cruiser, or lightly driven bike, DIY paint can be a fun solution. On a daily driver that sees heat, rain, road grime, curbs, and regular washing, expect touch-ups.
Never paint the tread
This should not need saying, and yet the internet exists. Keep all coatings on the sidewall only. Do not paint the tread blocks, grooves, or bead area. The goal is to create a white ring, not a rolling science experiment.
What You’ll Need
- Mild soap and water
- Nylon-bristle brush or stiff tire brush
- Clean microfiber cloths
- Painter’s tape or fine-line tape
- Index cards or masking paper
- A white tire marker, paint pen, or flexible rubber-compatible coating
- A small foam brush or detail brush if you are brushing paint on
- Optional: a whitewall stencil, compass tool, or homemade template
- Optional: a purpose-built whitewall strip kit if you want an alternative to paint
The best product depends on the look you want. Paint markers are easiest for thin stripes and lettering. Flexible rubber- or vinyl-compatible coatings work better for wider white bands. Whitewall strip kits are the cleanest shortcut when you want the look without freehand painting.
Simple Ways to Paint Whitewall Tires
Method 1: Use a white tire paint marker
This is the simplest method for beginners, especially if you only want a narrow stripe or to brighten an existing thin whitewall. Tire markers are made to work on rubber, and they are easy to control. They are also great for touching up faded white bands later.
The trade-off is coverage. Paint markers usually need multiple passes, and a wide band can take longer than expected. Your first coat may look streaky and mildly insulting. Do not panic. That is normal. Thin, repeated coats are how you build clean white coverage.
Method 2: Mask the sidewall and apply a flexible white coating
If you want a true custom white band, masking and painting is the better route. The key is choosing a coating that can handle flexible surfaces. Standard house paint, random craft paint, or brittle enamel is not your friend here. A flexible rubber- or vinyl-compatible coating is a much better bet.
This method gives the most control over width and style. You can create a thin classic ring, a wide old-school band, or something in between. It takes longer than using a paint pen, but the results can look much more intentional.
Method 3: Use a whitewall strip or decal-style kit instead of liquid paint
If your main goal is the look, not the romance of hand-painting rubber, a whitewall strip kit is worth considering. Some kits let you choose a thin or thick band and apply it directly to the sidewall. This can be easier than painting and can deliver a sharper edge. It is still a form of whitewall customization, just with less brush drama.
For many DIYers, this is the sweet spot: simpler than spraying, cleaner than freehand work, and easier to redo if you change your mind.
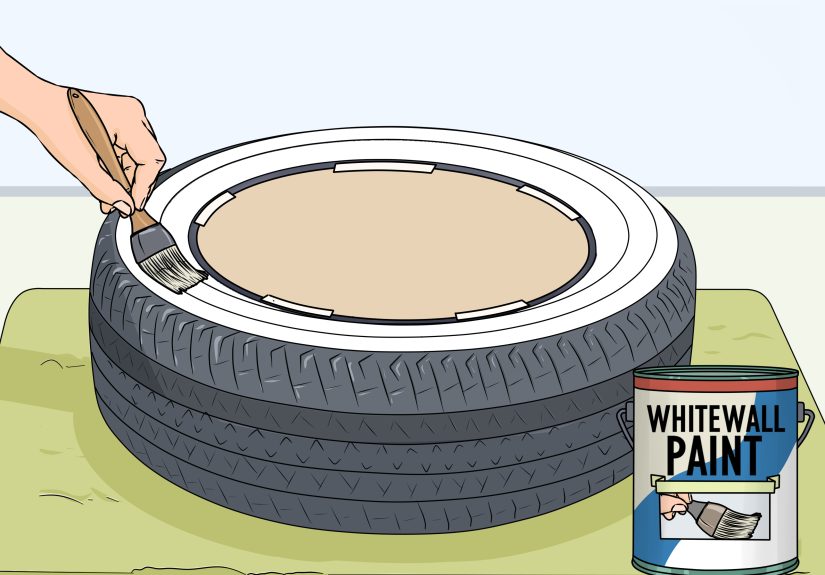
How to Paint Whitewall Tires Step by Step
- Clean the tire thoroughly.
Wash the sidewall with mild soap, water, and a nylon-bristle brush. Scrub until the surface is free of dressing, grime, and road film. Then rinse and dry completely. If the sidewall still feels slick, it is not ready.
- Inspect the sidewall.
Look for cracks, cuts, bulges, or exposed damage. If anything looks questionable, stop there. A pretty tire that is structurally suspect is still a bad tire.
- Plan your band width.
Use a ruler or flexible measuring tape to decide how wide the whitewall should be. A thinner line looks subtle and sporty. A wider band delivers full retro swagger.
- Mask carefully.
Use fine-line tape to create a clean circle. Protect the wheel and the outer sidewall with painter’s tape, masking paper, or tucked index cards. This step is boring, which is precisely why it matters so much.
- Apply light coats.
If you are using a marker, work slowly and build coverage in layers. If you are spraying or brushing, use multiple thin coats instead of one thick coat. Thick coats crack, sag, and look like you lost patience halfway through. Because you did.
- Let each coat flash or dry.
Follow the product instructions. Rushing the second coat is a classic mistake. The paint may look dry on top while still soft underneath.
- Remove the masking gently.
Peel tape off carefully once the product reaches the right stage according to the instructions. Too early and it smears. Too late and it can chip at the edge.
- Cure before driving.
Give the tire time before taking the vehicle out. Even the best-looking paint job will fail early if it gets flexed, scrubbed, or splashed before curing.
Mistakes That Ruin Painted Whitewall Tires
Using the wrong cleaner: If the tire is coated in dressing, silicone, or oily residue, the paint will struggle to bond. Clean first, and make sure the sidewall is fully dry.
Skipping masking: Freehand confidence is admirable in karaoke, less so on tires. Sharp edges come from good masking, not wishful thinking.
Applying thick coats: Heavy paint looks fast, but it dries poorly and fails early. Thin coats are the whole game.
Aggressive grinding: Some old-school imitation whitewall methods involved grinding or heavily altering the sidewall. That is not the move for a normal DIY project. Light prep is one thing. Taking too much material off a sidewall is another.
Ignoring the use case: A weekend cruiser can tolerate more experimentation than a daily highway car. Be honest about how the vehicle is used.
How Long Will Painted Whitewall Tires Last?
That depends on the product, prep, weather, and how often the vehicle is driven. A garage-kept weekend car may keep a painted whitewall looking decent for quite a while with occasional touch-ups. A daily driver may start showing dirt, scuffs, or fading much sooner.
White is unforgiving. Brake dust, road film, and curb kisses show up fast. The good news is that touch-up work is usually simple if you used a paint marker or a coating that is easy to reapply. In other words, painted whitewalls can be high style and medium maintenance. Like owning a white couch and pretending coffee is no longer part of your personality.
When It Makes More Sense to Buy Real Whitewalls
If you want the most durable, period-correct, and low-fuss result, genuine whitewall tires are still the gold standard. They are designed that way from the beginning, and modern versions can offer the appearance of vintage whitewalls with current-day performance expectations.
So if your budget allows it, or if your vehicle is valuable enough that you want the cleanest long-term solution, buying real whitewalls is the smarter move. Paint is the affordable shortcut. Factory-style whitewalls are the long game.
Real-World Experiences With DIY Whitewall Tires
One of the funniest things about DIY whitewall projects is that almost everyone begins with the same optimistic thought: “This should only take an hour.” Then the cleaning starts. Then the masking starts. Then you realize circles are emotionally complicated. Before long, you are crouched next to a tire, talking to painter’s tape like it owes you money.
That experience is incredibly common. The actual painting is usually the easy part. The prep is where the job is won or lost. Most first-timers discover that tires hold onto more residue than expected. Even when a sidewall looks clean, it may still carry leftover dressing, oily film, or embedded grime. The lesson hits fast: scrub once, wipe it down, then scrub again. The people who rush prep usually end up with fisheyes, streaks, or paint that flakes early.
Another common experience is being deeply offended by the first coat. Whether you use a marker or a flexible white coating, that first pass often looks uneven and grayish. Many people assume they bought the wrong product. Usually, they did not. White over black rubber almost always needs layering. The second and third coats are where the color starts to settle in and look intentional. Patience is not just helpful here; it is basically part of the tool kit.
DIYers also learn quickly that thin whitewalls are easier to make look clean than wide ones. A narrow stripe is more forgiving, easier to mask, and easier to touch up. A wide white band looks amazing when done well, but it also magnifies every wobble, drip, and fuzzy edge. That is why many people start thin on their first attempt, then go wider only after they have survived one round of sidewall combat.
Weather plays a role, too. Projects done in a cool, dry garage tend to turn out better than ones done in blazing sun or heavy humidity. Paint behaves differently when the tire surface is hot, and masking tape loses some of its manners when everything feels like a toaster. A calm workspace, moderate temperature, and enough cure time can make a basic job look surprisingly professional.
Then there is the maintenance side of the experience. Whitewall DIY fans often report that the finish itself can hold up reasonably well, but keeping it bright is a separate chore. White attracts dirt like gossip attracts a group chat. The painted area may need regular gentle cleaning, and after a few drives, many owners keep a marker handy for touch-ups. This is not necessarily a downside. It is just part of the deal. A painted whitewall is less of a one-and-done solution and more of a small ongoing ritual.
And finally, many people come away from the project with the same conclusion: it is worth it when expectations are realistic. Painted whitewall tires are best viewed as a style upgrade, not a forever finish. If you want a budget-friendly vintage look and enjoy a little hands-on work, they can absolutely deliver. If you want perfect, factory-like durability with almost no maintenance, real whitewalls are the better choice. Either way, the experience tends to teach the same thing: the classic look is easy to love, but getting there rewards patience, good prep, and just enough stubbornness to finish all four tires.
Conclusion
Painting whitewall tires is one of those old-school custom tricks that can still work beautifully today, as long as you approach it with the right expectations. Clean the sidewall well, use products that can handle flexible rubber surfaces, mask carefully, and build the white color in thin coats. For a show car, weekend cruiser, project bike, or budget vintage build, the result can look fantastic.
But the smartest DIYers know the truth: the simple part is not the paint itself. It is choosing the right method for your vehicle. If you want easy touch-ups, use a tire marker. If you want a fuller custom band, mask and apply a flexible coating. If you want the cleanest shortcut, consider a whitewall strip kit. And if you want the most durable solution of all, buy true whitewall tires and let the manufacturers do the hard part.
In other words, painted whitewalls can absolutely turn heads. Just make sure the only thing cracking is a smile when you step back and admire the finished look.