
Table of Contents >> Show >> Hide
- Before You Start: Know What Makes Vinyl Gutters Different
- Tools and Materials Checklist
- Step 1: Decide Where Water Should Exit (Downspout Plan)
- Step 2: Measure the Roofline and Count Your Parts
- Step 3: Inspect the Fascia (Because Rotten Wood Doesn’t Hold Screws)
- Step 4: Decide Your Slope and Mark the High Point
- Step 5: Snap a Chalk Line for the Slope (Gravity Needs Directions)
- Step 6: Dry-Fit the System on the Ground (Save the Awkward Ladder Balancing for Later)
- Step 7: Cut Gutter Sections to Length (Clean Cuts = Better Seals)
- Step 8: Install the Drop Outlet and Key Fittings (Follow Your System’s Order)
- Step 9: Mount Hangers/Brackets Along the Chalk Line
- Step 10: Hang the Gutter Sections and Connect Them
- Step 11: Seal Joints, Corners, and End Caps (Water Will Find the One Weak Spot)
- Step 12: Install the Downspouts, Elbows, and Straps
- Step 13: Test, Adjust, and Make a Maintenance Plan
- Common Mistakes (So You Don’t Learn Them the Hard Way)
- Frequently Asked Questions
- What I Learned Installing Vinyl Gutters (Real-World Notes)
- Conclusion
Vinyl gutters (a.k.a. PVC rain gutters) are the “snap-together furniture” of the gutter world:
lightweight, DIY-friendly, and forgivingright up until water decides to ignore your downspout and
redecorate your foundation. The good news? If you can measure, mark a slope, and resist the urge to
treat a ladder like a circus prop, you can install vinyl gutters on many one-story (and some two-story)
homes with solid results.
This guide walks you through 13 practical stepsfrom planning downspouts to sealing jointsso your
gutter system drains properly, stays supported, and survives seasonal temperature swings without
popping apart like a cheap plastic storage bin.
Before You Start: Know What Makes Vinyl Gutters Different
Vinyl gutters are sectional systems. That means you’ll connect multiple pieces using joiners, slip joints,
corners, end caps, and a drop outlet that feeds the downspout. Compared with seamless aluminum, vinyl:
- Expands and contracts more with temperature (so expansion room matters).
- Is lighter (easier to lift and align), but can sag if hangers are too far apart.
- Won’t rust and often doesn’t need painting, but can get brittle in extreme cold.
- Is great for DIY because parts are modular and mistakes are usually fixable.
Tools and Materials Checklist
Common tools
- Extension ladder (plus a stabilizer if possible), work gloves, eye protection
- Tape measure, pencil/marker, chalk line, level (or a level app + straightedge)
- Hacksaw or fine-tooth saw, utility knife/sandpaper to deburr cut edges
- Drill/driver with bits, screws recommended by your gutter manufacturer
- Caulk gun (for gutter sealant), rags, rubbing alcohol or cleaner for prep (if needed)
Materials (varies by brand/system)
- Vinyl gutter sections (commonly 10 ft lengths)
- Gutter hangers/brackets (hidden hangers or exterior brackets)
- Joiners/slip joints, inside/outside corners, end caps
- Drop outlet(s) for downspout connection
- Downspouts, elbows, straps/clips/brackets, connectors (if extending)
- Gutter sealant (or system-specific cement/adhesive if required)
- Splash blocks and/or downspout extensions
- Optional: gutter guards, leaf strainers, drip edge (if your roof edge needs it)
Step 1: Decide Where Water Should Exit (Downspout Plan)
The whole point of gutters is to move water away from your home’s foundationso start by deciding
where downspouts make the most sense. Look for spots where you can:
- Run water away from the house using an extension or splash block
- Avoid dumping water onto walkways that become winter skating rinks
- Keep discharge away from basement windows, crawlspace vents, and low spots
Planning tip: Long straight runs drain better with more than one downspout. Many systems recommend a
downspout roughly every 30–40 feet (and more if your roof collects a lot of water). If you’re unsure,
err on the side of “more exit points, less drama.”
Step 2: Measure the Roofline and Count Your Parts
Measure each eave where you want gutters. Write down each run length and note inside corners (where
two roof edges meet) and outside corners (where they wrap around a corner). Then plan:
- Gutter sections: total linear feet divided by section length (often 10 ft)
- Hangers/brackets: based on spacing (more on that in Step 8)
- Fittings: end caps, corners, joiners/slip joints, and drop outlets
- Downspouts: one per planned exit point, plus elbows and straps/clips
Real-world example: If your garage has a 30 ft run with one downspout at the right end, you’ll likely
need three 10 ft gutter pieces, a right end cap, at least one joiner/slip joint, one drop outlet,
and enough hangers to support the entire run without sagging.
Step 3: Inspect the Fascia (Because Rotten Wood Doesn’t Hold Screws)
Vinyl gutters may be light, but gutters filled with water and debris are not. Before you install anything,
check the fascia board (the board behind the gutters) for rot, soft spots, peeling paint, or missing wood.
If it’s compromised, repair or replace it first. Otherwise, you’ll be “installing” your gutters directly
into disappointment.
Also check for a straight fascia line. If the fascia waves like the ocean, your gutters will too, and
that’s how you get standing water (and mosquitoes that move in like they’re paying rent).
Step 4: Decide Your Slope and Mark the High Point
Gutters must slope so water flows to the downspout. The “right” slope depends on the system, but common
guidance ranges from about 1/8 inch to 1/2 inch drop per 10 feet. Too little pitch can cause
standing water; too much can cause water to race past the outlet and spill over the edge.
Choose the highest point farthest from the downspout. Mark it on the fascia so the top edge of the gutter
ends up slightly below the roof edge (often around an inch or so, but follow your gutter brand’s guidance).
This helps catch runoff without putting the gutter so high it tucks under shingles and interferes with roof
drainage.
Step 5: Snap a Chalk Line for the Slope (Gravity Needs Directions)
Once you’ve marked the high point, calculate the total drop to your downspout end. Example: If you choose
1/4 inch per 10 feet and your run is 30 feet, you need 3/4 inch total drop from high to low.
- Mark the high point on the fascia.
- Mark the low point near the downspout location using your calculated drop.
- Snap a chalk line between those marks.
That chalk line becomes your “install hangers here” runway. It’s also the difference between “smooth drainage”
and “mystery puddle that smells like wet leaves.”
Step 6: Dry-Fit the System on the Ground (Save the Awkward Ladder Balancing for Later)
Lay your gutter sections on the ground roughly in the order they’ll be installed. Identify where corners,
joiners/slip joints, end caps, and the drop outlet will go. This is the moment to notice:
- Which end needs an end cap
- Where your downspout outlet aligns with your planned discharge
- How many joints you’ll have (fewer joints = fewer leak opportunities)
Dry-fitting also helps you confirm you bought the right parts. Finding out you need an inside corner when
you’re already on the ladder is a special kind of character-building experience.
Step 7: Cut Gutter Sections to Length (Clean Cuts = Better Seals)
If a run isn’t an exact multiple of your section length, you’ll need to cut a piece. Use a hacksaw or
fine-tooth saw and cut square. Then deburr the edge (light sanding or careful trimming) so it seats properly
in joiners and corners.
Vinyl expands and contracts, so pay attention to any insertion marks or temperature guidelines your system
provides. The goal is a secure connection that still allows controlled movement as temperatures change.
Step 8: Install the Drop Outlet and Key Fittings (Follow Your System’s Order)
Many vinyl systems want the drop outlet installed early so everything slopes toward it correctly. Typically:
- Cut the outlet opening where the downspout will attach (some outlets guide the cutout size).
- Fasten or snap the drop outlet in place as the system requires.
- Install end caps and corners on the appropriate ends/turns.
Important: Some systems specifically warn against driving screws through certain parts (like the drop outlet
into the gutter) because it can prevent proper expansion and contraction. Translation: let vinyl move a little,
or it will move a lotusually at the worst seam.
Step 9: Mount Hangers/Brackets Along the Chalk Line
Hanger spacing is the difference between a straight gutter and a sad, droopy one. General guidance varies:
some DIY resources say around 24–36 inches, while some vinyl manufacturer instructions call for closer spacing
like 18–24 inches. If your area gets heavy rain, snow, or ice, closer spacing is your friend.
Best practice points:
- Place hangers near joints, corners, and outlets for extra support.
- Fasten into solid wood (ideally rafter tails or structural backing), not just thin fascia.
- Keep the top edge aligned with the chalk line so the slope stays consistent.
Step 10: Hang the Gutter Sections and Connect Them
With hangers installed, lift the gutter sections into place and snap/seat them according to your system.
This step is much easier with a helperone person holds alignment while the other fastens or snaps components.
When connecting sections:
- Use joiners/slip joints as intended (some systems use an inner + outer joiner; others use slip joints).
- Don’t force pieces together beyond insertion marks meant for expansion space.
- Support overlapped joints with a hanger whenever possible.
Humor break (but also serious): If you hear a loud “SNAP!” and it wasn’t the designed snap-together feature,
stop and check alignment. Vinyl will forgive you… right up until it doesn’t.
Step 11: Seal Joints, Corners, and End Caps (Water Will Find the One Weak Spot)
Sealant strategy depends on your system: many vinyl gutter kits use gutter sealant at seams and corners, while
other vinyl rainware systems may use a specific cement/adhesive for connectors and corners. Either way:
- Clean mating surfaces before sealing (dust and moisture reduce adhesion).
- Apply sealant where the manufacturer indicatesusually inside seams/corners and around end caps.
- Don’t smear sealant everywhere like you’re frosting a cake. Targeted beads seal better and look cleaner.
Pro move: After sealing, wait the recommended cure time before testing hard with a hose. Some sealants set
quickly, others need a bit longer. Rushing cure time is how you get “Why is it leaking?” followed by “Oh.”
Step 12: Install the Downspouts, Elbows, and Straps
Now route water down and away. A common layout is:
- Attach an elbow to the drop outlet to aim toward the wall.
- Add a short downspout piece, then another elbow to align the vertical run.
- Run the downspout down the wall, securing it with straps/clips every several feet.
- At the bottom, add an elbow and discharge into a splash block or extension.
Aim the discharge at least a few feet away from the foundation. If you can extend it 4–6 feet (or route to a
safe drainage area), even better. The goal is “water leaves the house area” instead of “water tries to become
part of the house.”
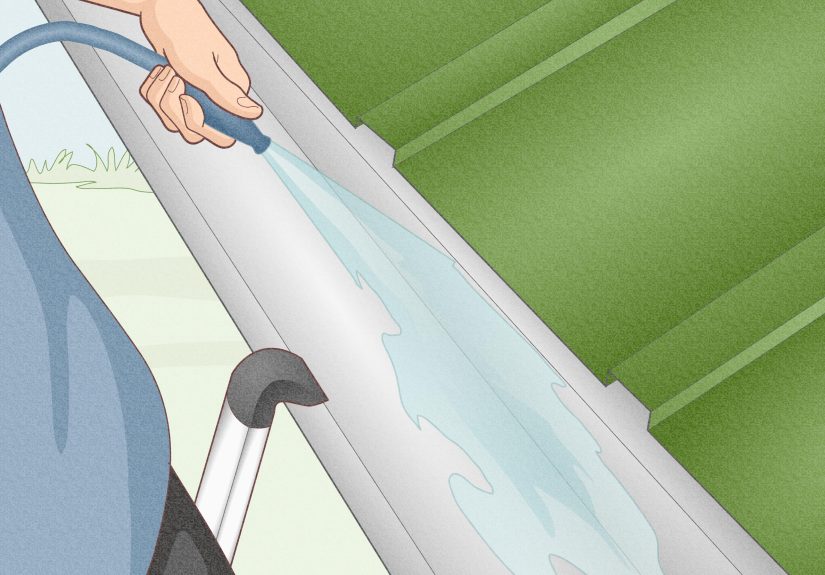
Step 13: Test, Adjust, and Make a Maintenance Plan
Time for the hose test. Run water into the high end and watch the flow:
- Water should move steadily toward the downspout without pooling.
- No drips at seams (a few initial wet spots can happen before sealant fully cures, but
active drips need attention). - No overflow at normal hose flow; if it spills, check pitch and outlet alignment.
If water stands in the gutter, you likely need a touch more slope or a hanger adjustment. Small tweaks matter.
Then plan simple upkeep: clean gutters at least seasonally (more often if you have lots of trees) and consider
gutter guards or strainers if clogs are a recurring hobby in your zip code.
Common Mistakes (So You Don’t Learn Them the Hard Way)
1) Hangers too far apart
Sagging gutters hold standing water, trap debris, and eventually pull away. If you’re unsure, add more hangers.
“Over-supported” is not a real gutter problem.
2) No expansion room
Vinyl moves with temperature. If you jam pieces together without allowing the system’s designed movement,
joints can separate or crack.
3) Not enough downspout capacity
One downspout on a long run can be overwhelmed in heavy rain. If your gutter overflows near the middle during
storms, consider adding a second downspout or pitching from the center to both ends.
4) Draining too close to the foundation
A perfect gutter install still fails if the downspout dumps water next to the house. Extensions and splash
blocks are cheap. Foundation repairs are… not.
Frequently Asked Questions
How do I choose the “right” slope?
Follow the manufacturer’s recommendation if available. If not, a common DIY target is around 1/4 inch drop per
10 feet. The key is consistent pitch toward the outletno dips, no flat spots.
Can I install vinyl gutters alone?
Technically yes, especially for short runs. Practically, a helper is safer and faster. Long gutter sections
behave like sails in even mild wind, and ladders do not appreciate surprise tug-of-war.
Where should the top of the gutter sit?
Generally, the gutter should sit below the roof edge enough to catch runoff without being so high it interferes
with shingles or drip edge. Use your system’s guidance and keep the chalk line consistent.
What I Learned Installing Vinyl Gutters (Real-World Notes)
The first time I installed vinyl gutters, I thought the hard part would be cutting pieces straight. Nope.
The hard part was accepting that gutters are basically a “precision water slide” and water is the world’s most
honest critic. If your slope is off by what feels like a hair, water will find that low spot, throw a party,
and invite every leaf within a three-block radius.
My biggest win was snapping a chalk line and treating it like law, not a suggestion. I used to eyeball hanger
placement and then wonder why the gutter had one suspicious puddle that never drained. Once I installed hangers
exactly on the slope line, the whole system behaved like it was suddenly in a better mood.
I also learned that “I’ll add hangers later if it sags” is the DIY version of “I’ll start stretching after I
pull a muscle.” Vinyl is light, so it’s tempting to space hangers out. But once the gutter fills with water and
wet debris, those extra inches between supports become a slow-motion failure. On the next install, I tightened
spacingespecially near corners, outlets, and jointsand the gutter line stayed straight through storms.
Another surprise: temperature changes are not theoretical. On a warm afternoon, everything fit perfectly. On a
cold morning, that same run felt tighter, and the joints wanted to argue. The systems that include insertion
marks or guidelines for expansion are not being dramaticthey’re saving you from seams that separate after the
first big seasonal swing. I started leaving the recommended movement room, avoided “locking” parts that were
meant to slide, and stopped over-tightening fasteners that pinched pieces in place.
Sealing taught me patience. The instinct is to use more sealant than necessary because “more must mean better.”
But sloppy sealant tends to smear, trap dirt, and still miss the actual leak path. What worked best was cleaning
surfaces, applying neat beads exactly where water could travel, and giving the sealant time to cure before a full
hose test. It’s not glamorous, but neither is chasing a drip with a caulk gun while balancing on a ladder.
Finally: the downspout discharge matters just as much as the gutter. On one run, I had flawless flow into the
downspoutthen watched the water dump right next to the foundation like it was trying to undermine the house.
A simple extension fixed it instantly. That’s when it clicked: gutters aren’t “installed” when they’re up.
They’re installed when water leaves your home’s perimeter and goes somewhere harmless.
Conclusion
Installing vinyl gutters is a very doable DIY project when you focus on the fundamentals: solid fascia support,
consistent slope, properly spaced hangers, sealed joints, and downspouts that carry water well away from your
foundation. Take your time on layout and slope, use the right fittings for your system, and test with water
before calling it done. Your future selfstanding outside during a rainstorm and not watching water waterfall
off the roof edgewill be deeply grateful.


