Table of Contents >> Show >> Hide
- Start With a Plan: What Do You Want Your Deck Area to Do?
- Step 1: Fix the “Not Sexy” Stuff First (Drainage, Grade, and Airflow)
- Step 2: Define the Edge So the Deck Feels “Built-In,” Not “Plopped Down”
- Step 3: Design Like a Pro: Use Layers (Low, Medium, Tall)
- Step 4: Make the Stairs and Walkways Feel Like an Invitation
- Step 5: Add Privacy Without Building a Wooden Fortress
- Step 6: Use Containers to Add Color, Height, and Flexibility
- Step 7: Blend the Deck Into the Yard With Hardscape “Bridges”
- Step 8: Keep It Low-Maintenance Without Looking Boring
- Deck Landscaping Layout Ideas You Can Copy
- A Simple Weekend Checklist
- Extra: of “Experience” What Deck Landscaping Feels Like in Real Life
- Conclusion
A deck is basically your backyard’s stage. But without landscaping, it’s a stage floating in spacelike a community theater production where the actors showed up and the set designer… did not. The good news: you don’t need a landscape architecture degree (or a mysterious European accent) to make your deck look intentionally gorgeous. You just need a smart plan, a little dirt math, and the willingness to move one shrub that you swore was “definitely” in the right place.
In this guide, you’ll learn how to landscape around a deck so it feels grounded, welcoming, and connected to the rest of your yardwhile also staying practical. We’ll cover drainage, plant selection, privacy, paths, lighting, and layout tricks that designers use to make outdoor spaces feel bigger and more polished. Along the way, you’ll get specific examples you can copy (no shamecopying is how we learn and how patios happen).
Start With a Plan: What Do You Want Your Deck Area to Do?
Before you buy a single plant, answer one question: How do you actually use your backyard deck? Landscaping works best when it supports real lifenot a fantasy version of you who sips tea quietly while reading classic literature near a butterfly garden (unless that’s you, in which case, carry on).
- Entertaining: You’ll want clear walking routes, lighting, and maybe a privacy buffer.
- Family hangout: Think durable plants, soft edges, and a place for feet to land off the stairs.
- Grilling central: You’ll need heat-tolerant, low-mess plants near the cooking zone.
- Quiet retreat: Add screening plants, soothing textures, and a “hide me from the world” vibe.
Once you decide the function, you can design the landscaping around a deck like a helpful assistant: guiding people, framing views, and making everything look more expensive than it was.
Step 1: Fix the “Not Sexy” Stuff First (Drainage, Grade, and Airflow)
The most beautiful flower bed in the world won’t matter if water pools near your deck or stays trapped underneath. Landscaping around a deck should help water move away, keep soil from splashing onto the structure, and allow airflowespecially for lower decks.
Shape the ground so water flows away from the deck and house
Ideally, the soil near a house (and any attached deck) slopes away so rainwater doesn’t linger where it can cause moisture problems. If your deck is attached to the house, treat the area like foundation-adjacent landscaping: don’t mound soil against siding, and don’t create a “moat” where water sits.
Use simple drainage helpers if your yard holds water
If your backyard is heavy clay or you notice soggy spots near the deck, consider adding: a shallow swale (a gentle dip that guides water), a gravel strip along the edge, or a rain garden in a low area that can accept runoff. These aren’t just eco-friendly buzzwords they’re practical ways to keep your deck area from turning into a slip-n-slide after storms.
Don’t suffocate the space under a low deck
For ground-hugging decks, airflow matters. If you’re adding skirting, aim for venting or removable sections. And avoid packing the perimeter with dense shrubs that block circulation. Your deck is not a basement; it does not need to feel “cozy” underneath.
Step 2: Define the Edge So the Deck Feels “Built-In,” Not “Plopped Down”
One of the fastest ways to elevate deck landscaping is to create a defined transition between deck and yard. This is where edging, bed lines, and ground materials do the heavy lifting.
Create a planting bed that mirrors the deck shape (or softens it)
Straight deck, straight bed line = clean and modern. Straight deck, gently curved bed line = softer and more garden-y. Either works. What doesn’t work is the “random blob bed” that looks like you outlined it during a phone call and lost interest halfway.
Practical bed sizing tip: Make beds wide enough for layering. A skinny 12-inch strip forces all plants to stand in a single-file line like they’re waiting for coffee. Aim for at least 3–5 feet where possible so you can combine groundcovers, perennials, and a few taller anchors.
Pick an edging style that fits your maintenance tolerance
- No edging: Natural look, but needs regular crisping with a spade.
- Metal edging: Sleek and long-lasting; great for modern landscapes.
- Stone or brick: Classic and sturdy; doubles as a mowing barrier.
- Composite or plastic edging: Budget-friendly, but quality varies.
Clean edges make everything feel intentional. Even if your plants are still “in their awkward teenage phase,” sharp bed lines create instant order.
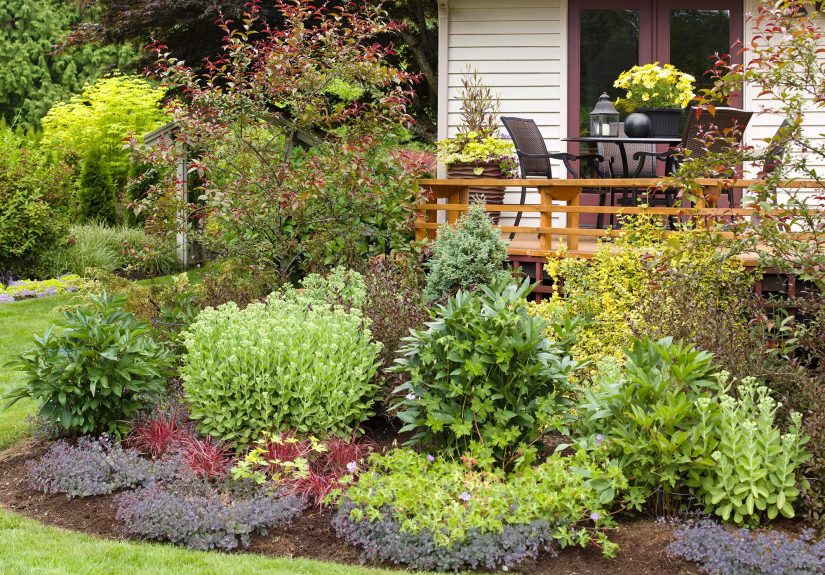
Step 3: Design Like a Pro: Use Layers (Low, Medium, Tall)
If you remember nothing else, remember this: layering is the cheat code. Landscaping around a deck looks best when plants are arranged in height layers, not scattered like confetti. Your goal is to frame the deck, soften hard lines, and guide the eye.
Layering formula for deck planting beds
- Front (low): groundcovers, creeping plants, low grasses (6–12 inches)
- Middle (medium): flowering perennials, compact shrubs (1–3 feet)
- Back (tall): taller shrubs, ornamental grasses, small trees (3–10+ feet)
Choose plants based on light and heat around the deck
Decks create microclimates. South- or west-facing decks can radiate heat and dry out soil faster. Shadier decks can stay cooler and damp longer. Pay attention to:
- Sun exposure: Full sun (6+ hours), part sun, shade
- Drainage: Does water sit or drain quickly?
- Hardiness: Pick plants suited to your USDA Plant Hardiness Zone
Example planting plan (sunny deck, low maintenance):
Low: creeping thyme or sedum (tough, tidy).
Medium: lavender, salvia, or coneflower (pollinator-friendly and hardy).
Tall: dwarf hydrangea (if you have some moisture) or ornamental grass for movement.
Example planting plan (shadier deck, softer vibe):
Low: sweet woodruff or low hostas (depending on region).
Medium: ferns and heuchera for texture and color.
Tall: a few upright shrubs placed to frame stairs or corners.
Step 4: Make the Stairs and Walkways Feel Like an Invitation
Most decks fail one big test: the transition to the yard feels abrupt. The fix is simple landscape around the stairs like they matter (because that’s where feet, eyes, and guests go).
Create a “landing zone” at the bottom of the steps
Give people a place to step off the stairs that isn’t muddy grass or a rock you didn’t notice until you found it with your ankle. Options include:
- Pavers: Classic, clean, and easy to expand later
- Gravel pad: Budget-friendly and great for drainage (use edging)
- Mulch + stepping stones: Soft, casual, and easy to DIY
Add a path that connects the deck to something
Paths are magic. They make a yard feel designed instead of accidental. Connect the deck to: the driveway gate, a fire pit, a garden shed, a patio, or even a seating area under a tree. The key is that the deck shouldn’t feel like a dead end.
Light the routes people actually walk
Deck and landscape lighting can be subtle and still do a lot: improve safety on stairs, define edges, and make the backyard usable after sunset. Think step lights, path lights, or string lights on a pergola. You don’t need a stadium; you need “I can see where I’m going and also this looks cute.”
Step 5: Add Privacy Without Building a Wooden Fortress
If your deck feels exposed, landscaping can create privacy in a way that looks natural and soft. The trick is mixing “green privacy” with a few structural helpers.
Use plants as living privacy screens
- Evergreen shrubs: Year-round screening (great for neighbors who are home year-round)
- Ornamental grasses: Quick coverage and movement, but seasonal in some climates
- Climbing vines: On trellises or pergolas for vertical privacy
Try a vertical planter or privacy wall near seating
For small yards, vertical solutionslike a planted privacy screencan give you separation without eating up floor space. Place it where you sit, not everywhere. Privacy works best when it’s targeted.
Step 6: Use Containers to Add Color, Height, and Flexibility
Planting beds are great, but containers are the secret weapon of deck landscaping. They let you change your mind, swap seasonal color, and add height exactly where you want it.
Container rules that save your deck (and your sanity)
- Use pot feet or risers: Let water drain and air circulate under pots.
- Avoid constant wet spots: Move planters occasionally so boards can dry out.
- Group in odd numbers: Threes and fives look more natural than a “two pot salute.”
- Mix heights: One tall thriller + one filler + one spiller is a classic combo.
Example container combo for a sunny deck: a tall grass or small citrus (in warm regions), plus a mound of petunias or calibrachoa, plus a trailing vine like sweet potato vine. Instant “magazine deck.”
Step 7: Blend the Deck Into the Yard With Hardscape “Bridges”
Hardscape is any non-plant element: gravel, pavers, stone, edging, steps, retaining walls. It’s what makes landscaping around a deck feel cohesiveespecially if your yard is sloped or uneven.
If your yard slopes, terrace the planting area
A small retaining edge (stone, timbers, or block) can create a level bed near the deck and prevent mulch from sliding away every time it rains. This is especially helpful around stairs or corners where runoff tends to carve little “mini canyons.”
Add a gravel or stone strip near the deck edge
A narrow border of gravel (with landscape fabric beneath and solid edging) can reduce mud splash, improve drainage, and create a crisp transition between deck and planting beds. It also makes the deck feel “finished” even before plants fill in.
Step 8: Keep It Low-Maintenance Without Looking Boring
“Low-maintenance” doesn’t mean “sad.” It means you design so your future self doesn’t hate your current self. Here are the choices that pay off:
Mulch correctly (and don’t overdo it)
Mulch helps retain moisture and suppress weeds, but deeper isn’t better. A moderate layer is usually enough. Keep mulch from piling against structures and plant stems, and refresh it when it thins.
Use drip irrigation or soaker hoses in beds
If you’re planting around a deck, watering is often the make-or-break factor. Drip lines tucked under mulch are low-effort and reduce evaporation. Bonus: fewer trips outside with a hose that always finds a way to kink at the worst moment.
Choose repeat performers
- Perennials: come back every year and fill out beds over time
- Evergreens: structure in winter and a consistent backdrop
- Groundcovers: reduce bare soil (and therefore weeds)
Deck Landscaping Layout Ideas You Can Copy
1) The “Soft Frame” (great for medium decks)
Place taller shrubs at the two front corners of the deck (or near stairs), then run a layered bed along one or two sides with perennials and groundcovers. Add a small paver pad at the bottom of steps and a short path leading to the yard. This makes the deck look integrated, not isolated.
2) The “Entertainer’s Loop” (great for hosting)
Build a clear circulation route: deck stairs to paver landing to fire pit or patio. Plant beds sit outside the walking loop, with low plants near paths and taller screens farther out for privacy. Add lighting on steps and along the route so guests don’t wander into the hydrangeas like it’s an escape room.
3) The “Small Yard Cheat” (great when space is tight)
Skip big beds. Use containers on the deck for color and height, then add a narrow planting strip below with shade-tolerant texture plants (or drought-tough plants if it’s hot and bright). Add a vertical planter or trellis for privacy. The yard feels layered even when it’s compact.
A Simple Weekend Checklist
| Task | Why it matters |
|---|---|
| Mark bed lines with a hose | Lets you “see” the shape before digging |
| Check for water pooling | Prevents soggy beds and deck moisture issues |
| Amend soil where needed | Healthy soil = fewer plant funerals |
| Place plants while still in pots | Easy rearranging before committing |
| Install edging and mulch | Defines beds and suppresses weeds |
| Add lighting on steps/routes | Safer + more usable at night |
Extra: of “Experience” What Deck Landscaping Feels Like in Real Life
Most guides make landscaping around a deck sound like a neat, linear process: design, dig, plant, admire. In real life, it’s more like: design, dig, realize the soil is 60% rocks, re-design, dig again, plant, and then stand back asking, “Is it… supposed to look this sparse?” (Yes. For a little while.)
One of the most common “aha” moments people have is discovering how much the deck changes the microclimate. A sunny deck can bounce heat and light onto the planting bed like a giant reflective pan. That’s why some flowers that look perfect at the garden center suddenly act dramatic once plantedwilting faster and begging for water. The fix usually isn’t “water everything constantly,” but rather “adjust the plan”: tuck drought-tough plants closer to the deck edge, use mulch properly, and reserve thirstier plants for spots with a bit of shade or better soil.
Another real-life lesson: the first bed shape you mark out is rarely the final bed shape. When you outline a border with a hose, it can look great… until you step onto the deck and realize the curve is too tight, the corner looks pinched, or the bed doesn’t frame the stairs the way you expected. That’s normal. The smartest DIY landscapers “audition” the bed lines from multiple viewpoints: from inside the house, from the deck seating area, and from the yard looking back. A small adjustmentwidening a curve by a foot, straightening a line, or shifting the bed away from a downspoutcan make the whole project feel more intentional.
Plant spacing is another place where experience kicks in. Everyone wants instant fullness, but planting too tightly can create a future jungle that presses against the deck, traps moisture, and demands constant pruning. A better strategy is to combine a few “anchor” plants (shrubs or ornamental grasses placed where you want structure) with faster fillers (annuals, groundcovers, or perennials that spread politely). That way, you get the finished look sooner without creating a long-term maintenance nightmare.
Finally, there’s the emotional experience of waiting. New landscaping often looks “unfinished” for a season. Mulch is visible. Plants are small. The bed edges feel too crisp. Thenalmost unfairlythings start to knit together. Groundcovers creep. Perennials bulk up. Shrubs find their shape. The area around the deck begins to look like it’s always belonged there. If you want an immediate boost while your plants grow, containers are the best shortcut: they add height and color now, and you can move them later as the beds mature.
The real goal isn’t perfectionit’s a deck that feels connected to the yard, supports how you live outside, and makes you want to step out there more often. If you achieve that, your backyard wins. And if one shrub ends up in the wrong spot? Congratulations: you’ve officially joined the landscaping club.
Conclusion
Learning how to landscape around a deck is really about connection: connecting the deck to the yard, connecting function to beauty, and connecting your outdoor space to how you actually live. Start with drainage and layout, define clean edges, layer plants by height, and use lighting and paths to guide movement. Add privacy where it matters, use containers for flexible color, and design for low maintenance so the deck stays enjoyable instead of becoming “that project you avoid looking at.”