Table of Contents >> Show >> Hide
- Why Build a DIY Dog Food & Water Station?
- Before You Build: Size, Safety, and the “Raised Bowl” Question
- The Build: A Simple, Sturdy DIY Dog Feeding Station (With Splash Control)
- Step-by-Step Instructions
- Optional Upgrades (Because You’re Now a Dog Furniture Designer)
- Keeping It Clean (The Part That Matters More Than Fancy Wood Joints)
- Troubleshooting: Common DIY Feeding Station Problems
- Design Ideas to Match Your Home (So It Doesn’t Scream ‘Garage Project’)
- Final Checks Before You Put It Into Service
- Real-World Experiences: What You Learn After the First Week (About )
- Conclusion
Your dog deserves a dining experience that’s somewhere between “fine bistro” and “not a puddle that used to be water.” A DIY dog food & water station
is one of those projects that looks fancy, costs less than your last impulse-buy dog toy, and quietly improves your daily life: fewer spills, easier cleanup,
and no more bowls doing the kitchen-floor cha-cha at mealtime.
In this guide, you’ll build a sturdy, easy-to-clean dog feeding station with a dedicated food bowl and water bowl, plus optional upgrades like splash control,
storage, and an adjustable height. The goal: a setup that fits your dog’s body, your home’s vibe, and your tolerance for mopping.
Why Build a DIY Dog Food & Water Station?
- Cleaner floors: A tray and non-slip base help contain splashes and kibble shrapnel.
- Better ergonomics: You can set the bowl height for comfortespecially for seniors or dogs with stiff joints.
- More organized feeding: One “dining zone” keeps bowls, mats, and food storage together.
- Easy maintenance: Removable bowls + washable surfaces = less gross.
Before You Build: Size, Safety, and the “Raised Bowl” Question
1) Pick a bowl size first (seriously)
Everything becomes easier if you choose the bowls before you cut wood. For everyday use, stainless steel bowls are a solid choice because they’re durable,
easy to sanitize, and don’t get chewed into a modern art sculpture like some plastics can. If you prefer ceramic, make sure it’s high-quality and replace it
if it chips (chips turn into tiny bacteria condos).
2) Decide the best height for your dog
Many dogs do perfectly fine with bowls on the floor. A raised dog bowl stand can help some dogs eat and drink more comfortablyespecially tall dogs, seniors,
or dogs with neck/back discomfort. But don’t assume “higher is always better.”
A practical rule of thumb for an elevated feeder: aim so the top rim of the bowl sits around your dog’s lower chest area when standing
comfortablyhigh enough to reduce bending, not so high the dog has to lift their head awkwardly.
3) A quick caution about bloat (GDV)
If your dog is large/deep-chested (think Great Danes, Weimaraners, Standard Poodles, German Shepherds, etc.), talk to your vet before going with a tall
elevated feeder. Some research has reported an association between raised feeders and increased GDV risk in large/giant breeds, and reviews note the evidence
isn’t perfectly consistent. If your dog has special medical needs (like megaesophagus), your vet may specifically recommend elevationso customize based on
your dog, not internet vibes.
The Build: A Simple, Sturdy DIY Dog Feeding Station (With Splash Control)
Project overview
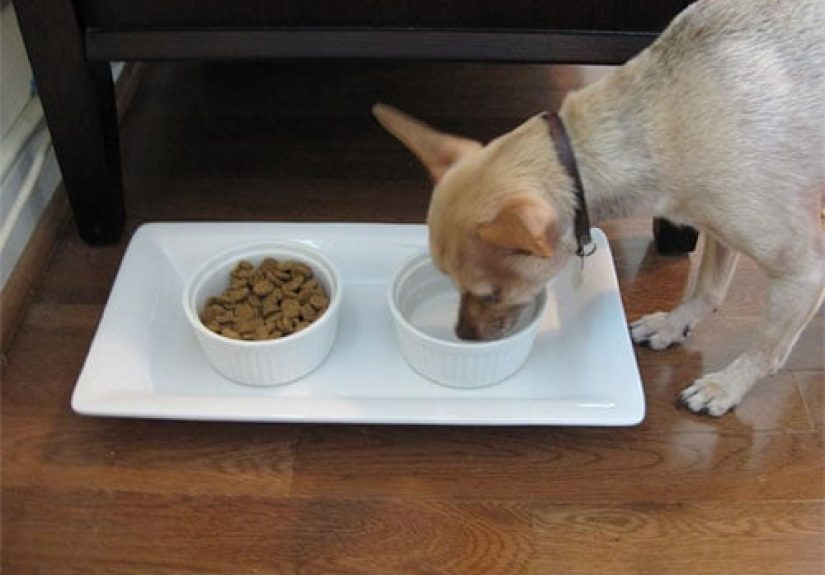
You’ll build a rectangular station with two bowl cutouts (food + water), a removable drip tray underneath, and a non-slip base. The core design is beginner-friendly,
but you can level it up with storage or adjustable legs.
Tools (choose your adventure)
- Measuring tape + pencil
- Drill + drill bits
- Jigsaw or hole saw set (for bowl holes)
- Sandpaper (80/120/220 grit) or a sanding block
- Optional: pocket hole jig, clamps, brad nailer (nice, not mandatory)
Materials
- One board for the top (common choices: 1×12 or 3/4" plywood panel)
- Wood for the sides/legs (1x4s, 1x6s, or scrap lumber)
- Wood screws (or pocket hole screws), wood glue
- Two stainless steel bowls (same diameter is easiest)
- A boot tray, shallow plastic tray, or cafeteria tray (your removable drip tray)
- Non-slip feet (rubber pads) or a silicone mat
- Finish: water-based polyurethane, food-safe oil/wax, or a sealed paint
Step-by-Step Instructions
Step 1: Measure your dog and choose a station height
If you’re building a floor-level station, skip the height math. If you want elevation, measure from the floor to your dog’s lower chest area (or roughly elbow-to-lower-chest zone),
then subtract the bowl depth so the rim lands at the target height.
Example: If your target rim height is 12" and your bowl is 3" deep, your stand top (where the bowl rests) might be around 9" above the floor,
depending on how the bowl lip sits in the cutout.
Step 2: Plan the top panel (where the bowls sit)
- Cut your top panel to length. A common starting point is 22–28 inches long and 9–12 inches deep (adjust for bowl size and dog enthusiasm).
- Place the bowls upside down on the panel. Trace around each bowl’s outer rim.
Then trace a second circle slightly inside the first (so the bowl lip can rest on the wood). - Leave at least 2 inches between the bowls and at least 1.5 inches from any edge, so the top stays strong.
Step 3: Cut the bowl holes
- Drill a starter hole inside your inner circle.
- Use a jigsaw to cut the circle slowly. Test-fit the bowls often.
- The goal: the bowl should drop in and rest on its lip without falling through.
If you cut a hair too large, don’t panicadd a thin support ring underneath (a simple wood strip “ledge” works great).
Step 4: Build the base (box frame)
The simplest base is a low box frame: two long side pieces and two shorter end pieces, sized so your drip tray can slide in underneath.
- Cut two side rails to match the top length (minus any overhang you want).
- Cut two end rails to match the top depth.
- Assemble a rectangle with glue + screws. Pre-drill to prevent splitting.
- Attach the top panel to the frame. If you want a cleaner look, set the top with a slight overhang (about 1/2").
Step 5: Add “splash management” for the water bowl
Water is the chaotic roommate of your dog feeding station. Here are three splash-control upgradespick one:
- Removable drip tray (recommended): Slide a boot tray under both bowls. It catches spills and lifts out for cleaning.
- Water-side backsplash: Add a 3–5" tall back panel behind the water bowl side. It’s basically a tiny wall that says, “Not today, puddles.”
- Recessed water well: Make the water cutout slightly deeper by adding a second layer of wood around that hole only, so splashes stay contained.
Step 6: Make it non-slip (so the station stops roaming)
Add rubber feet to the bottom corners, or set the whole station on a silicone feeding mat. If your dog eats like a competitive sport, do both.
Step 7: Sand, seal, and protect
Sand all edges smoothespecially around the bowl holes. Then seal the wood. A water-resistant finish matters because dog water has a special talent for
finding raw wood and turning it into a science project.
- Water-based polyurethane: Durable and easy to wipe down.
- Hardwax oil: A nice natural look; recoat as needed.
- Paint: Works great if you seal it well and let it cure fully before use.
Optional Upgrades (Because You’re Now a Dog Furniture Designer)
Add storage
Want a DIY dog food station with storage? Add a shelf or a small cabinet section for a sealed food container, measuring scoop, treats, and poop bags (because
life is about balance). Keep food in an airtight bin nearbut not insideanything that can get damp.
Make the height adjustable
Adjustable legs are perfect if you have a growing puppy or you’re not sure about the ideal bowl height. A simple approach:
- Use a sturdy base frame and add bolt-on legs with multiple pre-drilled height positions.
- Or build a “step riser” platform that the station sits on (swap risers as needed).
Multi-dog setup
For two dogs, build a longer top and repeat the cutouts, or create two separate stations to reduce resource guarding. Separate stations can also simplify cleaning:
one dog gets washed bowls while the other is busy judging your craftsmanship.
Keeping It Clean (The Part That Matters More Than Fancy Wood Joints)
A DIY food & water station works best when it’s hygienic. Bowls can grow biofilm and bacteria faster than you’d thinkespecially water bowls.
- Wash food bowls daily (and after each meal if using wet food).
- Wash water bowls daily and scrub off any slimy film.
- If you use a dishwasher, use a hot/sanitize cycle when possible and avoid mixing pet bowls with human dishes if you’re worried about cross-contamination.
(Also: nobody wants their coffee mug to taste like “beef dinner.”) - Wipe the station surface every day and deep-clean the tray weekly (or more for enthusiastic splasher dogs).
Troubleshooting: Common DIY Feeding Station Problems
“My bowls wobble.”
Add a support ring under the hole (thin wood strips forming a ledge) or switch to bowls with a wider lip. You can also line the cutout edge with a thin,
food-safe silicone strip for grip.
“My dog flips the water bowl like it owes him money.”
Use a heavier stainless steel bowl, add a non-slip gasket under the bowl lip, and make sure the station is wide enough to be stable. A drip tray helps, but
physics still exists.
“Water still gets everywhere.”
Upgrade the water side with a backsplash panel and keep the water bowl slightly recessed. If your dog is a legendary splash artist, consider a “splash-resistant”
bowl design inside your station’s cutout (still removable for cleaning).
“The wood looks rough around the bowl holes.”
Wrap sandpaper around a cup or a small sanding drum to smooth the curve. Then seal the exposed grain thoroughlyedges are where moisture sneaks in first.
Design Ideas to Match Your Home (So It Doesn’t Scream ‘Garage Project’)
- Modern minimal: Clean lines, matte finish, hidden screws.
- Farmhouse: Stained top, painted base, maybe a tiny nameplate (your dog won’t read it, but you will).
- Space-saving: Narrow depth + wall-side backsplash; store food in a nearby sealed bin.
- Outdoor station: Use exterior-grade plywood and finish; keep bowls shaded and refresh water often.
Final Checks Before You Put It Into Service
- Ensure the finish is fully cured and doesn’t smell strongly.
- Confirm there are no sharp edges or splinters.
- Test stability: push from the sideif it slides, add more grip.
- Do a “splash test” with water before introducing your dog (because you’d rather discover problems than mop them).
Real-World Experiences: What You Learn After the First Week (About )
The funny thing about building a DIY dog food & water station is that the project doesn’t end when the last screw goes in. The real “field testing”
starts the moment your dog decides this new furniture is either (A) a luxury upgrade worthy of immediate admiration or (B) suspicious and possibly haunted.
Most dogs choose option A in under 12 secondsespecially if snacks are involved.
One of the biggest lessons is that water behavior is a personality trait. Some dogs drink politely like they’re sipping sparkling water at a café.
Others drink like they’re trying to inhale the ocean. If your dog is in the second group, you’ll quickly appreciate anything that contains splashes: a recessed
water cutout, a drip tray that actually slides out easily, and a backsplash panel that blocks that one specific arc of water that always hits the baseboard.
If your tray is annoying to remove, you will “temporarily” stop using it, and then you’ll be right back to wiping puddlesso make that tray effortless.
The second lesson: non-slip is non-negotiable. Even calm dogs can turn a station into a sled if the floor is slick. Rubber feet help, but a silicone
mat under the whole station is the cheat codeespecially on tile. The mat also catches the tiny crumbs that escape no matter what you build, because kibble has
a graduate degree in “rolling into corners.”
Another surprise is how much bowl choice affects mess. A wider, heavier stainless steel bowl tends to stay put and is easier to clean thoroughly.
Plastic bowls can get scratched and hang onto odors; ceramic looks nice but chips if dropped. After a week, most people end up with a simple routine: two sets
of bowls, rotating daily, so clean ones are always ready. The station itself needs less scrubbing when the bowls are truly clean, because old food residue is
what turns a feeding area into a sticky situation.
If you built a raised feeder, you may notice posture changes right awaysome dogs look more comfortable, while others don’t care at all. That’s normal.
Dogs are not interior design critics; they are efficiency experts. If your dog eats faster or seems gulpier after elevating, consider slowing things down
with a slow-feeding insert (or switch back to a lower height). The best station is the one that supports your dog’s health and habitsnot the one that wins
imaginary woodworking awards.
Finally, you’ll learn that a DIY feeding station is a behavioral landmark. Dogs love routines, and a consistent “dining zone” can reduce wandering
crumbs and encourage calmer mealtimes. It also makes it easier to spot changes: if your dog suddenly avoids the water bowl, drinks less, or seems uncomfortable
eating, you’ll notice faster because everything is in one place. The station isn’t just furnitureit’s a small system that helps you care better, with fewer
surprises and fewer mops.
Conclusion
A DIY dog food & water station is a practical upgrade that pays you back every day: less mess, smoother cleaning, and a setup tailored to your dog’s size
and habits. Build it simple, seal it well, keep the bowls clean, and add upgrades only if they genuinely make life easier. Your dog will be thrilledand your
floor will finally get a break.