Table of Contents >> Show >> Hide
- Why Paper Rings Are Such a Great DIY Craft
- Before You Start: Best Paper and Basic Supplies
- DIY Craft #1: The Classic Folded Paper Band
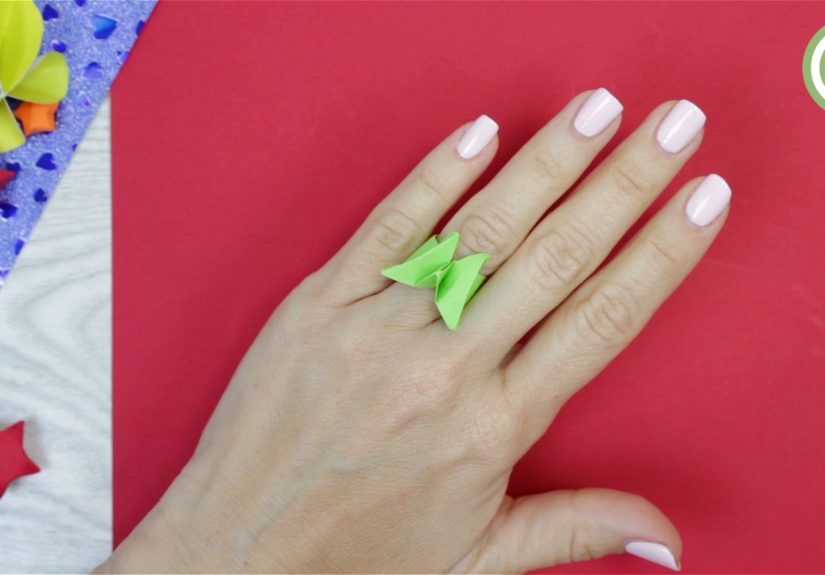
- DIY Craft #2: The Origami Gem Ring
- DIY Craft #3: The Rolled Paper Bead Ring
- How to Choose the Right Paper Ring Style
- Common Mistakes to Avoid
- Creative Ways to Decorate a Paper Ring
- Are Paper Rings Just for Kids?
- Experiences and Creative Ideas Inspired by Making Paper Rings
- Final Thoughts
- SEO Tags
Paper rings are the kind of craft that sound slightly ridiculous until you make one and suddenly think, “Wait… why is this actually adorable?” They are cheap, fast, customizable, and surprisingly satisfying to create. If you have a scrap of paper, a few minutes, and the emotional courage to fold something tiny without launching it across the room, you already have the makings of a fun DIY project.
Whether you want a playful craft for kids, a cute handmade gift, a budget-friendly party activity, or a low-stakes way to dabble in paper jewelry, learning how to make a ring out of paper is a smart little skill to have. Better yet, there is not just one method. In this guide, you will learn 3 unique DIY paper ring crafts: a classic folded paper band, a faceted origami gem ring, and a rolled paper bead ring that looks surprisingly polished for something born from humble stationery.
Let’s fold, roll, and glue our way to finger fashion.
Why Paper Rings Are Such a Great DIY Craft
There is a reason paper crafts keep surviving every trend cycle. They are affordable, creative, beginner-friendly, and wildly customizable. A paper ring checks all the boxes. You can make one from notebook paper, scrapbook paper, wrapping paper, magazine pages, or origami sheets. You can go minimalist and elegant or loud enough to be seen from space.
Paper rings also make sense when you want a craft with a fast payoff. Some projects require a shopping cart full of tools and the patience of a saint. Not this one. Most paper rings can be finished in less than 30 minutes, and even the fancier versions are manageable for beginners.
They are also great for birthdays, classroom crafts, rainy afternoons, bridal shower activities, handmade Valentine’s Day gifts, costume accessories, or just those moments when your hands want to do something besides scroll.
Before You Start: Best Paper and Basic Supplies
Not all paper behaves the same way, and this is where many DIY dreams go to dramatically collapse. Thin paper is easier to fold into crisp shapes, while thicker paper tends to give you a sturdier final ring. The trick is choosing the right paper for the design.
Best paper for paper rings
- Origami paper: Great for precise folds and neat edges.
- Scrapbook paper: Excellent for decorative rings with patterns and color.
- Magazine pages: Best for rolled or coiled styles with a fun, artsy look.
- Cardstock: Better for structured rings, though it can be stubborn for tight folds.
- Wrapping paper: Pretty, but often thin, so it works best when layered or glued.
Basic supplies
- Paper
- Scissors
- Ruler
- Pencil
- Glue stick or craft glue
- Optional: clear tape, Mod Podge, clear acrylic sealer, markers, glitter, tiny gems
If you are crafting with children, use blunt scissors and keep expectations realistic. Tiny folds and small fingers do not always form a peaceful alliance.
DIY Craft #1: The Classic Folded Paper Band
This is the easiest way to make a paper ring and the best place to start if you are a complete beginner. It uses simple folds to create a slim band that can be adjusted to fit your finger.
Why this ring works
The folded band is quick, clean, and requires little to no glue. It is perfect for party crafts, kids’ projects, and anyone who wants a cute result without entering a full origami spiral.
What you need
- One strip of paper about 1 inch wide and 6 to 8 inches long
- Ruler
- Scissors
- Optional decorations
How to make it
- Cut a long paper strip. Start with a strip that is longer than you think you need. Extra length is easier to trim than magic more paper into existence later.
- Fold the strip lengthwise into thirds to make it narrower and sturdier.
- Wrap the folded strip around the base of your finger to measure the size.
- Leave a small overlap, then mark where the ends meet.
- Tuck one end into the folded layers of the other end if possible. If the paper is slippery, use a tiny dab of glue.
- Press it flat and let it sit for a minute so it keeps its shape.
Ways to customize the classic band
This simple paper ring becomes much more interesting when you decorate it. Add stripes with markers, glue on a tiny paper heart, wrap it in washi tape, or write a funny message inside the band. If you are making rings for a party, use color themes or print initials on the front.
You can also create a layered version by gluing two contrasting strips together before folding. That gives the ring a little extra body and makes the edges more visually interesting.
DIY Craft #2: The Origami Gem Ring
If the classic band is the easygoing friend, the origami ring with a gem top is the dramatic one who arrives wearing structured shoulders and a mysterious smile. This design looks far more complicated than it actually is, which is exactly the energy many of us want from a DIY project.
Why this ring stands out
The folded top creates a faceted jewel effect, making the ring look decorative without needing beads or store-bought embellishments. It is a great craft if you want your paper ring to feel more like costume jewelry than a simple loop.
What you need
- One rectangular strip of decorative paper, about 1 x 4 inches
- Flat surface
- Optional: bone folder for sharper creases
How to make it
- Place the paper horizontally and fold it in half crosswise. Unfold it to create a center crease.
- Fold the top corners inward toward the center crease so the strip starts to form a point or little roof shape.
- Refold and narrow the strip beneath that top section so it begins to resemble a ring band with a decorative face.
- Wrap the lower section around your finger to determine the ring size.
- Tuck the end into the folded pocket or secure it with a tiny bit of glue if needed.
- Shape the top so the “gem” sits centered on your finger.
Tips for success
Use lighter paper for this design. Thick cardstock tends to fight back, and frankly it can get a little rude. Crisp folds are the secret to making the top look faceted rather than crumpled. If you have a scoring tool or bone folder, this is the moment to use it.
For an elevated version, use metallic paper, patterned origami sheets, or two-sided paper with different colors. The contrast makes the folds pop and gives the “gem” more visual depth.
Best uses for the origami gem ring
This style works well as a party favor, a playful accessory for dress-up, a classroom craft, or a handmade little surprise tucked into a greeting card. It is especially charming for kids who want “jewelry” without anything precious, permanent, or expensive.
DIY Craft #3: The Rolled Paper Bead Ring
This is the sturdier, more artistic option. Instead of relying only on folds, this ring uses rolled paper to create a bead or coiled centerpiece and a fitted band. It is a smart choice if you want something that feels more crafted and less temporary.
Why this design is different
The rolled paper bead ring lets you turn decorative paper into a focal point. It is a little more hands-on than the first two projects, but it also gives you more room to experiment with color, shape, and texture.
What you need
- Scrapbook paper, magazine paper, or thin cardstock
- Scissors
- Craft glue
- A narrow paper strip for the band
- Optional: clear sealer for durability
How to make the bead
- Cut a long triangle or tapered strip of paper. A wide base and narrow tip will create a rounded bead when rolled.
- Starting at the wide end, roll the paper tightly around a toothpick, skewer, or the tip of a pencil.
- Add a little glue near the end and finish rolling to secure the bead.
- Slide the bead off and let it dry fully.
How to make the band
- Cut a narrow strip of paper long enough to wrap around your finger twice.
- Fold or roll it into a smooth band and glue the overlap.
- Once dry, glue the paper bead on top of the band.
- Let the whole ring dry completely before wearing it.
How to make it stronger
If you want this paper ring to last longer than one enthusiastic afternoon, seal it. A thin coat of decoupage medium or clear craft sealer can help the paper resist wear and light moisture. Do not dunk it in water or wear it to wash dishes unless your life goal is to watch your art become a cautionary tale.
You can also stack several small paper beads on top for a chunkier ring or glue a flat paper flower, tiny cutout shape, or layered circle over the bead for a mixed-media look.
How to Choose the Right Paper Ring Style
If you are wondering which paper ring craft to try first, here is the easy answer:
- Choose the classic folded band if you want the fastest and easiest project.
- Choose the origami gem ring if you want a ring that looks impressive without extra supplies.
- Choose the rolled paper bead ring if you want a more decorative craft with a handmade jewelry feel.
There is no wrong answer here. The only real danger is making one ring and then convincing yourself you need to make fourteen more because now you suddenly run a paper accessories empire from the kitchen table.
Common Mistakes to Avoid
Using paper that is too thick
Heavy paper can crack, bunch, or refuse to hold tight folds. For detailed folding, thinner paper usually works better.
Skipping the measuring step
If you do not size the ring around your finger before securing it, you may end up with something better suited to a carrot than a human hand.
Using too much glue
Paper crafts love moderation. Too much glue warps paper, causes wrinkles, and creates soggy sadness.
Rushing the drying time
Especially with rolled paper rings, patience matters. Let glue dry fully before wearing or decorating the ring.
Creative Ways to Decorate a Paper Ring
Once you know the basic construction, the real fun begins. A paper ring is basically a tiny wearable canvas.
- Use metallic markers for a faux gold or silver effect.
- Add tiny paper flowers for a spring-themed look.
- Wrap the band in washi tape.
- Use old comic book pages for a quirky pop-art ring.
- Cut hearts, stars, or initials and glue them on top.
- Use wedding-color paper for event crafts or favors.
- Seal the finished ring for a glossier, more polished finish.
If you are making these with kids, let them choose wild patterns. Children have no fear of color theory, and honestly that can be refreshing.
Are Paper Rings Just for Kids?
Absolutely not. While paper ring crafts are easy enough for kids, adults can make them look surprisingly stylish. Use elegant Japanese paper, muted florals, vintage book pages, sheet music, or minimalist black-and-white prints and the results can feel thoughtful and artistic rather than childish.
Paper jewelry has a long history in the DIY world because it turns humble materials into something expressive. A paper ring is not pretending to be a diamond. It is doing something better: being delightfully original.
Experiences and Creative Ideas Inspired by Making Paper Rings
The funny thing about learning how to make a ring out of paper is that it rarely stays just about the ring. People start with one tiny craft and end up discovering all sorts of little experiences wrapped around it. A folded paper ring can become a rainy-day rescue, a last-minute party activity, a classroom icebreaker, or the kind of handmade gift that makes someone grin because it is unexpectedly charming.
One of the best experiences with paper ring crafts is how low-pressure they feel. If a fold goes crooked, you have lost a strip of paper, not a mortgage payment. That makes these DIY crafts ideal for beginners who want the satisfaction of making something by hand without worrying about expensive mistakes. There is a freedom in that. You can experiment more, play more, and laugh off the occasional misshapen result that looks less like jewelry and more like abstract emotional expression.
Paper rings also work beautifully in group settings. At birthday parties, each guest can make a custom ring in their favorite color. At bridal showers, metallic and floral paper rings make cute place-setting extras. In classrooms, students can create rings with words, symbols, or tiny folded toppers tied to a theme. Even at family gatherings, this craft gives people something to do with their hands besides checking their phones or debating who forgot the ice.
There is also something genuinely sweet about the gift potential. A paper ring may be inexpensive, but it does not feel thoughtless. A child can make one for a parent. Friends can trade them like tiny friendship tokens. You can slip one into a lunch note, tape one inside a birthday card, or use one as a playful stand-in for a pretend proposal that hopefully does not create unnecessary emotional confusion.
Many crafters end up using paper rings as a gateway project. After making a simple band, they start wondering what else paper can do. Suddenly they are folding stars, rolling beads, decorating notebooks, or cutting tiny flowers at the dining room table like a person who now has very strong opinions about glue. It happens fast.
Another experience people love is the personalization factor. A store-bought ring is finished before you touch it. A paper ring becomes whatever you want. It can be bright and silly, elegant and minimal, seasonal and sparkly, or themed for a party, costume, or school event. You can match rings to outfits, holidays, table decor, or your current emotional attachment to polka dots.
For adults, paper rings can feel oddly relaxing. The repetitive folding, trimming, rolling, and pressing creates a gentle rhythm that many people find calming. It is not a miracle cure for stress, but it is a lot healthier than rage-refreshing your email. The focus required is just enough to pull your brain into the present moment, which may be the craft’s sneakiest superpower.
And yes, some finished rings will be flimsy. Some will be crooked. Some will fit only one finger on one hand if the moon is in the right phase. But that is part of the charm. Handmade crafts carry the evidence of making. They look human. They tell a little story. And in a world full of mass-produced perfection, a tiny imperfect paper ring can feel refreshingly honest.
So if you are on the fence about trying these DIY crafts, start with one strip of paper and see where it goes. Worst case, you make something funny. Best case, you discover a creative hobby that is affordable, portable, and a whole lot more delightful than it has any right to be.
Final Thoughts
Learning how to make a ring out of paper is one of those wonderfully simple skills that delivers way more joy than you would expect. With just a few folds, a little glue, and some imagination, you can create a classic band, a faceted origami jewel, or a rolled paper bead ring that feels surprisingly artsy and personal.
The best part is that these DIY paper ring crafts are easy to customize for any age, style, or occasion. Keep them simple, dress them up, make them as gifts, or turn them into a full afternoon craft session. Paper may be humble, but in the right hands, it can still be dramatic. And honestly, it loves the attention.