Table of Contents >> Show >> Hide
- Why People Love Dollar Bill Origami Shirts
- What You Need Before You Start
- How to Make a Shirt out of a One Dollar Bill: 8 Steps
- Step 1: Place the Dollar Bill Face Down and Make a Center Crease
- Step 2: Fold the Long Edges Inward to the Center
- Step 3: Choose One End and Fold It Over to Create the Collar Base
- Step 4: Form the Collar by Folding the Two Corners Diagonally Inward
- Step 5: Move to the Opposite End and Fold Out the Sleeves
- Step 6: Fold the Body of the Shirt Up Toward the Collar
- Step 7: Tuck the Top Edge Under the Collar
- Step 8: Rotate, Flatten, and Refine the Final Shape
- Tips for Making Your Dollar Bill Shirt Look Better
- Common Mistakes Beginners Make
- Creative Ways to Use a One Dollar Bill Shirt
- Can You Use Other Bills or Paper?
- A Quick Note on Caring for Currency
- Why This Simple Craft Is So Surprisingly Fun
- Experience and Practical Lessons from Folding a Dollar Bill Shirt
- Final Thoughts
- SEO Tags
Note: Clean body-only HTML, written for web publishing, with no source links and no unwanted citation artifacts.
There are two kinds of people in this world: people who hand someone a dollar, and people who hand someone a tiny origami shirt made from a dollar and instantly look 37% more interesting. If you would like to join the second group, welcome. Learning how to make a shirt out of a one dollar bill is one of those small, oddly delightful skills that turns an ordinary piece of cash into a conversation starter, a creative tip, or a gift that says, “Yes, I brought money, but I also brought flair.”
The good news is that this dollar bill origami project is beginner-friendly. You do not need scissors, glue, tape, a ruler, a degree in engineering, or the patience of a saint. What you do need is a reasonably crisp bill, a flat surface, and a few minutes of focus. Once you understand the folding pattern, you can make a money origami shirt in less time than it takes to decide what to stream and then ignore.
In this guide, you will learn exactly how to fold a dollar bill shirt in 8 clear steps, plus get practical tips, beginner fixes, and real-world ideas for using your finished creation. Whether you are making a fun cash gift, dressing up a greeting card, or just proving to yourself that one dollar can still buy a little joy, this tutorial has you covered.
Why People Love Dollar Bill Origami Shirts
A one dollar bill shirt works because it is simple, recognizable, and unexpectedly charming. It is still money, which people appreciate, but it also feels thoughtful because you spent time creating something. That makes it a favorite for birthdays, graduations, Father’s Day cards, restaurant tips, office gift exchanges, and those moments when a plain bill feels a little too plain.
It also helps that the final shape is clever without being complicated. Unlike some money origami designs that look like they require wizardry and a backup pair of eyeballs, the shirt follows a logical sequence. First you create structure, then sleeves, then collar, then the final tuck. It is one of the easiest ways to make cash look intentional instead of last-minute.
What You Need Before You Start
- 1 crisp one dollar bill
- A smooth, flat surface
- Clean, dry hands
- A little patience and a willingness to refold if needed
A crisp bill makes a huge difference. Soft, wrinkled, pocket-survivor money can still work, but your folds may look less sharp. If your bill has been through emotional hardship and a washing machine, press it flat under a heavy book for a while before starting.
How to Make a Shirt out of a One Dollar Bill: 8 Steps
Step 1: Place the Dollar Bill Face Down and Make a Center Crease
Lay the bill flat with the side you want on the inside facing up. Many people start with the back of the bill visible, but the exact orientation is not life-or-death here. Fold the bill in half crosswise to create a clear center crease, then unfold it. This crease becomes your guide for the next folds, so take a second to make it neat.
Think of this step as drawing the chalk lines before the game starts. Nothing exciting has happened yet, but you are setting up everything that follows.
Step 2: Fold the Long Edges Inward to the Center
Take the top long edge of the bill and fold it down toward the center crease. Then take the bottom long edge and fold it up to meet that same center line. When you are done, the dollar should look like a long, narrow rectangle with two folded flaps meeting in the middle.
This is the basic body of the shirt. Press the folds firmly, because clean edges make the finished shirt look crisp rather than sleepy.
Step 3: Choose One End and Fold It Over to Create the Collar Base
On one short end of the narrow rectangle, fold a small section over. This folded band will become the collar area. Keep it modest; you do not need a giant fold here. About a small flap is enough to establish the top of the shirt.
The size of this fold affects the final look. A smaller fold creates a tighter, tidier collar. A larger fold makes the collar more dramatic, which is great if your tiny shirt has main-character energy.
Step 4: Form the Collar by Folding the Two Corners Diagonally Inward
Staying on the same end you just folded, take the two outer corners and fold them diagonally inward so they angle toward the center line. These folded corners create the collar points. Try to make both sides symmetrical, but do not panic if one side looks slightly more enthusiastic than the other. Tiny imperfections usually disappear once the model is finished.
This is the step where the project suddenly starts looking like an actual shirt instead of a folded receipt.
Step 5: Move to the Opposite End and Fold Out the Sleeves
Now focus on the other short end of the bill. Gently pull and fold the layers outward on both sides to create angled sleeves. You are not unfolding the entire model; you are shaping just enough of the side flaps so the shirt gets a little shoulder action.
The exact angle can vary. Some people like short, subtle sleeves. Others prefer sleeves that flare more. As long as both sides look balanced, you are doing it right.
Step 6: Fold the Body of the Shirt Up Toward the Collar
Take the sleeve end and fold the long body of the bill upward toward the collar end. Stop when the top edge reaches just beneath the collar points. This is the main assembly fold, where the shirt body finally meets the neckline.
Before pressing it flat, check the proportions. You want the sleeves visible, the body centered, and the collar still clearly defined. If something looks crooked, this is the perfect moment to adjust it.
Step 7: Tuck the Top Edge Under the Collar
Carefully slide the upper edge of the folded body under the collar flaps you created earlier. This tuck locks the structure together and gives the shirt its finished shape. Once tucked in, flatten the bill gently so everything sits snugly in place.
If the tuck feels stubborn, do not force it like you are closing an overstuffed suitcase. Loosen the collar slightly, guide the edge underneath, and then press everything back into place.
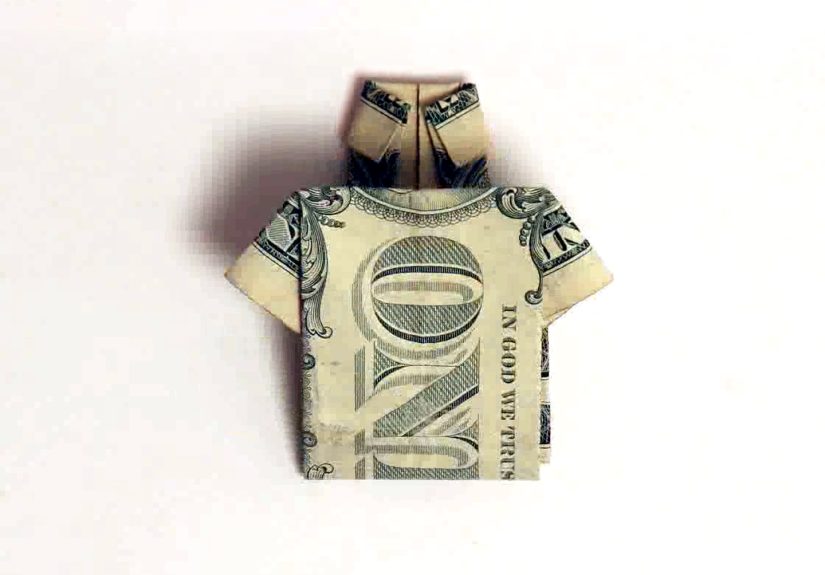
Step 8: Rotate, Flatten, and Refine the Final Shape
Turn the model over if needed and smooth every edge with your fingers. Adjust the sleeves so they match, sharpen the collar points, and press the body flat. Congratulations: you now have a dollar bill shirt.
It is tiny. It is stylish. It has absolutely no business being this satisfying.
Tips for Making Your Dollar Bill Shirt Look Better
Use a Crisp Bill
The cleaner and flatter the bill, the sharper your folds will look. A fresh bill creates neat lines and a more polished final result.
Crease Firmly but Gently
Press folds with your fingertip or nail, but do not mash the bill like you are trying to iron it through sheer attitude. Controlled pressure gives you precision.
Keep the Model Centered
If the collar is off-center or one sleeve sticks out farther than the other, the shirt can look lopsided. Pause after each step and compare both sides before moving on.
Practice on Scrap Paper First
If you are nervous, practice on a rectangular strip of paper with similar proportions. Once the sequence makes sense, move to the dollar bill.
Common Mistakes Beginners Make
The most common mistake is rushing the early folds. If the center crease is weak or the long edges do not line up cleanly, every later step becomes harder. Another frequent problem is making the collar too large, which leaves less room for a tidy tuck. And of course, there is the classic sleeve disaster: one sleeve looks cool and stylish, while the other looks like it got caught in a wind tunnel.
The fix is simple: slow down and refold. One of the best things about this craft is that it is forgiving. You are not cutting anything, and you are not committing to permanent changes. If a fold looks wrong, open it back up and try again. Origami is basically a polite conversation between you and paper, with occasional passive-aggressive creasing.
Creative Ways to Use a One Dollar Bill Shirt
- Slip it inside a birthday card as a fun surprise
- Attach it to a graduation gift with a short handwritten note
- Use it as a creative cash tip for excellent service
- Add several folded shirts to a money bouquet or shadow box
- Include it in a Father’s Day or retirement gift for a playful touch
- Use it as an icebreaker at parties, classrooms, or office events
A folded bill shirt works especially well when the gift theme already connects to clothing, work, style, or “a little something to wear.” The pun is built in, and honestly, puns love to be invited.
Can You Use Other Bills or Paper?
Yes, you can practice with paper cut to a similar shape, which is a smart move if you want to master the folds before using actual cash. Many people also repeat the same method with other bills once they understand the structure. The key is keeping the proportions close enough that the sleeves, collar, and tuck still line up nicely.
For beginners, though, the one dollar bill is the sweet spot. It is low-risk, easy to replace, and emotionally manageable if your first attempt ends up looking more like a folded burrito than a shirt.
A Quick Note on Caring for Currency
This project works best when you fold the bill only and avoid cutting, gluing, taping, laminating, or otherwise permanently damaging it. A simple folded shirt can usually be unfolded later, which keeps the craft playful and practical. In other words, treat the bill like a temporary art project, not a science experiment gone rogue.
Why This Simple Craft Is So Surprisingly Fun
Part of the appeal is transformation. A dollar bill is ordinary, but once it becomes a shirt, it feels personal. It changes from “money” into “gesture.” That tiny difference is exactly why people remember it. It shows creativity without demanding a big budget, and it gives you a low-pressure way to make something by hand.
It also scratches that deeply satisfying human itch to turn flat things into other things. We fold napkins into fancy shapes, cardboard into boxes, and receipts into regrettable little triangles. A dollar bill shirt just happens to be one of the cutest versions of that instinct.
Experience and Practical Lessons from Folding a Dollar Bill Shirt
The first time most people try making a shirt out of a one dollar bill, they expect it to be either absurdly easy or weirdly impossible. The truth lives somewhere in the middle. Your first shirt may look a little crooked. One sleeve may be bolder than the other. The collar might suggest “fashion-forward” when it actually means “I folded the corners at two completely different angles.” That is normal. In fact, it is part of the fun.
A lot of the experience comes down to how the bill feels in your hands. A crisp bill behaves almost like lightweight craft paper. It listens. It cooperates. It makes you feel capable. An old, soft bill has a different personality. It resists, shifts, and tries to reopen at the worst moment. After folding a few shirts, you start to recognize this instantly. You stop blaming yourself for every imperfect crease and begin understanding the material, which is a very fancy way of saying, “Some bills are just dramatic.”
Another real lesson is that presentation matters more than perfection. If you slide a tiny folded shirt into a card, place it on a dinner check as a creative tip, or hand it to someone with a grin, people do not inspect it like museum curators. They react to the surprise. They laugh. They turn it over in their hands. They usually say some version of, “Wait, you made this out of a dollar?” That reaction is the payoff. Not mathematical precision. Not origami glory. Just delight.
This project is also a great confidence-builder for beginners who want to get into money origami without starting on something complicated. A shirt teaches useful habits: making a guide crease, aligning edges, folding symmetrically, and using a final tuck to lock a model together. Once those ideas click, other projects feel less intimidating. So even though this is a small craft, it quietly teaches bigger skills.
There is also a social side to it. A dollar bill shirt is one of those rare handmade things that feels light and playful, not overly serious. It works at family gatherings, office celebrations, school events, and casual gift moments. It says, “I made an effort,” but not in a dramatic, scrapbook-at-midnight kind of way. It is thoughtful without being heavy. That balance is a big reason people come back to it.
Over time, you also learn that tiny refinements make a big difference. Sharper collar folds make the whole shirt look cleaner. Balanced sleeves make it look intentional. A better final flattening makes it photograph well if you want to share it online or include it in a craft roundup. These are small improvements, but they create that satisfying moment when your fifth shirt looks noticeably better than your first. Progress sneaks up on you.
Maybe the most enjoyable part is that the project feels a little mischievous in the best possible way. You are taking something practical and turning it into something whimsical, then handing it back to the world. That is a lovely use of five or ten minutes. And because the finished piece can usually be unfolded later, it stays flexible: part gift, part craft, part tiny joke. Not bad for one dollar.
Final Thoughts
Now you know how to make a shirt out of a one dollar bill in 8 simple steps. The process is quick, inexpensive, and surprisingly rewarding. With a crisp bill, a flat surface, and a little patience, you can turn ordinary cash into a tiny handmade design that feels far more memorable than handing over a plain dollar.
Whether you use your dollar bill origami shirt as a gift topper, a clever tip, a party trick, or the beginning of a new paper-folding hobby, the secret is the same: make clean folds, keep the collar tidy, and do not be afraid to try again. After one or two practice rounds, you will probably start looking at every spare bill and thinking, “You could be fashion.”
Note: This article is intended for educational crafting purposes and assumes the bill is folded only, without permanent damage.