
Table of Contents >> Show >> Hide
- What Is a Wooden Percussion Frog?
- Tools and Materials You’ll Need
- Step-by-Step: How to Make a Wooden Percussion Frog
- 1. Sketch and Plan Your Frog
- 2. Rough Out the Basic Shape
- 3. Refine the Frog’s Body
- 4. Hollow the Body for Resonance
- 5. Carve the Ridged Back
- 6. Add Facial Features and Details
- 7. Sand for a Smooth, Safe Surface
- 8. Apply a Kid-Safe, Music-Friendly Finish
- 9. Make the Striker (Croaking Stick)
- 10. Test and “Tune” the Croak
- Safety and Kid-Friendly Considerations
- Decorating and Personalizing Your Frog
- How to Play Your Wooden Percussion Frog
- Real-World Experiences: Lessons from Making Wooden Percussion Frogs
- Wrap-Up: A Tiny Frog with a Big Personality
If you’ve ever wandered through a market or gift shop and heard a mysterious little
“rrribb-bbbit” sound, chances are it came from a wooden percussion frog. These charming
hand-carved instruments look like tiny sculptures, but they also act like a small wooden guiro:
you drag a stick along the ridged back and the frog magically “croaks.”
The good news? You don’t have to fly to Thailand or scour craft fairs to get one. With a basic
wood block, a few carving tools, and some patience, you can make your own wooden percussion frog
at home. In this guide, we’ll walk through everything from sketching the frog shape and hollowing
the body to carving those signature ridges and giving it a safe, beautiful finish.
Whether you’re a music teacher, a parent looking for a creative project, or a beginner woodcarver
who just likes the idea of making a frog that doubles as a rhythm section, this tutorial will help
you create a small, croaky superstar of your own.
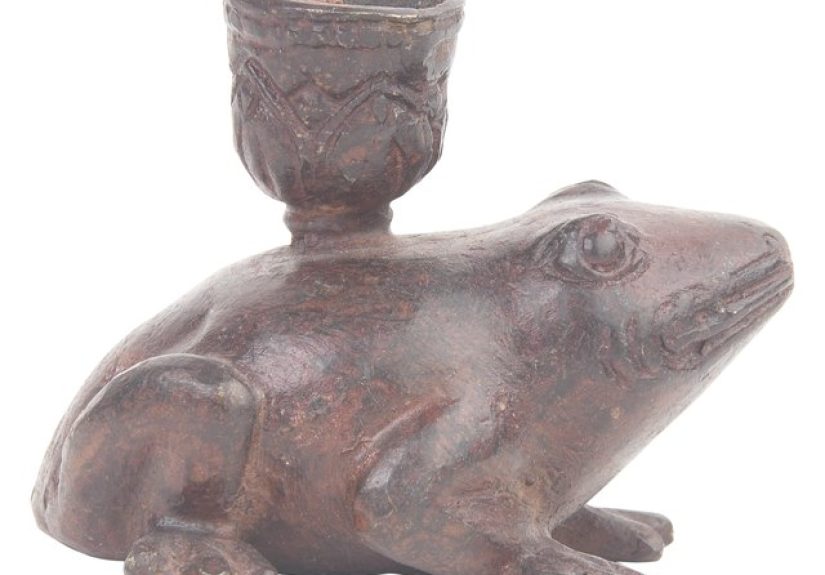
What Is a Wooden Percussion Frog?
A wooden percussion frog (often called a frog guiro) is a small, hollow wooden instrument carved
to look like a frog. The back is ridged, and when you drag a wooden stick from tail to head, the
instrument produces the characteristic rasping sound that mimics a frog’s croak.
The design comes from the same family as the Latin American güiro, a notched
instrument traditionally made from a gourd or wood. Like the guiro, your frog works because the
ridges interrupt the motion of the stick, creating a rapid series of hits that sound like a
continuous rasp.
Most frogs are small enough to fit in your hand. Many players also “tap” the frog on the head for
a woodblock-style sound and then switch to scraping the back for the croak. Some drummers even
mount frog guiros on their kits as quirky effect instruments.
Tools and Materials You’ll Need
You don’t need a full professional woodshop to make a wooden percussion frog, but you do need
sharp tools and a safe workspace. Here’s a simple list to get started:
Wood and Basic Supplies
-
Wood block: Soft, fine-grained woods like basswood or pine are ideal for
beginners. A block around 2″ × 2″ × 4″ (5 × 5 × 10 cm) works well. -
Carving knife and gouges: A basic whittling knife plus a couple of small
gouges or chisels for shaping and hollowing. - Small saw or coping saw: Optional, but helpful for rough shaping.
-
Drill and bits: For nose holes, eye sockets, or a hole for storing the
striker. -
Sandpaper: Grits ranging from about 120 up to 220–320 for a toy-safe smooth
finish. - Pencil and paper: For your frog sketch and patterns.
Finishing and Safety Gear
-
Non-toxic finish: Food-safe oils (like pure tung or hemp oil), beeswax, or
toy-safe oil/wax blends are popular choices. Water-based, low-VOC polyurethane rated safe for
toys is another option. - Rags or brushes: To apply finish.
-
Safety gear: Cut-resistant gloves, eye protection, and a dust mask when
sanding. - Clamps or a bench vise: To hold the workpiece securely while carving.
Step-by-Step: How to Make a Wooden Percussion Frog
1. Sketch and Plan Your Frog
Start with a rough sketch of your frog on paper: side view and top view. Keep the body chunky and
slightly rounded. Add simple legs, eyes, and a slightly raised back where your ridges will go.
Simple cartoon-style frogs are easier to carve than ultra-realistic ones.
Once you like your design, transfer the outline to your wood block. Use a pencil to mark the basic
profile on both sides and the top. This sketch will act as a carving roadmap so you don’t shave
away something you meant to keeplike the frog’s nose. (No one wants a noseless frog soloing in
the percussion section.)
2. Rough Out the Basic Shape
Clamp the wood block securely to your work surface. Use a small saw, carving knife, or chisel and
mallet to remove large chunks of waste wood. Aim to:
- Round the top into a curved frog back.
- Define the snout and head area.
- Block in the front and back legs as simple shapes.
This stage is sometimes called “roughing in” or “blocking out” and is mentioned in many
beginner-friendly animal carving tutorials.
3. Refine the Frog’s Body
Switch to finer carving cuts and start shaping:
- Round the belly and sides so the frog feels comfortable in the hand.
- Slightly raise the back area where the ridges will be carved.
- Carve simple, stylized legsdon’t worry about tiny toes at first.
Think in “planes” rather than details: first define big shapes (back, head, legs), then round
them. Tutorials for carving small animal figurineslike bears, cats, or birdsoften emphasize this
big-to-small approach.
4. Hollow the Body for Resonance
For a strong, clear croak, your frog needs a hollow cavity to act as a resonating chamber.
There are two main approaches:
-
Top-down hollow: Carve a cavity from the underside, leaving enough wall
thickness (around 1/4″–3/8″). Then glue on a flat belly plate. -
Split-body method: Saw the block in half, carve out a cavity in both halves,
then glue them back together.
Use gouges and chisels, working slowly and checking thickness with your fingers. Tap the wood with
your knuckle periodicallyyou’ll hear it change from a dull “thud” to a more hollow “thuk” as the
cavity develops.
5. Carve the Ridged Back
The ridges are the heart of the wooden percussion frog’s sound. Mark evenly spaced lines along the
frog’s backabout 1/8″ to 1/4″ apart. Use a V-gouge or a small chisel to carve grooves between
those lines, leaving raised ridges.
Test the sound by lightly scraping a spare stick across the ridges. If the sound is weak, try:
- Deepening the grooves slightly.
- Sharpening the ridge edges (but not so sharp they’re uncomfortable to touch).
- Ensuring the ridged section sits directly above or near the hollow cavity.
6. Add Facial Features and Details
Now for the fun personality touches:
-
Eyes: Drill shallow holes and either leave them carved or insert tiny wooden
dowels or burned dots. -
Nostrils and mouth: Use a small gouge or knife tip to add simple lines or
shallow holes. -
Stick holder: Many commercial frogs have a hole in the frog’s mouth or side to
store the striker when not in use. Drill a snug hole that matches your stick’s diameter.
Keep features simple and slightly exaggeratedbig eyes and a gentle smile make the frog feel
friendly, especially for kids.
7. Sand for a Smooth, Safe Surface
Once you’re happy with the carving, it’s time to sand. Begin with a medium grit (around 120–150)
to remove tool marks, then move up through 180–220 and, if desired, 320 for an extra-smooth toy
surface.
Pay special attention to:
- Edges where small fingers will grip the frog.
- The ridged backsmooth the ridge tops without rounding them off too much.
- Any sharp corners on legs or mouth.
Always sand with the grain, and wear a dust mask or respirator to avoid breathing fine dust.
8. Apply a Kid-Safe, Music-Friendly Finish
A good finish does three things: protects the wood, makes the frog look great, and stays safe for
anyone handling or mouthing the instrument (especially kids). Common options include:
-
Natural oils: Food-safe tung or hemp oil penetrate the wood and highlight the
grain. -
Oil-and-wax blends: Many toy makers use plant-based oil/wax blends tested to
toy safety standards like EN 71-3. -
Water-based polyurethane: Low-VOC, non-toxic when cured, and durable for
classroom use.
Follow the manufacturer’s instructions for drying and curing times. Avoid heavy, gummy finishes on
the ridges; excess buildup can dull the croak. Thin coats are better than thick globs.
9. Make the Striker (Croaking Stick)
The striker is simply a smooth wooden stick, about the thickness of a chopstick or pencil. You can:
- Cut a length of dowel (6″–8″), round both ends, and sand smooth.
- Whittle a small branch from a hardwood tree and sand it thoroughly.
Make sure the stick fits the storage hole you drilled earlier and feels comfortable between your
fingers.
10. Test and “Tune” the Croak
Time for the big reveal. Hold the frog in one hand, nose pointing forward. With the other hand,
drag the striker from the frog’s tail up toward the head in one steady motion. If all went well,
you’ll hear a satisfyingly froggy rasp.
If the sound is too quiet or dull:
- Deepen the hollow cavity slightly (carefully).
- Sharpen the ridges just a bit.
- Try different scraping angles and pressures.
Many players also tap the frog’s head for a sharp woodblock tone, then immediately scrape the back
for a croak effectinstant jungle soundtrack.
Safety and Kid-Friendly Considerations
Wooden percussion frogs are popular with kids, so it’s worth going the extra mile for safety.
Toymakers and woodworking safety guides emphasize:
- Thorough sanding to at least 220–320 grit to prevent splinters.
- Non-toxic finishes specifically labeled safe for toys or food contact.
- Good ventilation and protective equipment when applying any finish.
If you’re making frogs for very young children, consider:
- Skipping small decorative parts that could break off.
- Making the striker fairly thick and long so it isn’t a choking hazard.
- Checking local safety guidelines for handmade toys if you plan to sell them.
Decorating and Personalizing Your Frog
Once your frog is carved and finished, you can keep it natural or add a little flair:
-
Wood-only look: Many traditional frogs are left in natural wood tones with
just oil or wax. The grain becomes the “pattern” on the frog’s back. -
Subtle color: Toy painters often use non-toxic stains, watercolors, or
child-safe paints sealed under a toy-safe topcoat. -
Character frogs: Add painted spots, stripes, or even tiny crowns for a “frog
prince” version.
If you’re making multiple frogs (for a classroom or gift set), vary the shapes slightlychunky
frog, tall frog, sleepy frogso each one has its own personality and slightly different croak.
How to Play Your Wooden Percussion Frog
Now that you’ve built it, how do you actually use this thing in music? Players and drummers use
frog guiros in a few classic ways:
-
Basic croak: Scrape from tail to head in one smooth motion. This long rasp
works well as a sound effect. -
Rhythmic pattern: Alternate short and long scrapes with taps on the head to
create simple grooves (e.g., tap–scrape–tap–tap–scrape). -
Call-and-response: Use the frog as a “call” instrument in kids’ music
activities: you play a pattern, the group claps or echoes it. -
Layered textures: In band settings, a frog guiro adds subtle rhythmic texture
behind drums, shakers, and hand percussion.
The frog doesn’t need to be perfectly in tune with anythingit’s a texture and effect instrument,
so feel free to experiment with rhythms, tempos, and scraping angles.
Real-World Experiences: Lessons from Making Wooden Percussion Frogs
Once you’ve made one wooden percussion frog, you quickly learn what works, what doesn’t, and what
makes people grin when they hear that first croak. Here are some experience-based insights that
can save you time (and maybe a frog or two).
First, most beginners underestimate the importance of the hollow cavity. A solid frog looks fine,
but it often sounds mutedmore like dragging a stick across a table than a real frog call. When
you take the time to carve out a resonant chamber, the sound suddenly opens up. The frog becomes
louder, richer, and more responsive. If you ever compare two frogsone hollowed and one solidthe
difference is so obvious that you’ll never skip the hollowing step again.
Second, ridge depth and spacing matter more than you’d think. Early attempts often feature either
ridges that are too shallow (which feel smooth and sound weak) or ridges that are too far apart,
which creates a choppy, clicky noise instead of a smooth rasp. Through trial and error, many
makers settle on moderate spacing and enough depth that you can feel each ridge distinctly under
the stick while still gliding along the back. Once you find a pattern that produces the sound you
love, measure it and repeat it on future frogsinstant “house style.”
Another common lesson is about comfort. A frog that looks fantastic in photos may feel awkward in
the hand. Makers quickly realize that rounded bellies, gently curved sides, and softened edges
make a huge difference, especially for kids and music students who may hold the frog for long
periods. Experienced carvers often do a “closed-eye test”: they close their eyes and feel the
frog from every angle. Any area that feels pokey, sharp, or uncomfortable gets more carving or
sanding. If the frog feels like a worry stone you want to keep rubbing, you’ve nailed the shape.
Finishing experiments also teach valuable lessons. Heavy, glossy finishes can look impressive but
sometimes dull the sound or make the ridges slippery. Makers who want a crisp croak tend to favor
thin, penetrating finishesoils and waxes that protect the wood without building a thick layer on
top. Over time, you’ll notice that frequently played frogs naturally polish in the spots where
hands and sticks touch them, creating a lovely, subtle patina that no spray can really imitate.
On the practical side, many hobbyists discover that wooden percussion frogs make great gifts and
surprisingly popular craft-fair items. They’re small, relatively quick to carve once you’ve
dialed in your process, and they appeal to a wide audience: kids, music teachers, percussionists,
and anyone who likes tactile, handmade objects. Makers often keep a “reject box” of early frogs
that didn’t sound quite rightand those frogs still get adopted by friends or end up on desks as
charming little mascots.
Finally, there’s the simple joy factor. There’s something delightful about handing a quiet person
a frog and watching them light up when they discover the croak. In classrooms, frogs quickly
become icebreakers; in music circles, they offer a playful way to experiment with rhythm without
needing formal training. Once you’ve made your first frog, it’s hard not to imagine variations:
bigger frogs with deeper croaks, tiny pocket frogs with higher pitches, or even a whole “choir” of
frogs in different sizes. Each one becomes a mix of sculpture, instrument, and conversation
starterand all of that starts with a simple block of wood, a sketch, and a willingness to carve
and listen.
Wrap-Up: A Tiny Frog with a Big Personality
Making a wooden percussion frog is one of those projects that sits perfectly at the intersection
of craft, music, and fun. You learn basic animal carving skills, experiment with resonance and
rhythm, and end up with an instrument that makes people smile the second they hear it. By
choosing a beginner-friendly wood, carving a hollow body, carefully shaping the ridged back, and
finishing with a kid-safe product, you’ll create a frog that looks good on a shelf and sounds
great in a jam session.
Once your first frog is hopping happily along your rhythm tracks, don’t be surprised if you start
getting requests: “Can you make me one?” Fortunately, now you know exactly how to say yeswith a
sharp knife, a smooth stick, and a cheerful little croak.


