
Table of Contents >> Show >> Hide
- What Is an Origami Flapping Bird?
- Supplies and Paper Tips
- Origami “Vocabulary” You’ll Use (Without the Fancy Attitude)
- Step-by-Step: How to Fold the Origami Flapping Bird
- How to Make It Flap
- Troubleshooting: When Your Bird Refuses to Perform
- Pro Tips for Cleaner Folds (That Actually Matter)
- Fun Variations and Ways to Use Your Flapping Bird
- FAQ: Common Questions About the Origami Flapping Bird
- Conclusion
- Real-Life Folding Experiences: on What It’s Like to Learn This Model
If you’ve ever wished your origami could do more than sit there looking adorable and judgmental on your desk,
meet the origami flapping birda classic action origami model that actually moves.
With one square sheet of paper and a little patience (the “secret ingredient” in all paper folding),
you’ll end up with a bird that flaps its wings when you gently pump its tail.
This guide walks you through the fold in a beginner-friendly way, with clear checkpoints, common fixes,
and a little “why this works” science so you can troubleshoot like a folding wizard. No fancy tools required.
No glue. No tape. Just crisp creases and good vibes.
What Is an Origami Flapping Bird?
The origami flapping bird is a traditional model closely related to the crane family of folds.
It’s built from a base that creates two long points (head and tail) and two broad wings. When you hold the body
and move the tail up and down, the wings flutter because the folded layers act like linked hingestiny paper
“joints” transferring motion from one part of the model to another.
Why It’s a Favorite
- It’s interactive: kids and adults love a paper craft that “does something.”
- It teaches core techniques: squash folds and reverse folds show up in tons of origami models.
- It’s fast once you learn it: after a few practice runs, you’ll fold one in minutes.
Supplies and Paper Tips
What You Need
- 1 square sheet of paper (origami paper is great, but regular printer paper works too)
- Optional: a ruler and scissors (only if you need to cut a square)
- Optional: a flat surface (tables are basically “crease quality” boosters)
Best Paper Size and Type
For a bird that flaps well, choose thin but sturdy paper. Standard origami paper is ideal.
A classic starter size is around 6 in × 6 in (about 15 cm × 15 cm). If your paper is too large,
too thick, or too floppy, the motion can feel “meh” instead of “wow.” In other words: the bird gets stage fright.
Make a Perfect Square (If Your Paper Isn’t One)
- Start with a rectangle (like printer paper).
- Fold one corner diagonally to form a triangle, aligning edges neatly.
- Trim the extra strip along the bottom edge (ask an adult for help with scissors if needed).
- Unfold. You now have a square.
Origami “Vocabulary” You’ll Use (Without the Fancy Attitude)
You don’t have to memorize a dictionary of folds, but it helps to recognize these moves:
- Valley fold: fold toward you like making a “V.”
- Mountain fold: fold away from you like making a “∧.”
- Squash fold: open a pocket and flatten it into a symmetrical shape.
- Inside reverse fold: push a point inward along an existing crease to flip its direction.
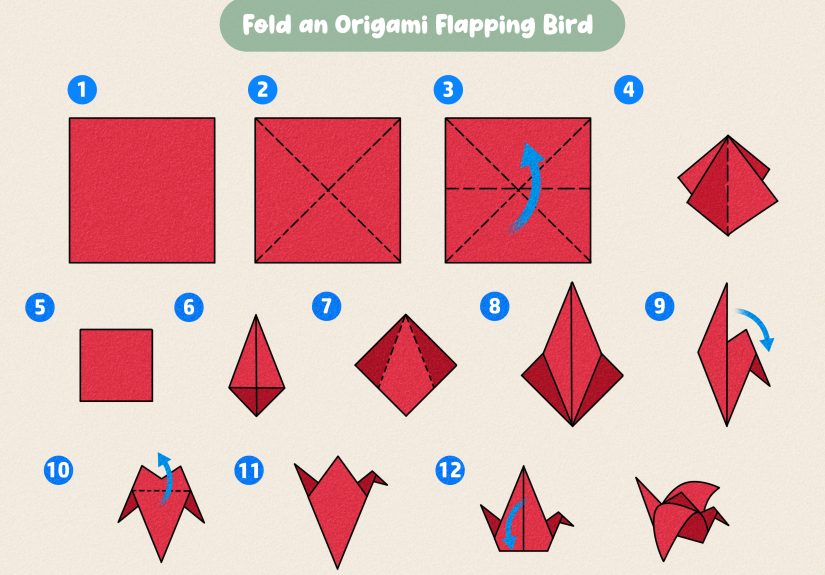
Step-by-Step: How to Fold the Origami Flapping Bird
Take your time and make sharp creases. Origami rewards precision the way cookies reward following the recipe:
mostly with happiness and fewer disasters.
Part 1: Make the Preliminary Base (Square Base)
-
Start with the colored side down (or whichever side you want mostly inside).
- Place the paper like a diamond (one corner pointing up).
-
Fold diagonally corner-to-corner and crease, then unfold.
- Repeat on the other diagonal.
- You should see an “X” crease pattern.
-
Flip the paper over.
- Fold in half top-to-bottom and crease, then unfold.
- Fold in half left-to-right and crease, then unfold.
- You should now have creases that form a starburst: an X plus a +.
-
Collapse into a square base.
- Bring the left and right corners toward each other (the paper will “want” to collapse).
- As it collapses, press the top corner down so it forms a neat square.
- Checkpoint: You have a square with layered flapsan opening at the bottom.
Part 2: Form the Bird Base
- Position the square base so the open point faces down (like a little paper tent).
-
Fold the front left edge to the center line; crease.
- Fold the front right edge to the center line; crease.
- You’ve made a kite shape on the front layer.
-
Open those last folds and do a petal lift.
- Lift the top front flap upward from the bottom point.
- As you lift, the paper opens like a pocketflatten it along the creases you made.
- Checkpoint: The front layer becomes a longer diamond shape.
-
Flip the model over and repeat Steps 6–7 on the back.
- Now you have a classic bird base: two long points at the bottom and two flaps at the sides.
-
Make the body slimmer.
- On the front, fold the lower left edge to the center line; crease.
- Fold the lower right edge to the center line; crease.
- Flip and repeat on the back.
- Checkpoint: The body looks narrower, with two thin “legs” pointing down.
Part 3: Create the Head, Tail, and Wings
-
Lift one thin point up (this will become the neck/head).
- Fold it upward as far as it naturally goes; crease.
-
Lift the other thin point up (this will become the tail).
- Fold it upward to match the first; crease.
- Checkpoint: You now have a triangle “body” with two long points rising.
-
Shape the wings.
- Find the two broad side flaps (these are the wings).
- Gently pull them outward so they sit like a bird’s wings at rest.
- Optional: slightly curve the front edges with your fingers for smoother flapping.
-
Make the head with an inside reverse fold.
- Choose one long point to be the neck/head.
- Near the tip, create a small crease where you want the head to bend.
- Open the layers at that crease and push the tip inward, reversing the direction.
- Checkpoint: The bird now “has a face” (or at least the confident suggestion of one).
How to Make It Flap
The Quick Way
- Hold the bird’s body gently just under the “neck” area.
- With your other hand, pinch the tail end.
- Move the tail up and down slowly and smoothly (no need to yankthis isn’t a lawn mower).
- The wings should flutter as the internal folds flex.
Why It Works (Tiny Paper Physics)
Inside the bird, layered folds act like a linkage system. When the tail moves, it changes tension through the body,
nudging the wing layers. If the wings are symmetrical and the creases are crisp, they “hinge” nicely. If one wing
is stubborn, it’s usually a symmetry or thickness issuenot your destiny.
Troubleshooting: When Your Bird Refuses to Perform
Problem: Only One Wing Flaps
- Fix symmetry: check that both wings are angled the same and creased evenly.
- Adjust shaping: gently curve both wings forward slightly so they mirror each other.
- Check paper stiffness: very flimsy paper can buckle unevenly.
Problem: It Barely Flaps (Tiny Sad Wiggles)
- Use smaller paper: medium sizes tend to flap better than oversized sheets.
- Sharpen creases: re-crease the body folds and wing edges.
- Move slower: smooth tail motion creates a better “hinge” effect than fast shaking.
Problem: The Head Looks Weird
- Make a smaller reverse fold: tiny head folds look cleaner on small birds.
- Hide wonky creases: gently squash the neck area and re-align layers.
- Embrace personality: some birds look dramatic. That’s not a bug; it’s character.
Pro Tips for Cleaner Folds (That Actually Matter)
- Align corners like it’s your job: most “origami problems” start with a 2 mm mismatch early on.
- Crease, then press: make the fold lightly first, confirm alignment, then sharpen it.
- Use a flat edge: a ruler edge or fingernail can help define creases (gentlyno paper injuries).
- Practice with cheap paper first: save your fancy patterned origami sheets for your victory lap.
Fun Variations and Ways to Use Your Flapping Bird
Make It a Mini “Flock”
Fold a handful in different colors and hang them from thread to make a mobile. If you’re publishing this as a craft,
it’s also a great chance to add a simple “learning moment” about symmetry, geometry, and following sequences.
Try Two-Sided Paper
Paper that’s one color on one side and another on the other side can give your bird a cool contrast:
a light belly and darker wings, or a patterned body with plain wings for a cleaner look.
Turn It Into a Quick Party Trick
The flapping bird is perfect for classrooms, rainy-day activities, or family gatheringsespecially because the “wow”
moment happens after the folding, when it suddenly comes alive in your hands. It’s like magic, but with geometry.
FAQ: Common Questions About the Origami Flapping Bird
Is this origami flapping bird good for beginners?
Yesespecially if you go slowly. The only “new” skills are squash folds and reverse folds, but once you learn them,
they unlock a ton of classic origami animals and action models.
What paper works best if I only have printer paper?
Printer paper works fine. Just cut it into a square first and keep your folds crisp. If your bird feels bulky,
try using lighter-weight paper or a smaller square.
Can kids make this?
Many kids can fold it with guidance, especially if an adult helps with creating a square and with the reverse fold
for the head. It’s also a great fine-motor activity (and way more fun than worksheets pretending to be fun).
How do I get a stronger flap?
Focus on symmetry and wing shaping. Small adjustmentslike matching wing angles and curving both wings slightly
often make the flap smoother and more dramatic.
Conclusion
The origami flapping bird is one of those paper crafts that feels like a tiny achievement trophy:
it looks classic, teaches real folding skills, and has a fun interactive payoff. Once you’ve made one,
you’ll start seeing the logic behind other origami birdsbecause a lot of models share the same foundations.
Keep a few squares of paper nearby, practice your creases, and remember: if your first bird doesn’t flap,
it’s not broken. It’s just shy. Fold another one and tell it you believe in it. (Or, you know, fix the wings.)
Real-Life Folding Experiences: on What It’s Like to Learn This Model
Most people’s first experience with an origami flapping bird starts the same way: confidence, followed by a brief
moment of “Wait… why is my square turning into a strange paper hat?” That’s normal. The early stagewhere you make
the preliminary basefeels like the paper is transforming into something on its own. It’s one of the first times a
beginner realizes origami isn’t just folding edges; it’s guiding the paper into a structure it already “wants” to
become because of the crease pattern.
Then comes the very relatable part: the bird base. This is where many learners notice that origami has a personality:
it’s polite when your folds are accurate, and dramatic when they’re not. A small misalignment early on can make the
later steps feel oddly resistant, like the paper is quietly refusing to cooperate. But here’s the cool thingthis
model teaches troubleshooting in a gentle way. If something looks off, you can often back up one step, re-crease,
and suddenly everything lines up again. It’s practice in patience that doesn’t feel like a lecture.
The first time someone successfully does an inside reverse fold for the head, there’s usually a tiny “Aha!”
moment. It’s a technique that looks complicated when explained, but once you feel the paper open slightly and flip
inward along the crease, it becomes intuitive. After that, people often start hunting for excuses to reverse fold
everythingtails, beaks, earsbecause it makes models look more “alive” with just one little movement.
And then, the main event: the flap. The most common beginner reaction is to pump the tail too aggressively at first,
expecting instant cartoon-level wing flapping. When it barely wiggles, the disappointment is real… for about five
seconds. Because the next instinct is to adjust the wingspull them forward a bit, match the angles, sharpen the
creasesand suddenly the bird starts fluttering. That’s the moment where the model stops being “a craft” and becomes
“a mini machine.” People love realizing that paper can behave like a mechanism when folds are arranged correctly.
Over time, many folders develop preferences: some like slightly smaller paper for snappier motion, while others like
medium paper for easier handling. Many discover that thin, crisp paper gives the cleanest action, while thick paper
makes the bird look sturdy but reduces the flutter. And when someone folds a few birds in different colors, another
experience tends to happen: they start gifting them. The flapping bird is the kind of simple, joyful object that
makes people smile, whether it’s on a desk, in a classroom, or attached to a string in a homemade mobile.


