
Table of Contents >> Show >> Hide
- Why Industrial Pipe Shelves Are Still a Great DIY Project
- Choose Your Shelf Design Before You Buy Anything
- Materials You Will Need
- How to Make Industrial Pipe Shelves Step by Step
- Step 1: Measure the wall and decide what the shelves will hold
- Step 2: Find the studs
- Step 3: Dry-fit the pipe layout
- Step 4: Cut and sand the wood
- Step 5: Stain or paint the boards
- Step 6: Seal the wood
- Step 7: Mark bracket or flange locations on the wall
- Step 8: Mount the pipe brackets or frame
- Step 9: Attach or place the wood shelves
- Common Mistakes to Avoid
- Where Industrial Pipe Shelves Work Best
- Real-World Experience: What Building Industrial Pipe Shelves Actually Feels Like
- Final Thoughts
Industrial pipe shelves are what happen when a lumber aisle and a plumbing aisle fall in love. The result is sturdy, practical, and just rugged enough to make your living room look like it has strong opinions. If you want open shelving that feels custom, adds storage, and brings a little loft-style attitude into your home, industrial pipe shelves are one of the smartest DIY projects you can take on.
The best part is that you do not need a giant workshop or a reality-TV renovation budget. You need a solid plan, the right pipe fittings, quality wood, a level, and the patience to measure twice before drilling holes where your future self will have to stare at them forever. In this guide, you will learn how to make industrial pipe shelves step by step, how to choose the right materials, how to mount them safely, and how to avoid the classic DIY mistakes that turn “custom shelving” into “modern wall damage.”
Why Industrial Pipe Shelves Are Still a Great DIY Project
There is a reason industrial pipe shelving keeps showing up in kitchens, home offices, laundry rooms, bathrooms, and coffee nooks. It solves two problems at once: storage and style. The metal pipe gives the shelves a strong, architectural look, while the wood keeps them warm enough that the room does not feel like a machine shop with throw pillows.
They are also flexible. You can build a small two-shelf unit above a toilet, a row of open kitchen shelves, or a full wall-mounted bookshelf with multiple tiers. Depending on your design, you can go rustic, modern farmhouse, urban loft, or something in between. Industrial pipe shelves are basically the blue jeans of home projects: they work with almost everything.
Choose Your Shelf Design Before You Buy Anything
Before you toss fittings into a cart like a raccoon with a credit card, decide what kind of shelf you are building. This matters because the design determines the pipe layout, the number of flanges, the wood size, and the mounting method.
Option 1: Simple wall-mounted bracket shelves
This is the easiest version and the best choice for beginners. Pipe brackets mount to the wall, and the wood shelf sits on top. It is clean, relatively fast, and ideal for kitchens, bathrooms, and smaller spaces.
Option 2: Multi-tier wall unit
This design uses vertical pipe supports and several shelves stacked upward. It creates a bigger visual statement and adds a lot more storage, but it requires more precise measuring and stronger wall attachment.
Option 3: Floor-to-wall industrial shelving
This style combines floor support with wall anchoring. It is excellent for books, baskets, and display pieces, especially when you want a built-in look without actually building cabinetry.
If this is your first attempt, start with a single-span wall shelf or a simple two-tier shelf. There is no shame in learning to crawl before building a six-foot pipe masterpiece that stares down your sofa like a steel giraffe.
Materials You Will Need
Your exact shopping list depends on your design, but most DIY industrial pipe shelves use the same core ingredients.
Pipe and fittings
Most builds use black steel or black iron pipe and threaded fittings. Common pieces include floor flanges, elbows, tees, couplings, nipples, and end caps. For many home shelf projects, black pipe is popular because it already has that dark industrial look, and it pairs beautifully with stained wood.
Wood boards
Pine is budget-friendly, easy to work with, and easy to stain. Oak is tougher and more refined. Poplar is smooth and paint-friendly. Reclaimed wood can look fantastic, but only if it is flat, clean, and structurally sound. If a board is twisted like a pretzel, leave it at the store and let it continue its emotional journey without you.
Fasteners and finishing supplies
You will also need wood screws or lag screws, drywall anchors if you cannot hit studs for every mounting point, sandpaper, stain or paint, and a clear protective topcoat such as polyurethane. For indoor shelves, a protective finish helps the boards resist water rings, dust buildup, and everyday wear.
Tools
Basic tools include a tape measure, drill and bits, level, stud finder, pencil, wrench, rags or brushes, and either a saw or access to store cutting services. A socket set and clamps can also make life easier.
How to Make Industrial Pipe Shelves Step by Step
Step 1: Measure the wall and decide what the shelves will hold
Start by measuring your width, height, and depth. Then think honestly about what is going on these shelves. Decorative plants and framed photos are one thing. Cookware, heavy mixers, or a row of hardcovers that all seem to weigh as much as a bowling ball are another. Weight affects everything from bracket spacing to mounting hardware to shelf thickness.
Write down a cut list and a pipe list before buying materials. This keeps you from guessing at the store, which is how many DIY projects end with three extra elbows, two wrong flanges, and one deeply personal crisis in aisle 14.
Step 2: Find the studs
If you remember only one sentence from this article, let it be this: shelves are happiest when attached to studs. Use a stud finder and mark the stud centers clearly. In many homes, studs are commonly spaced 16 inches apart, though spacing can vary. If your layout does not align perfectly with the studs, you may need to adjust the shelf width, move the bracket locations, or use heavy-duty anchors where appropriate.
For large or tall shelving units, anchoring into studs is especially important. If the unit extends high on the wall or might attract climbing kids, extra wall attachment is not optional decoration. It is the difference between “stylish storage” and “physics experiment.”
Step 3: Dry-fit the pipe layout
Before you mount anything, assemble the pipe pieces on the floor. This helps you confirm that all fittings line up properly and that your dimensions make sense in the real world, not just on the back of an envelope. Fitting depth can vary slightly by manufacturer, so dry-fitting is the easiest way to catch surprises early.
Make sure the shelf support points are symmetrical and the pipe frame sits square. If one side looks off now, it will not magically improve after drilling into your wall. Walls are forgiving. Levels are not.
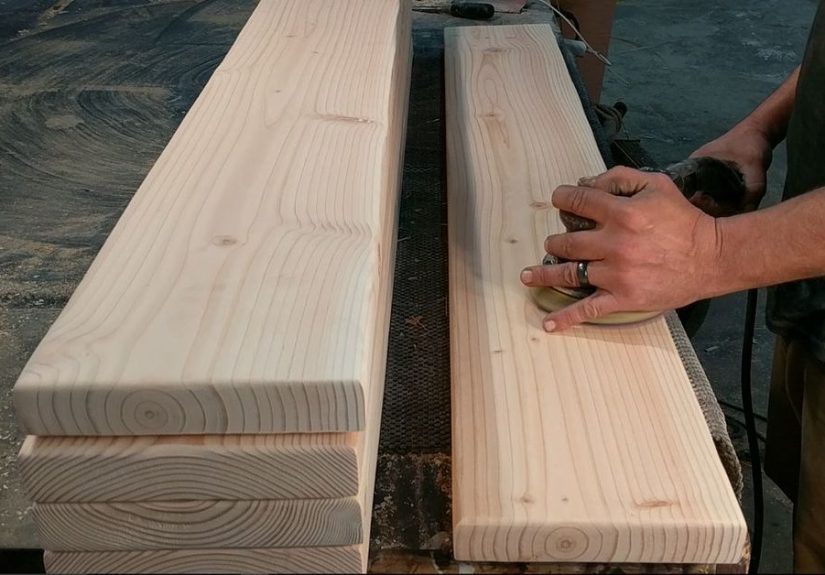
Step 4: Cut and sand the wood
Cut your shelf boards to length and sand them thoroughly. Start with a coarser grit if the lumber is rough, then move to a finer grit for a smooth finish. Ease the sharp edges slightly so the shelves feel finished and less like a medieval hazard.
If you are using reclaimed wood, inspect it carefully for nails, deep cracks, unstable knots, or old finishes. If there is any chance the old paint contains lead, stop and handle that situation properly instead of sanding first and asking questions later.
Step 5: Stain or paint the boards
This is where the project starts looking intentional instead of “miscellaneous hardware with ambitions.” Apply stain with a rag or brush, allow it to penetrate, then wipe off the excess. If you want a darker tone, add another coat only after the first has had time to dry properly.
Popular industrial shelf color combinations include dark walnut with black pipe, weathered gray with matte black fittings, or natural oak with a clear sealer for a cleaner modern look. There is no law that says pipe shelves must look moody, but they do wear moody very well.
Step 6: Seal the wood
After the stain dries, apply a clear finish. This step matters more than people think. A sealed shelf is easier to clean, more resistant to scratches, and better protected from moisture. For shelves in kitchens, bathrooms, or laundry rooms, protection is a very good idea unless you enjoy water rings and regret.
Lightly sand between coats if the product directions call for it. Let the final coat cure before loading the shelves. Yes, waiting is annoying. No, fingerprints in half-dry finish are not a great alternative.
Step 7: Mark bracket or flange locations on the wall
Use your level and pencil to mark exactly where each flange or bracket will go. Check the height from more than one reference point, especially if you are installing more than one shelf. Crooked industrial shelves do not look charmingly handmade. They look like the room is giving up.
For a standard shelf, wider spans often need at least two solid support points, and heavier loads may need more. If you are building multiple tiers, make sure the vertical spacing leaves enough room for the items you plan to store. A shelf that cannot fit a cookbook, basket, or coffee maker is just decorative optimism.
Step 8: Mount the pipe brackets or frame
Pre-drill pilot holes where needed, then secure the flanges or brackets to the wall. Hit the studs whenever possible. If a mounting point lands outside a stud, use the correct heavy-duty anchor for your wall type and expected load. Keep checking for level as you go. Tiny errors at the first bracket become giant headaches by the last one.
Once the pipe structure is mounted, tighten fittings so everything feels solid but avoid over-torquing and damaging threads or finish. A wrench helps, but brute force is not a design strategy.
Step 9: Attach or place the wood shelves
Set the boards on top of the brackets or slide them into your chosen frame design. Depending on the design, you may leave the boards resting in place, or you may screw them from underneath into the pipe support or bracket. If the shelves are in a high-use area, securing the boards is usually worth it.
After installation, place a few test items on the shelves before fully styling them. This is the DIY version of a handshake. You are making sure everything feels stable, balanced, and ready for the long haul.
Common Mistakes to Avoid
Ignoring wall structure
Beautiful shelves mounted poorly are still mounted poorly. Decorative confidence does not replace structural support.
Using boards that are too thin
Long shelves with inadequate thickness can sag over time. If the shelf span is wide or the load is heavy, choose thicker boards or add more support points.
Skipping the dry fit
Pipe fittings can vary slightly, and even a small mismatch can throw off the whole build. Assemble first. Celebrate later.
Rushing the finish
Stain and topcoat need proper drying and curing time. If you rush, the shelf may look fine at first and then betray you with tackiness, smudges, or dents.
Building too deep for the room
Industrial shelves should add storage, not elbow collisions. In hallways, bathrooms, or narrow kitchens, depth matters a lot.
Where Industrial Pipe Shelves Work Best
In kitchens, they are great for plates, mugs, dry goods, and décor. In bathrooms, they work for towels, toiletries, and baskets. In home offices, they add vertical storage without the visual bulk of full cabinets. In laundry rooms, they can make a small, purely functional area look intentionally designed. And in living rooms, they are ideal for books, plants, framed art, and the candles people light for exactly six minutes before remembering they own smoke detectors.
Real-World Experience: What Building Industrial Pipe Shelves Actually Feels Like
The first time you build industrial pipe shelves, you think the hard part will be the pipe. It is not. The hard part is deciding where the shelves should go, changing your mind three times, and then standing in the room holding a tape measure like it is a divining rod for good taste. Once you settle on placement, the project becomes much easier.
One of the biggest lessons people learn from this build is that planning saves money. It is very easy to underestimate how many fittings you need or to assume every piece of pipe will line up perfectly without a test assembly. In reality, pipe shelving rewards patience. Laying everything out on the floor first helps you catch odd spacing, awkward proportions, and fittings that technically work but look slightly off. That step alone can save you from drilling unnecessary holes or making a second trip to the store, which is the official cardio program of home improvement.
Another common experience is realizing that wood choice changes the entire feel of the shelf. Cheap pine can still look fantastic if you sand it well and use a rich stain. A cleaner hardwood can make the same pipe structure feel more upscale and modern. Reclaimed wood can look amazing, but only if it is actually usable. Some boards have “character,” and some boards have “a future as firewood.” Learning the difference is part of the journey.
People are often surprised by how much the finish affects the final result. A board can look ordinary before stain and suddenly look custom after one coat and a clear protective finish. It is one of the most satisfying parts of the project because it transforms a basic piece of lumber into something that looks intentional and expensive. That moment is usually followed by an irrational urge to stain every loose board in the house.
Mounting is where the project starts to feel serious. You stop thinking like a decorator and start thinking like a structural realist. Finding studs, checking level, pre-drilling, and testing each support point is not the glamorous part, but it is the part that determines whether your shelves will still look great a year from now. Most experienced DIYers come away from the project with a stronger appreciation for alignment, wall structure, and the miracle of a good level.
There is also a styling lesson built into the experience. Industrial pipe shelves look best when they are not overloaded. A mix of practical storage and breathing room usually works better than packing every inch with stuff. The shelves should feel useful, not panicked. Once they are finished, most people realize they have built more than storage. They have created a feature that changes the whole room.
That is what makes industrial pipe shelves such a rewarding DIY project. They are practical enough to justify the effort, customizable enough to feel personal, and dramatic enough to make guests ask where you bought them. Getting to say, “I made them,” is one of the better moments in home improvement. It is right up there with finishing a project on time and discovering you still have the correct screwdriver in your pocket.
Final Thoughts
If you want a DIY project that is stylish, useful, and genuinely customizable, industrial pipe shelves are hard to beat. With the right layout, solid wall mounting, quality wood, and a durable finish, you can build shelves that look custom-made for your space and hold up for years. Start simple, measure carefully, respect the wall structure, and do not skip the finishing steps. The result is storage that works hard and looks even better doing it.


