Table of Contents >> Show >> Hide
- Before You Start: A Quick Reality Check
- How to Move a Grandfather Clock in 10 Easy Steps
- Step 1: Study the clock and clear your path
- Step 2: Stop the pendulum and let everything settle
- Step 3: Secure chains or cables (the right way for your movement type)
- Step 4: Remove and label the weights
- Step 5: Remove the pendulum and secure the pendulum guide/leader
- Step 6: Remove and protect glass panels and loose accessories
- Step 7: Secure internal components (chime rods, hammers, and moving parts)
- Step 8: Close, lock, and wrap the clock case
- Step 9: Move the cabinet upright using a dolly and helper(s)
- Step 10: Reassemble, level, restart, and test the clock
- Common Mistakes to Avoid When Moving a Grandfather Clock
- Experience-Based Lessons From Real Grandfather Clock Moves (Extended Practical Section)
- Conclusion
Moving a grandfather clock is a little like moving a chandelier that also judges your life choices. It’s tall, heavy, delicate, and full of parts that do not appreciate “good enough” packing. The good news? With patience, planning, and the right technique, you can move one safely.
This guide breaks the process into 10 easy steps, from prep and disassembly to transport, reassembly, and getting that lovely tick-tock back in rhythm. Whether your clock is a family heirloom, an antique shop score, or the one piece of furniture everyone in the house is afraid to touch, this step-by-step walkthrough will help you avoid costly damage and common mistakes.
Before You Start: A Quick Reality Check
Is DIY moving the right choice?
Grandfather clocks are often heavy (many fall in the roughly 100–300 pound range depending on size and construction), top-heavy, and mechanically sensitive. If your clock is especially old, high-value, or already finicky, hiring a professional mover or clock specialist is usually the safest call.
That said, many homeowners successfully move grandfather clocks themselvesespecially for short-distance moves within the same home or across townif they disassemble and secure the internal components correctly. The biggest problems happen when people try to “just wheel it out” without prep. Please do not be that person.
Supplies you’ll want nearby
- Cotton gloves or a soft cloth (to reduce fingerprints on brass and glass)
- Furniture blankets or thick moving blankets
- Bubble wrap and packing paper
- Painter’s tape or masking tape (gentler than aggressive tape)
- Zip bags for small hardware / keys
- Labels or masking tape + marker (for left/center/right weights and panels)
- Twist ties / cable ties / string (for chains or cables, depending on movement)
- A dolly/hand truck with straps
- A moving truck with a ramp (for long-distance or truck loading)
- A bubble level (for setup in the new location)
- At least one helper (two is better)
How to Move a Grandfather Clock in 10 Easy Steps
Step 1: Study the clock and clear your path
Before touching anything, inspect the clock and figure out how it opens. Some models give access through the front door, side panels, or a rear panel. Identify where the pendulum, weights, chains/cables, and chime rods are located.
Then clear the route: doorways, corners, rugs, stairs, and truck access. Measure the clock and measure your doors. This takes five minutes and can save you from a dramatic “it doesn’t fit” moment in the hallway.
Pro tip: Take a few photos before disassembly. Photos help during reassembly and settle future arguments like, “Was this panel on the left side or the other left?”
Step 2: Stop the pendulum and let everything settle
Open the clock door and gently stop the pendulum by hand. Don’t grab or force delicate parts higher up in the movement. Just stop the pendulum swing calmly and let the clock come to rest.
If your clock has chime settings or a night shutoff lever, note the current setting before moving anything. You don’t need to start changing dials right nowthis is a moving job, not a “let’s improve everything” project.
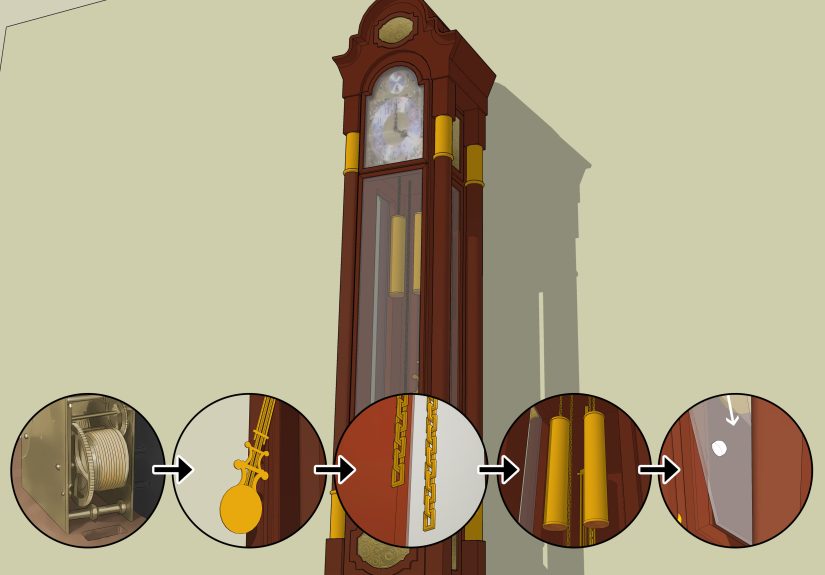
Step 3: Secure chains or cables (the right way for your movement type)
This step matters more than it looks. Grandfather clocks may be chain-driven or cable-driven, and the securing method is different.
- Cable-driven clocks: Many manufacturer guides recommend inserting foam blocks (or suitable packing material if original blocks are unavailable) above pulleys to maintain tension, then raising the weights before removal. Preserving cable tension helps prevent tangling and overlap.
- Chain-driven clocks: Secure the chains near the sprockets with string/wire/ties so the chains don’t slip loose or tangle during transport.
Do not yank chains or let cables go slack suddenly. This is exactly how a “simple move” becomes a repair bill.
Step 4: Remove and label the weights
Once the chains/cables are secured, remove the weights one at a time. Most grandfather clocks have three weights, and many are not interchangeable. If they aren’t already marked, label them clearly:
- Left (L)
- Center (C)
- Right (R)
Wrap each weight individually in bubble wrap or packing paper and place them in a padded box. Handle brass-finished weights with gloves or a soft cloth to reduce smudges and scratches.
Important: Don’t wind or manipulate the movement casually while weights are off. Follow your manufacturer’s manual for your exact model.
Step 5: Remove the pendulum and secure the pendulum guide/leader
Gently unhook the pendulum. On many clocks, it lifts slightly to disengage. If your model uses a pin or special retainer, remove it carefully and keep it in a labeled bag.
Wrap the pendulum separately and place it somewhere safe where it won’t bend or get crushed. After removing it, secure the pendulum guide/leader so it doesn’t swing around inside the case during the move. Light padding works welljust don’t cram material in so tightly that you stress delicate parts.
Think “snug and protected,” not “mummified.”
Step 6: Remove and protect glass panels and loose accessories
Many moving and clock-care guides recommend removing front and side glass panels before transport. These panels are vulnerable to cracking if the cabinet twists even slightly. If your model’s panels are removable, take them out carefully, wrap them well, and label them as fragile.
Also remove and bag any keys, crank, decorative finials, or small hardware that could get lost. If your clock has tubular chimes (rather than chime rods), follow model-specific instructions for removing and packing the tubes.
Quick note: Not every clock is built the same. If a panel doesn’t come off easily, don’t force it. Check your manual first.
Step 7: Secure internal components (chime rods, hammers, and moving parts)
The inside of a grandfather clock contains delicate components that can vibrate, strike, or bend during transit. Common DIY prep methods include lightly securing/protecting chime rods and preventing pendulum-related parts from swinging freely.
Use soft packing material and avoid over-tightening anything around chime rods or hammers. The goal is to reduce movement and rattlingnot to put pressure on metal parts that need precise alignment.
If you hear yourself say, “I’m sure it’ll be fine,” pause and add a little more protection.
Step 8: Close, lock, and wrap the clock case
After internal parts are secured and removable pieces are packed, close and lock the clock door(s). Then wrap the entire cabinet with moving blankets. Tape the blankets to themselves rather than directly to the clock finish whenever possible.
Cover corners and protruding trim well. Grandfather clocks often have decorative moldings that chip easily during doorway turns, truck loading, or “just set it down for a second” breaks.
If you’re moving long-distance, some movers use additional cardboard shielding or a custom box sleeve around the cabinet for extra protection.
Step 9: Move the cabinet upright using a dolly and helper(s)
This is the no-heroics stage. Grandfather clocks should generally be transported upright unless your manufacturer or a qualified clock professional says otherwise for your exact model. Upright transport helps protect the movement and suspension components from stress and misalignment.
With help, carefully tilt the wrapped clock just enough to slide a dolly underneath. Strap it securely to the dolly. Move slowly, avoid sharp turns, and keep one person guiding from the front while another stabilizes from behind.
When loading into a truck, use a ramp and secure the clock to the side wall with straps so it cannot tip. Avoid stacking anything on or against it. This is not a Tetris piece.
Step 10: Reassemble, level, restart, and test the clock
At the new location, place the clock on a stable surface and level it front-to-back and side-to-side. Reinstall components in reverse order:
- Return panels and internal protections as needed (remove transport padding from moving parts)
- Reinstall pendulum
- Reinstall weights in the correct L/C/R positions
- Release secured chains/cables and confirm proper routing
- Start the pendulum and listen for an even tick-tock rhythm
If the ticking sounds uneven, the clock may be out of level or need a beat adjustment. Often, careful leveling solves it. Some clocks may also need slight pendulum regulation over the next day or two to return to accurate timekeeping.
When setting the time, follow your model’s instructions exactly. Many floor clock manuals (including common Howard Miller guidance) instruct owners to move the minute hand only when setting the time, rather than forcing the hour hand. Always verify with your clock’s manual because mechanism details vary by brand and movement.
Common Mistakes to Avoid When Moving a Grandfather Clock
- Skipping disassembly: Trying to move the clock with weights and pendulum still installed is one of the fastest ways to damage it.
- Not labeling weights: Mixing up left/center/right positions can cause chime and strike issues.
- Laying the clock flat without model-specific approval: Upright transport is the safer default for most clocks.
- Using aggressive tape on finished wood: Tape the blankets, not the finish, whenever possible.
- Forcing parts: Glass panels, pendulum hooks, and side access pieces should never require brute force.
- Forgetting to level after the move: Even a slight tilt can affect operation and cause the clock to stop.
- Rushing reassembly: A grandfather clock is a precision machine hiding in furniture clothing. Treat it accordingly.
Experience-Based Lessons From Real Grandfather Clock Moves (Extended Practical Section)
One of the most helpful things about learning how to move a grandfather clock is realizing that the process is less about strength and more about sequence. People who have an easy move usually do the “boring” steps first: photos, labels, padding, and clearing the path. People who have a hard move usually skip those steps because they seem obviousuntil they’re standing in a doorway holding a wrapped cabinet and wondering where the pendulum box went.
A common experience during short in-home moves (like moving a clock during remodeling) is underestimating how much the floor changes from room to room. A clock that ran perfectly in the dining room may suddenly stop in the den because the new floor surface slopes slightly or has softer padding under carpet. That’s why re-leveling is such a big deal. Many owners think something “broke” in the move, when the real issue is simply that the cabinet is no longer sitting square and the beat is off.
Another frequent lesson: labels save the day. People often assume they’ll remember which weight goes whereespecially if they’re only moving across town. Then the move happens, everyone gets tired, and the three wrapped weights look exactly the same. Labeling them left, center, and right (and taking one quick photo before removal) turns a stressful reassembly into a 10-minute task.
Families moving heirloom clocks also report that emotions can make the job feel harder than it is. If the clock belonged to a grandparent or has been in the family for decades, every small sound during the move can feel alarming. That’s normal. The best way to reduce that stress is to move slowly, use two or three people, and assign roles: one person stabilizes, one handles the dolly, and one watches clearances and doors. When everyone knows their job, there’s less confusion and less chance of bumps.
Long-distance moves teach a different lesson: truck loading matters just as much as disassembly. A beautifully packed clock can still get damaged if it isn’t strapped securely and kept upright in the truck. Vibration, shifting, and sudden braking are where many transport issues happen. Owners who report the smoothest outcomes usually pad generously, strap the cabinet to the wall, and avoid stacking items around it.
Finally, many people are surprised that post-move setup may take a little patience. Even when reassembly is correct, the clock might need time to settle, re-leveling adjustments, or minor pendulum regulation over a day or two. That doesn’t necessarily mean anything went wrong. In fact, that “fine-tuning” phase is often part of a successful move. The big win is getting the clock safely to its new location without damage. Once it’s there, a little calm troubleshooting can usually bring back the steady tick-tockand your peace of mind.
Conclusion
Moving a grandfather clock safely comes down to doing things in the right order: stop the pendulum, secure chains or cables, remove and label weights, protect glass and internal parts, keep the cabinet upright, and re-level the clock in its new home. It’s absolutely a DIY-friendly project for many peoplebut only if you treat the clock like the delicate mechanical instrument it is.
If your clock is antique, unusually valuable, or already temperamental, a professional mover or clock technician is worth every penny. But if you follow the 10 easy steps above, work slowly, and resist the urge to “just wing it,” you’ll give your clock an excellent chance of arriving safely and chiming happily in its new spot.