
Table of Contents >> Show >> Hide
- The Two Goals: Safe and Still Delicious
- Quick Decision Guide: Pick Your Reheat Path
- The Best Method: Reheat Stuffing in the Oven (Moist + Crispy)
- How to Reheat Stuffing in the Microwave (Fast, Not Sad)
- How to Reheat Stuffing on the Stovetop (Crispy Edges, Cozy Vibes)
- Bonus Methods: Toaster Oven and Air Fryer (Small Batches, Big Crunch)
- How to Reheat Frozen Stuffing (Without Turning It Into a Brick)
- Why Stuffing Dries Out (And How to Stop It)
- Troubleshooting: Fix Dry, Soggy, or “Oops” Stuffing
- Food Safety Notes (Because Nobody Wants a “Memory” Like That)
- Final Take: The Best Way to Reheat Stuffing Without Drying It Out
- Kitchen Stories & Real-Life Stuffing Experiences (500-ish Words)
Leftover stuffing is one of life’s greatest second chances. The first time, it’s the cozy, buttery sidekick to the main event. The next day, it can either be a glorious encore… or a sad, crumbly brick that tastes like it was stored in a dehumidifier. The good news: reheating stuffing without drying it out is absolutely doable, and you don’t need a culinary degreejust a little moisture, the right heat, and a tiny bit of patience (yes, even if everyone in your house is hovering like hungry seagulls).
This guide walks you through the best methods to reheat stuffingoven, microwave, stovetop, and a few bonus tricksso it comes out moist inside, with that crispy top you secretly love more than the turkey.
The Two Goals: Safe and Still Delicious
Reheating stuffing is a balancing act between food safety and texture. You want it hot enough to be safe, but not so hot (or so long) that it dries out. Stuffing is basically bread plus moisture plus time, which means it can go from “soft and steamy” to “dry and dusty” faster than you can say “Who ate the last roll?”
Texture-wise, most people want two things:
- Moist interior (tender, not gummy)
- Crispy top (golden, not scorched)
Quick Decision Guide: Pick Your Reheat Path
Use this cheat sheet so you don’t overthink it while holding a fork like a microphone.
- Reheating a full pan for a group? Use the oven method (best overall).
- Reheating one plate fast? Use the microwave method (fastest, if you add moisture and cover).
- Want extra crispy edges? Use the stovetop skillet method (crispy, cozy, a little indulgent).
- Stuffing is frozen? Oven wins again (thaw first if you can, but you don’t have to).
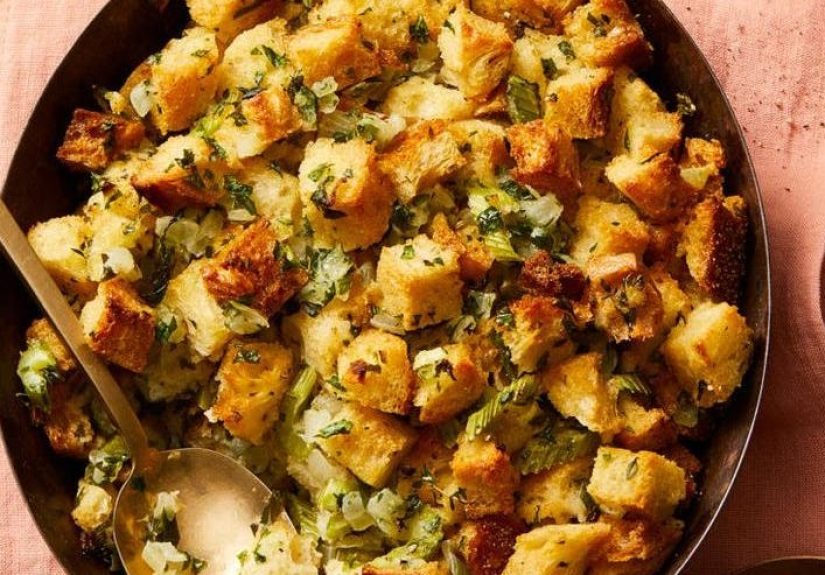
The Best Method: Reheat Stuffing in the Oven (Moist + Crispy)
If you want stuffing that tastes closest to “freshly baked,” the oven is the move. It reheats evenly, revives moisture, and gives you control over the crispy top. The secret is simple: add a little liquid and cover it for most of the heating. That trapped steam is your anti-dryness insurance policy.
Step-by-Step: Oven Reheating Without Drying It Out
- Preheat the oven to 350°F. If your stuffing is already pretty dry, you can go slightly lower (325°F) to reduce moisture loss.
- Spread stuffing in an even layer in a baking dish. Very thick stuffing takes longer to heat and dries out on the outside before the middle warms. If you’ve got a mountain, consider splitting it into two dishes.
- Add moisture before heating. Drizzle broth (chicken, turkey, or veggie), turkey drippings, or even a bit of melted butter mixed with broth. Start small: about 1 tablespoon per cup of stuffing, then gently fold it in. If it’s already moist, you may only need a light splash.
- Cover tightly with foil. Press the foil close to the surface so it traps steam. Steam = moisture. Moisture = happiness.
- Bake covered for 20–30 minutes (depending on how cold it is and how deep the dish is). A full casserole dish may need 30–40 minutes.
- Uncover for the final 5–15 minutes to crisp the top. If you love crunchy bits, keep it uncovered a little longerbut keep an eye on it so it doesn’t go from “golden” to “campfire memory.”
- Check for doneness. Stir the center once, then serve hot. If you’re using a thermometer, make sure the middle is fully hot before serving.
Pro Tips for Oven Success
- Use broth, not water when possible. Water adds moisture but not flavor; broth adds both.
- Don’t over-mix when adding liquid. You want revived stuffing, not bread pudding soup.
- Want extra crispy? Dot the top with a few tiny bits of butter before the uncovered phase.
- Glass or ceramic dish? Let it sit on the counter for 15–30 minutes before heating, so it warms more evenly.
How to Reheat Stuffing in the Microwave (Fast, Not Sad)
The microwave gets a bad reputation because people nuke stuffing uncovered and then act shocked when it comes out dry. Microwaves heat fast, and fast heat steals moisture unless you trap steam. The microwave method works best for single servings or small portions.
Step-by-Step: Microwave Reheat Without Drying
- Put stuffing in a microwave-safe bowl or dish and break it up slightly so it heats evenly.
- Add a splash of broth (or drippings). Start with 1–2 teaspoons per cup, then stir.
- Cover it. Use a microwave-safe lid, a plate, or damp paper towel. The goal is steam, not a stuffing desert.
- Heat in short bursts (30–60 seconds), then stir. Repeat until hot all the way through.
- Rest for 1 minute before eating. The heat will continue to distribute, and the texture improves.
Microwave Tricks That Actually Help
- Lower power, better texture: If your microwave runs hot, try 70–80% power and add a little time.
- Flatten the portion: A thinner layer reheats faster and more evenly than a thick mound.
- Want a crispy top? Microwave first, then toast quickly under a broiler or in a hot skillet for 1–3 minutes.
How to Reheat Stuffing on the Stovetop (Crispy Edges, Cozy Vibes)
If you like the crunchy bitsthe browned edges, the crispy corners, the “I’m pretending this is a crouton but with feelings” pieces a skillet is your best friend. This method shines for smaller portions and gives you a satisfying, fresh-cooked texture.
Step-by-Step: Stovetop Skillet Reheat
- Heat a skillet over medium-low heat and add a small pat of butter or a drizzle of oil.
- Add stuffing and break it into chunks. Spread it in an even layer.
- Add a splash of broth around the edges (not directly on top if you want it crispy).
- Cover with a lid for 3–5 minutes to steam and warm the inside.
- Remove the lid and cook 2–5 minutes more, stirring occasionally, until the texture is where you want it.
This method is especially good for cornbread stuffing, sausage stuffing, and anything that benefits from a little browning. It’s also the method most likely to cause “Wait, why is this better than yesterday?” confusionin a good way.
Bonus Methods: Toaster Oven and Air Fryer (Small Batches, Big Crunch)
If you’re reheating a small amount and want a crisp top without heating a full-size oven, a toaster oven or air fryer can work beautifully. The key is still moisture: add a tiny splash of broth, cover briefly (if possible), then finish uncovered.
- Toaster oven: 325–350°F in a small baking dish. Cover with foil for 10–15 minutes, then uncover 3–8 minutes to crisp.
- Air fryer: Use a small air fryer-safe pan or foil “boat.” Heat at 320–350°F. Add a light splash of broth, heat 5–8 minutes, and check often so it doesn’t over-crisp.
How to Reheat Frozen Stuffing (Without Turning It Into a Brick)
Frozen stuffing is a lifesaver for future-you. The texture can hold up really wellespecially if you froze it in smaller portions. You have two good options: thaw first for even reheating, or bake straight from frozen if you’re in a hurry.
Option A: Thaw, Then Reheat (Best Texture)
- Thaw stuffing in the refrigerator overnight.
- Follow the oven method: add broth if needed, cover with foil, bake, then uncover to crisp.
Option B: Reheat From Frozen (Works Fine, Takes Longer)
- Preheat oven to 350°F.
- Place frozen stuffing in a baking dish, add a few tablespoons of broth, and cover tightly with foil.
- Bake longer than usual (often 45–60 minutes depending on thickness), then uncover to crisp at the end.
If it’s frozen in a giant block, expect a longer warm-up and more stirring. This is why freezing in smaller portions is the real hero move.
Why Stuffing Dries Out (And How to Stop It)
Stuffing dries out for a few predictable reasons:
- Evaporation: High heat + uncovered dish = moisture escaping into the air.
- Refrigeration effects: Bread-based dishes firm up as they chill. That’s normaland reversible with gentle heat plus moisture.
- Overheating: Stuffing doesn’t need to be blasted. It needs to be warmed through.
Prevention Tips (So Tomorrow’s Stuffing Is Even Better)
- Store promptly and keep stuffing in airtight containers.
- Save drippings or broth separately so you can add moisture while reheating (without making it bland).
- Freeze in portions so it thaws and reheats evenly.
- Reheat only what you’ll eat to keep the rest from drying out through repeated warming.
Troubleshooting: Fix Dry, Soggy, or “Oops” Stuffing
If It’s Too Dry
- Drizzle warm broth or drippings over it, cover with foil, and reheat gently.
- For extra rescue power: mix broth with a little melted butter before adding.
- Let it rest 5 minutes after heating so the moisture redistributes.
If It’s Too Soggy
- Spread it out in a thinner layer and bake uncovered for 5–15 minutes to dry the surface.
- Stir once halfway through so moisture can escape evenly.
- Add crunch: sprinkle a few toasted breadcrumbs on top and bake uncovered briefly.
If the Top Is Browning Too Fast
- Cover it again with foil and lower the oven rack.
- Reduce temperature slightly and add a few minutes of time instead.
Food Safety Notes (Because Nobody Wants a “Memory” Like That)
Stuffing is delicious, but it’s also a classic “handle it correctly” foodespecially if it was cooked with poultry. The safest approach is to refrigerate leftovers promptly, store them properly, and reheat thoroughly.
- Refrigerate leftover stuffing within 2 hours of serving.
- Eat refrigerated leftovers within 3–4 days for best quality and safety.
- Reheat until it’s fully hot throughoutespecially in the center of the dish.
- Microwave reheating: spread evenly, cover, and stir for even heating.
Final Take: The Best Way to Reheat Stuffing Without Drying It Out
If you take one thing from this guide, make it this: add a little broth and cover while reheating. That simple combo turns leftover stuffing from “meh” back into “more, please.” The oven method is the gold standard for big batches and best texture, the microwave is great for quick single servings, and the stovetop skillet is your ticket to crispy-edged comfort.
Now go forth and reheat confidently. Your stuffing deserves better than becoming edible sawdustand honestly, so do you.
Kitchen Stories & Real-Life Stuffing Experiences (500-ish Words)
There’s a very specific moment that happens the day after a holiday: you open the fridge, spot the container of stuffing, and feel an odd mix of excitement and suspicion. Excitement, because stuffing is the flavor MVPsavory herbs, buttery bread, maybe sausage, maybe cornbread, maybe that one aunt’s “secret ingredient” that’s definitely just more butter. Suspicion, because leftover stuffing has a reputation. It can reheat into something comforting and steamy, or it can crumble into dry chunks that make you wonder if you should chase it with a beverage… or a humidifier.
A lot of home cooks learn the hard way that stuffing isn’t like soup. You can’t just blast it in a microwave uncovered and expect it to behave. The first time someone does that, the result is usually a plate of warm crumbs with a crispy edge that’s less “golden” and more “I forgot this in the oven while answering a group chat.” But then comes the upgrade: a splash of broth, a cover, and suddenly the stuffing is back. It’s almost unfair how much difference that tiny step makes.
Then there’s the “crowd leftover” scenario: a big pan of stuffing that’s been packed into the fridge like it’s hibernating. People often try to reheat it exactly as-is, straight from cold, and wonder why the top is scorching before the center is warm. The better moveone that feels suspiciously grown-upis to spread it out, add moisture, and cover it for most of the bake. It’s not complicated, but it feels like a kitchen superpower when you pull the foil off at the end and the top starts to crisp. Suddenly, the kitchen smells like the holiday again, and everyone magically appears “just to check on it.”
Stuffing also has this funny way of becoming a “choose your own adventure” leftover. Some people pile it next to turkey, mashed potatoes, and gravy in the classic leftovers plate. Others repurpose it: stuffing waffles (yes, really), stuffing-topped casseroles, or skillet-fried stuffing with a runny egg. In those creative moments, reheating becomes less about “getting it hot” and more about “building the texture you want.” Want crunchy? Skillet. Want soft and plush? Covered oven bake. Want fast? Microwave with a cover and a little liquid, then maybe a quick crisp-up if you’re feeling ambitious.
The best part is that once you get your preferred method down, you stop thinking of stuffing as a one-day wonder. It becomes a planned sequel. You might even catch yourself making extra stuffing on purposebecause you know tomorrow’s version, reheated gently with broth and finished uncovered for crunch, can be just as satisfying as the original. And when leftovers turn into something you actually look forward to, that’s not just good cooking. That’s winning the day-after-holiday game.


