Table of Contents >> Show >> Hide
- Why a Processor Gets Stuck to a Heatsink
- Tools You Should Have Ready
- How to Remove a Processor Fused to a Heatsink: 7 Steps
- Step 1: Shut Everything Down and Make the Area Safe
- Step 2: Warm the Thermal Paste Before You Try to Separate Anything
- Step 3: Support the Assembly and Inspect the Processor
- Step 4: Twist Gently to Break the Seal
- Step 5: Use Floss or Thread if the Paste Is Still Acting Like Cement
- Step 6: Inspect, Clean, and Prepare Both Surfaces
- Step 7: Reinstall the CPU and Cooler with Fresh Thermal Paste
- Common Mistakes to Avoid
- When to Stop and Get Help
- Real-World Experiences and Lessons From Stuck CPU Removals
- Final Thoughts
- SEO Tags
There are few PC-upgrade moments more dramatic than this one: you remove the cooler, expect a civilized little separation, and instead the processor comes up with the heatsink like they just got engaged. At that point, many people do the worst possible thing: pull harder. That is exactly how bent pins, damaged sockets, and regrettable life choices happen.
If your CPU is stuck to the cooler, don’t panic. In most cases, the real culprit is old thermal paste that has dried out and turned into the clingiest substance in your computer. The good news is that a processor fused to a heatsink can usually be separated safely with patience, light heat, and the right technique. The bad news is that brute force is not a technique.
This guide walks you through how to remove a processor fused to a heatsink in 7 practical steps. You’ll also learn what tools to use, what mistakes to avoid, and how to reinstall everything without turning your desktop into a silicon crime scene.
Why a Processor Gets Stuck to a Heatsink
A CPU usually gets stuck to a heatsink because the thermal paste between them has aged, dried out, or formed a strong seal after years of heat cycles. This happens often with older desktop systems and is especially common when a cooler is removed before the paste has been warmed up. On some AMD PGA chips, the processor may even lift out of the socket while still attached to the cooler. On Intel LGA systems, the cooler usually sticks to the CPU lid rather than pulling the chip fully out, but the same paste problem can still make removal awkward.
The short version: the paste did its job for years, then decided retirement looked like glue.
Tools You Should Have Ready
- Lint-free cloth or coffee filters
- Isopropyl alcohol
- Dental floss or strong thread
- A plastic card or non-metal edge tool
- Fresh thermal paste
- Small screwdriver for cooler hardware if needed
- Good lighting and a clean work surface
Important: Avoid knives, metal pry tools, and “I saw this online” chaos. Metal tools can scratch the CPU heat spreader, damage the cooler base, or send the processor flying into the nearest hard surface.
How to Remove a Processor Fused to a Heatsink: 7 Steps
Step 1: Shut Everything Down and Make the Area Safe
Start by powering off the PC, switching off the power supply, and unplugging the system. Press the power button once after unplugging it to discharge any remaining power. Then move the computer to a stable, well-lit surface.
If the processor is still installed in the motherboard, disconnect the CPU cooler fan cable and remove the cooler mounting hardware carefully. If the CPU has already come out stuck to the heatsink, place the whole assembly flat on a soft, clean surface with the processor protected.
Touch a grounded metal object before handling components, and avoid working on carpet. Static electricity is not dramatic on camera, but it is very good at ending a repair early.
Step 2: Warm the Thermal Paste Before You Try to Separate Anything
This is the step many people skip, and it is usually the difference between a smooth fix and a bent-pin horror story.
If the system still works and the cooler is still mounted, run the computer for a few minutes under light to moderate load before shutting it down. Warming the processor softens old thermal paste and makes separation much easier. If the CPU and heatsink are already off the motherboard, you can gently warm the heatsink only with warm air for short intervals. The goal is to soften the paste, not roast the hardware.
Use gentle warmth, not excessive heat. You should never need to scorch the cooler, and you should not use an open flame. If your method sounds like something from a garage repair channel, choose a calmer method.
Step 3: Support the Assembly and Inspect the Processor
Before you start twisting, take a close look at how the processor is attached. Is it flat against the heatsink? Are there exposed pins? Is one edge slightly separated? Are any pins already bent?
If you’re dealing with a PGA-style processor with visible pins, keep those pins away from the work surface at all times. Support the assembly so the CPU is not carrying the load. A soft towel or padded mat is useful here. If the processor has any bent pins already, slow down even more. A stuck CPU is annoying. A stuck CPU plus bent pins is a full weekend project.
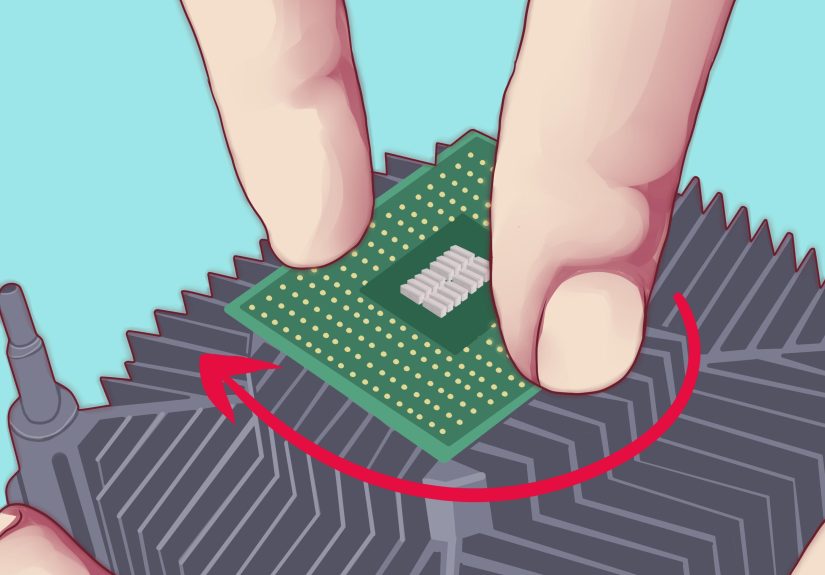
Step 4: Twist Gently to Break the Seal
The safest first removal method is a gentle twisting motion. Hold the heatsink firmly and rotate the processor a few millimeters clockwise and counterclockwise. You are not trying to unscrew it like a jar of pickles. You are just breaking the suction created by old thermal paste.
Do not pull straight up first. Straight upward force is what bends pins or stresses the socket area. A light twist loosens the bond much more safely. In many cases, once the seal breaks, the processor lifts off with almost no effort.
If the CPU begins to move, continue with slow, controlled twisting until it releases. If it does not move at all, stop and go to the next step instead of escalating into caveman mode.
Step 5: Use Floss or Thread if the Paste Is Still Acting Like Cement
If twisting alone doesn’t work, use dental floss or strong thread to cut through the paste. Slide the floss carefully into any tiny gap between the CPU and the heatsink, then move it in a gentle sawing motion. This method works because it breaks the thermal paste bond without concentrating force on one corner of the processor.
Keep the motion slow and level. Do not yank the floss downward into the pins. Do not pry from one edge with a screwdriver. If needed, add a bit more gentle warmth and try again. Patience is cheaper than a replacement processor.
Some builders also use a plastic card to help once the bond has already started to separate, but the card should assist the process, not become a wedge of destruction.
Step 6: Inspect, Clean, and Prepare Both Surfaces
Once the processor is free, inspect it immediately. Look for bent pins on PGA processors, paste on the underside of the chip, and residue on the heatsink base. Also check the socket area if the CPU came out unexpectedly.
Next, clean the old thermal paste from the top of the CPU and the cooler’s contact plate. Start with a dry wipe to remove the bulk of the material, then use a lint-free cloth lightly moistened with isopropyl alcohol to remove the rest. Keep wiping until both surfaces are clean and dry.
If there is thermal paste anywhere it does not belong, especially on contacts or around pins, clean it carefully before reinstallation. Do not reinstall the processor with old hardened paste still on it. That is like changing one dirty sock and calling it laundry day.
Step 7: Reinstall the CPU and Cooler with Fresh Thermal Paste
Reinstall the processor in the socket carefully, making sure the alignment marks are correct and the CPU sits flat. Lock the retention arm or socket mechanism. Then apply a small amount of fresh thermal paste to the center of the CPU heat spreader. In most desktop builds, a pea-sized dot works well.
Mount the cooler evenly, tightening screws in a cross pattern if applicable. Reconnect the CPU fan or pump header, check cable routing, close the system, and boot into BIOS or your operating system to monitor temperatures.
If temperatures are unusually high after reassembly, shut the system down and check the cooler mount, thermal paste coverage, and fan or pump connection. A successful separation job is only a success if the CPU cools properly afterward.
Common Mistakes to Avoid
- Pulling straight up: This is the fastest way to bend pins or yank a CPU out of its socket.
- Using a metal screwdriver to pry: One slip can scratch surfaces or damage the processor package.
- Skipping fresh thermal paste: Once the cooler is removed, old paste should be cleaned off and replaced.
- Applying too much new paste: More is not better. Thermal paste is not peanut butter.
- Overheating the cooler: Warm it gently. You are softening paste, not smelting ore.
- Ignoring bent pins or socket damage: Reinstalling a damaged CPU can create bigger problems later.
When to Stop and Get Help
If the processor is delidded, if liquid metal was used, if the CPU has severe pin damage, or if the socket itself looks compromised, it may be smarter to stop and consult a professional repair technician. The same goes for laptops, mini PCs, and proprietary systems where access is tighter and the cooler design is less forgiving.
Sometimes the smartest DIY move is knowing when not to turn a recoverable problem into a collector’s item.
Real-World Experiences and Lessons From Stuck CPU Removals
One of the most common stories goes like this: someone upgrades a CPU cooler after two or three years, loosens the mounting hardware, gives the heatsink a tug, and suddenly the processor comes out attached to it like they were factory-built together. Panic follows. Usually there is a moment of silence, then a sentence that starts with, “Well, that’s not ideal.”
In many real-world cases, the biggest lesson is that the stuck processor itself is not the true disaster. The real damage happens in the next ten seconds when the person holding it decides to pull harder, twist wildly, or wedge in a metal tool because impatience feels productive. It is not. The people who walk away with working systems are usually the ones who stop, breathe, and switch from force to method.
Another common experience comes from builders working with older AMD systems. Because many PGA processors have pins on the chip instead of the socket, a cooler can lift the CPU out unexpectedly if the thermal paste has hardened enough. Some users report that they thought the cooler screws were still attached because the CPU came out so firmly bonded to the heatsink. In those cases, gentle warming and slow twisting usually solve the problem. The people who succeed rarely describe a dramatic “break.” They describe a tiny movement, then a little more, then a clean release.
There are also plenty of stories from people who thought they had fixed the issue, only to discover temperatures were terrible after reassembly. Why? Because they reused old paste, applied too much new paste, forgot to reconnect the CPU fan, or mounted the cooler unevenly. That part matters. A processor fused to a heatsink is only half the job. The second half is reinstalling everything correctly so the CPU cooler actually cools again instead of just sitting there looking helpful.
A lot of experienced builders also mention that warming the system first is the move they wish they had learned earlier. It sounds almost too simple, but it works. Old thermal paste softens with heat, and that slight softening changes the whole removal process. What felt glued down a minute ago may come free with a controlled twist once the paste is less brittle. In other words, sometimes the best tool is not stronger hands. It is better timing.
Then there is the emotional side of the repair, which is oddly consistent. People tend to assume a stuck CPU means they have already ruined something. Usually they have not. A processor bonded to a heatsink looks scary, but it is often recoverable if the pins are intact and the socket was not damaged. Many first-time builders are shocked to learn that their “catastrophic” mistake turned into a routine cleanup, a re-paste, and a perfectly normal boot on the next attempt.
The biggest takeaway from these experiences is simple: slow is smooth, and smooth is cheap. If you treat the job like a delicate mechanical separation instead of a tug-of-war, your odds improve dramatically. Warm the paste, support the chip, twist gently, clean thoroughly, and reinstall with care. That calm, boring method is exactly what saves hardware. And in PC repair, boring is often another word for successful.
Final Thoughts
If you need to know how to remove a processor fused to a heatsink, remember this: the safest fix is rarely the most dramatic one. Old thermal paste can make a CPU and cooler stick together like they signed a lease, but a little warmth, a gentle twist, and careful cleanup usually solve the problem without casualties.
Take your time, avoid prying, use fresh thermal paste, and double-check your cooler installation before powering back on. Your processor does not need heroics. It needs patience, decent lighting, and fewer impulsive decisions.