Table of Contents >> Show >> Hide
- Why Sealing Windows Matters for Energy Savings
- How to Tell Whether Your Windows Are Leaking Air
- Caulk vs. Weatherstripping: Use the Right Material in the Right Spot
- Tools and Materials You May Need
- How to Seal Windows Step by Step
- Best Upgrades if Basic Sealing Is Not Enough
- Common Mistakes to Avoid
- Don’t Forget Indoor Air Quality
- When to Seal Windows for the Best Results
- A Composite Homeowner Experience: What This Project Feels Like in Real Life
- Final Thoughts
If your house feels like it is secretly pen pals with the outdoors, your windows may be the problem. Drafty windows let conditioned air slip out and outdoor air sneak in, which forces your heating and cooling system to work overtime like an unpaid intern. The result is a home that feels less comfortable and an energy bill that arrives with the emotional impact of a jump scare.
The good news is that sealing windows is one of the most practical and affordable ways to cut energy waste without diving headfirst into a full-blown renovation. In many homes, a careful mix of caulk, weatherstripping, and a few smart upgrades can make rooms feel warmer in winter, cooler in summer, and quieter all year long. It is not glamorous work, but neither is paying more than you should every month.
This guide explains how to seal windows the right way, what materials to use, where homeowners often mess it up, and when sealing is enough versus when it is time to consider a bigger upgrade. If you are ready to stop heating the neighborhood, let’s get into it.
Why Sealing Windows Matters for Energy Savings
Windows affect your energy use in two big ways. First, air leaks around the frame, sash, trim, and joints let indoor air escape and outdoor air enter. Second, the glass itself can lose or gain heat. Sealing focuses mainly on the first issue: uncontrolled air movement. That is the part that makes a room feel drafty, uneven, and annoyingly expensive.
Even small leaks can add up. A narrow crack around a window may not look dramatic, but multiplied across several windows and several seasons, it becomes a steady drain on comfort and money. Sealing those gaps helps keep conditioned air where it belongs: inside your home, not on a world tour.
There is also a comfort bonus that people underestimate. Lower utility bills are great, but many homeowners first notice something simpler: the couch near the window is no longer freezing, the bedroom stops feeling windy, and the thermostat suddenly seems less dramatic. That is a win.
How to Tell Whether Your Windows Are Leaking Air
Before you start squeezing caulk into every crack that looks suspicious, figure out where the leaks actually are. A little detective work saves time, money, and the kind of DIY regret that ends with a scraper in one hand and bad decisions in the other.
Look for the obvious signs
- Noticeable drafts near the window
- Rooms that feel colder or hotter than the rest of the house
- Rattling sashes or loose panes
- Peeling or cracked old caulk
- Visible daylight around frames or trim
- Condensation, moisture stains, or signs of mold near the window area
Try a few simple leak tests
A paper test is a classic. Close the window on a piece of paper and try to pull it out. If it slides out easily, the seal is weak. Another method is the smoke or incense test. On a breezy day, hold smoke near the sash or frame and watch for movement. If the smoke bends or flickers, air is moving too. At night, a flashlight test can help reveal larger gaps if someone stands outside and looks for light escaping.
Check both the interior and exterior sides of the window. Leaks can show up in different places, and some of the most important gaps hide behind trim or where the frame meets the siding.
Caulk vs. Weatherstripping: Use the Right Material in the Right Spot
This is the part many homeowners get backward. Not every gap should be treated the same way.
Use caulk for stationary parts
Caulk is for areas that do not move. Think of the joints where the window frame meets the wall, trim, siding, or other fixed materials. If the gap stays still, caulk is usually your friend. It creates a flexible seal that blocks drafts and helps keep moisture out.
For most small gaps around window exteriors, a quality exterior-grade caulk works well. Indoors, paintable acrylic latex or siliconized acrylic caulk is often easier to work with and clean up. For outdoor areas exposed to weather, many homeowners prefer high-performance exterior sealants designed to flex with temperature changes.
Use weatherstripping for movable parts
If the window opens, closes, slides, or lifts, do not glue it shut with caulk unless your life goal is to create a permanent art installation. Use weatherstripping instead. It seals the moving joint while still allowing the window to operate.
Common weatherstripping types include:
- Foam tape: affordable and easy to install, good for small, uneven gaps
- V-strip: durable for double-hung or sliding windows
- Felt: inexpensive but usually less durable
- Rubber or vinyl: long-lasting and effective when properly fitted
Use backer rod or low-expansion foam for bigger gaps
If a gap is too wide for caulk alone, add foam backer rod first. This gives the caulk something to sit on and helps create a better seal. For hidden cavities around the frame, especially behind removable trim, low-expansion spray foam can help. The phrase “low-expansion” matters here. Regular expanding foam can bow window frames and turn a draft fix into a window repair project.
Tools and Materials You May Need
- Caulk gun
- Interior or exterior caulk
- Weatherstripping
- Backer rod
- Low-expansion spray foam
- Putty knife or scraper
- Utility knife or scissors
- Rags and mild cleaner
- Painter’s tape
- Gloves
- Hair dryer if using a window insulation film kit
You do not need a truckload of supplies. Most window-sealing jobs are simple enough for a weekend run to the hardware store and a modest amount of patience.
How to Seal Windows Step by Step
1. Inspect the window carefully
Open and close the window. Look for worn weatherstripping, cracked old caulk, loose trim, gaps at the sill, and places where the sash does not sit tightly. Check for rot or water damage. If the wood is deteriorated, sealing alone may not solve the problem.
2. Remove failing old material
Scrape away cracked or loose caulk. Pull off damaged weatherstripping. Clean dirt, dust, and old residue so the new materials will actually stick. This step is not exciting, but it is the difference between a durable fix and a decorative failure.
3. Clean and dry the surface
Caulk and adhesive-backed products bond best to clean, dry surfaces. Wash away grime, let everything dry completely, and avoid rushing this part. Wet surfaces and fresh sealants get along about as well as socks and puddles.
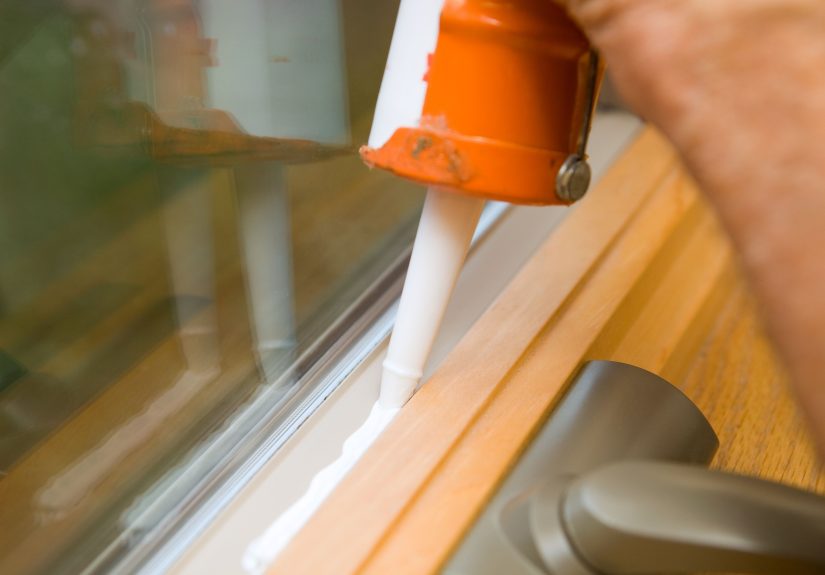
4. Apply caulk to fixed gaps
Run a continuous bead of caulk around the exterior perimeter where the frame meets the siding or trim. Indoors, seal small fixed gaps where trim meets wall or frame. Smooth the bead for a neat finish and full contact. Do not caulk weep holes or drainage paths on the exterior of the window, because those are there for a reason. Blocking them can trap water where you definitely do not want it.
5. Install weatherstripping on movable joints
Measure carefully and cut the material to fit. Apply it where the sash meets the frame or where moving parts create air gaps. Close the window after installation to test the fit. You want it snug, not impossible. If you need both hands, one knee, and a motivational speech to close the window, the weatherstripping is probably too thick.
6. Seal larger hidden gaps if needed
If trim can be removed without damage and you discover an open space between the window jamb and framing, fill it with backer rod plus caulk or use low-expansion foam. This area is often leakier than homeowners realize. Reinstall the trim once everything cures properly.
7. Consider temporary or seasonal add-ons
For older or especially drafty windows, interior insulation film kits can add a helpful extra barrier during cold weather. These kits are inexpensive and easy to install. Other options include removable caulk, rope caulk, or draft-blocking seals for seasonal use. They are not always pretty, but neither is losing warm air at full speed.
8. Check your work
After everything cures, repeat the paper or smoke test. You should notice less movement, a tighter close, and improved comfort. Sealing should feel practical, not mysterious.
Best Upgrades if Basic Sealing Is Not Enough
Sometimes caulk and weatherstripping are only part of the answer. If the windows are old, single-pane, or poorly performing overall, consider adding a few extra layers of defense.
Window insulation kits
Plastic film kits create an interior air barrier that can reduce drafts during cold months. They are usually one of the cheapest and fastest fixes for rental homes, old houses, or rooms that need immediate help.
Cellular shades or insulating curtains
Tightly fitted shades or heavy curtains can reduce heat loss in winter and unwanted solar heat gain in summer. They do not replace air sealing, but they can complement it beautifully.
Storm windows
If your primary windows are older but still serviceable, storm windows can deliver a major performance boost without the cost of full replacement. They help with air sealing, comfort, and noise reduction, and they make a lot of sense when replacement is not in the budget.
Full window replacement
If the frame is rotted, the sash will not operate properly, the glass seal has failed, or the window leaks despite repeated repairs, replacement may be the smarter long-term move. When shopping, compare energy labels such as U-factor and solar heat gain coefficient so you are not just buying something “new” instead of something “better.”
Common Mistakes to Avoid
- Using caulk on movable joints: this can prevent proper operation and fail quickly
- Skipping prep: dirt and loose material ruin adhesion
- Using the wrong foam: high-expansion foam can distort frames
- Ignoring moisture problems: leaks, condensation, and rot need attention before sealing
- Blocking drainage paths: windows need proper water management
- Sealing only indoors: some leaks start on the exterior side
- Assuming windows are the only issue: attics, doors, ducts, and basements can also drive energy loss
Don’t Forget Indoor Air Quality
A tighter home is usually more efficient and more comfortable, but sealing everything without thinking about ventilation can cause problems. Moisture, odors, and indoor pollutants need a path out. If your home already struggles with condensation, stale air, or humidity, treat those issues seriously while weatherizing.
In other words, yes, stop the drafts. But do not accidentally create a house that feels like a sealed leftovers container. Good air sealing and healthy ventilation are teammates, not enemies.
When to Seal Windows for the Best Results
Early fall and mild spring days are ideal because surfaces are easier to clean and most sealants cure better in moderate temperatures. That said, if your living room currently feels like a bus stop, you do not have to wait for perfect weather to improve it. Just check product directions for temperature and surface requirements.
A Composite Homeowner Experience: What This Project Feels Like in Real Life
Many homeowners go into a window-sealing project expecting something dramatic, like a movie montage with instant savings and triumphant thermostat music. Real life is a little less cinematic, but still satisfying. A common experience starts with one room that feels off. Maybe it is the guest bedroom that never warms up, or the corner by the sofa where everyone avoids sitting in January. You notice that the HVAC system keeps running, yet comfort never quite catches up. That is usually the moment when windows become suspects.
The first surprise is how often the problem is not the glass alone. People assume the entire window is “bad,” when the bigger culprit is often worn weatherstripping, cracked exterior caulk, or a hidden gap around the frame. Once those are fixed, the improvement can feel immediate. The room stops feeling drafty. The curtains stop moving slightly when nobody is near them. The temperature becomes more even, especially near the wall with the windows.
Another common experience is discovering that old houses have opinions. You pull off a bit of trim expecting a tiny gap and find a cavity large enough to make you rethink previous owners and their life choices. This is where patience matters. Homeowners who take the time to clean surfaces, choose the right materials, and work methodically usually report better long-term results than those who rush and try to seal everything with one miracle product.
There is also a learning curve. The first bead of caulk may look like it was applied during an earthquake. The first strip of weatherstripping may be too thick, making the window hard to close. That is normal. By the second or third window, most people get the hang of it. The project becomes less intimidating, and the payoff starts to feel real.
What homeowners often appreciate most is not just the utility savings, but the change in how the home feels. Bedrooms become easier to sleep in because temperatures stay steadier overnight. Living rooms feel less drafty during storms. Air conditioners and furnaces seem to cycle more reasonably instead of acting like they are auditioning for an action movie. The house gets quieter too, which is a nice bonus if your windows face a busy street.
People also learn that sealing windows is not a magic trick. If the attic is under-insulated, the door sweeps are shot, or the ductwork leaks, window sealing will help, but it will not solve every comfort complaint. Still, it is one of the most approachable upgrades because the cost is manageable, the tools are basic, and the results are noticeable.
In the end, the experience tends to be less about one heroic repair and more about a smart series of small fixes. Seal a few windows well, and the whole house starts behaving better. That is the kind of boring, practical victory homeowners grow to love.
Final Thoughts
If you want to save on your energy bill, sealing windows is one of the best low-cost places to start. It tackles a common source of wasted energy, improves comfort quickly, and does not require a massive remodel. The key is matching the material to the problem: caulk for fixed gaps, weatherstripping for moving parts, backer rod or low-expansion foam for larger openings, and smart add-ons when basic sealing is not enough.
You do not need perfect windows to get meaningful results. You just need less unwanted air movement, better attention to detail, and a willingness to spend a weekend making your house less drafty and less expensive to run. That is not flashy, but your future utility bill may write you a thank-you note.