Table of Contents >> Show >> Hide
- Start With the Room, Not the Shopping Cart
- Pick the System That Fits Your Space and Budget
- Speaker Placement: This Is Where the Magic Happens
- Connections and Setup: Keep It Simple and Correct
- Calibration: The Part Most People Skip and Then Regret
- Do Not Ignore Room Acoustics
- Two Realistic Setup Examples
- Common Mistakes to Avoid
- Final Thoughts
- Field Notes: Real Experiences From Setting Up Home Theater Systems
Setting up a home theater system sounds easy right up until you’re standing in your living room holding three remotes, one HDMI cable of suspicious origin, and a center speaker that suddenly seems the size of a carry-on suitcase. The good news is that a great home theater is not reserved for people with velvet walls, a popcorn machine, and a mortgage-sized speaker budget. A smart setup can turn an ordinary room into a genuinely cinematic space, whether you’re building around a TV, a projector, a soundbar, or a full surround system with enough channels to make your ceiling feel employed.
The trick is to stop thinking like a shopper and start thinking like a planner. A home theater system is not just a pile of gadgets with strong opinions. It is a room, a screen, speakers, seating, wiring, and calibration all working together. Get the basics right and even modest gear can sound fantastic. Get them wrong and even expensive gear can sound like a blockbuster being played from inside a laundry basket.
Start With the Room, Not the Shopping Cart
Before buying anything, study the room. Measure the wall where the screen will go, the distance from screen to couch, the height of your seating, nearby windows, and the locations of outlets. This tells you whether your space is best suited for a TV, a projector, a soundbar, or a traditional receiver-and-speaker setup.
If the room gets a lot of daylight and you are not planning to darken it every time you watch a movie, a TV is usually the easier choice. Modern TVs handle ambient light much better than most projectors. If you can control the light and want the biggest image possible, a projector becomes much more tempting. That is where the “cinema” part of home theater starts flexing a little.
Choose the Right Display Size
Bigger is usually better, but “bigger” should still make sense for your viewing distance. A practical rule for mixed TV and movie use is to divide your viewing distance in inches by 1.6 to estimate a comfortable screen size. If your sofa is about 10 feet away, that is 120 inches divided by 1.6, which lands around a 75-inch screen. Conveniently, that is also the point where a lot of people suddenly realize their old 55-inch TV has been living a very safe, very underachieving life.
Screen height matters too. You do not want to watch a three-hour movie with your chin tilted upward like you are admiring cathedral art. The center of the screen should be close to your natural seated sightline. In plain English: do not mount the TV halfway to the ceiling unless your couch is actually a bunk bed.
TV or Projector?
A TV is simpler, brighter, and easier to live with day to day. A projector shines when you want a huge image and can control the room lighting. In small and medium rooms, a 65- to 85-inch TV is often the sweet spot. In a dedicated movie room, a projector with a 100- to 120-inch screen can feel spectacular. If you go projector, plan the throw distance, screen size, screen height, and cable run before drilling anything. The projector should be positioned square to the screen, not cockeyed like it gave up halfway through geometry class.
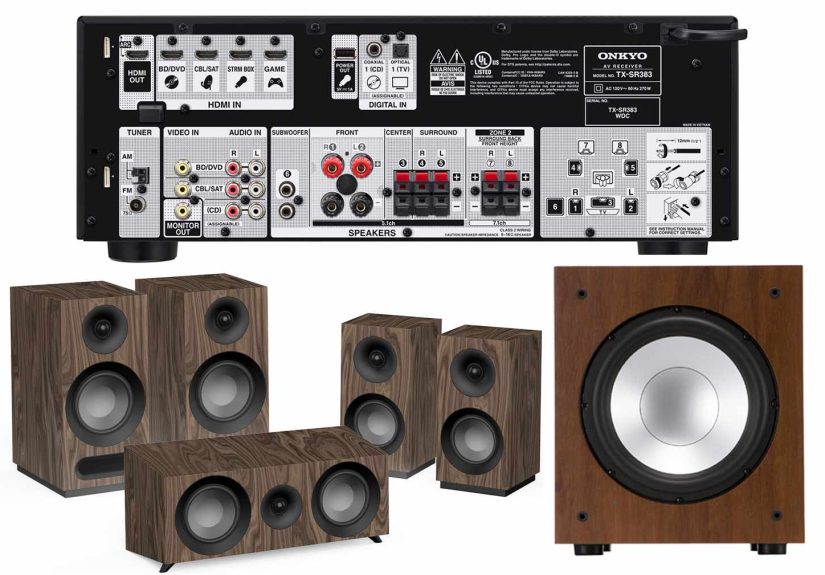
Pick the System That Fits Your Space and Budget
Not every room needs a 7.1.4 Dolby Atmos build. Sometimes a clean 3.1 setup will beat a sloppy surround system every day of the week. The goal is not maximum complexity. The goal is maximum enjoyment with the least drama.
What the Numbers Mean
- 2.1 = left speaker, right speaker, and subwoofer.
- 3.1 = left, center, right, plus subwoofer.
- 5.1 = three front speakers, two surrounds, and one subwoofer.
- 7.1 = 5.1 plus two rear surround speakers.
- 5.1.2 = 5.1 plus two height or overhead speakers for Dolby Atmos.
- 5.1.4 or 7.1.4 = more height channels for stronger overhead effects.
For many living rooms, 3.1 is the smartest starting point because it dramatically improves dialogue and bass without demanding extra speaker stands behind the couch. If you want a true movie experience, 5.1 is the standard layout that makes films feel spacious and cinematic. If the room is large and your seating is far from the back wall, 7.1 can add smoother rear effects. If you love immersive audio and your receiver and content support it, 5.1.2 is a terrific upgrade path into Atmos.
Soundbar vs. Separate Speakers
A soundbar is easier, cleaner, and less intimidating. A receiver with separate speakers is more flexible, more upgradeable, and usually more convincing for true surround sound. A good soundbar can absolutely improve TV sound, especially for dialogue. But if you want real front-stage width, stronger separation, and the ability to grow over time, separate speakers with an AV receiver still win the long game.
The honest answer is this: choose the system you will actually set up correctly. An elegant 3.1 system you finish this weekend is better than an ambitious 7.1 setup that spends six months in cardboard.
Speaker Placement: This Is Where the Magic Happens
Speaker placement matters so much that it can make average speakers sound surprisingly good and expensive speakers sound weirdly disappointing. Placement is not glamorous, but neither is flossing, and both are worth doing properly.
Front Left and Right Speakers
Your front left and right speakers should form a wide stage with the main seat. A strong rule of thumb is to place them at ear height and angle them slightly toward the listening position. If possible, keep them an equal distance from the main seat. Give them some breathing room from corners and side walls, because cramming them into room boundaries can hurt imaging and make the sound feel thick or smeared.
If you are using bookshelf speakers, stands are not optional décor. They are how those speakers stop sounding like they are performing from knee level.
The Center Channel
The center speaker handles dialogue, which means it is the MVP of movie night. Put it directly above or below the TV, centered on the screen. If it sits below ear level, angle it upward toward the listeners. This one change can do wonders for dialogue clarity.
Avoid burying the center speaker deep in a cabinet cubby. That is how you end up blaming the movie mix when the real culprit is a wooden resonance chamber you built into your furniture.
Surround Speakers
In a 5.1 system, surround speakers usually work best to the sides and slightly behind the main seating position. They should not be jammed directly behind your head like the world’s most aggressive whisperers. A little height helps too. In many rooms, placing surround speakers somewhat above ear level creates a more spacious effect, especially when multiple people are watching.
In a 7.1 system, the extra rear speakers go behind the listening area. These help close the gap in larger rooms and make motion effects feel smoother.
Atmos and Height Speakers
If you are building a 5.1.2 Atmos setup, the height speakers or in-ceiling speakers are usually placed slightly in front of the main seat. If you add four height speakers in a 5.1.4 system, use one pair in front of the listeners and one pair behind. The point is not to merely add more speakers. The point is to create a convincing overhead layer so rain, aircraft, and ambient effects feel like they exist in three-dimensional space instead of just “somewhere near the TV.”
If cutting into the ceiling sounds like a terrible weekend, Atmos-enabled upward-firing speakers can be a more practical option, though they are more room-dependent and generally perform best with flat, reflective ceilings.
Subwoofer Placement
The subwoofer is the most likely speaker to start family arguments with the floor. Start by placing it near the front wall, ideally close to the front speakers. Corner placement can increase output, which is great if you want more bass, but it can also make the bass sound bloated or one-note. If the sub is ported, give it some breathing room from the wall so the port is not obstructed.
If the bass sounds boomy in one seat and nearly disappears in another, that is not your imagination. Rooms can create peaks and dips in low frequencies. This is why people talk about the “subwoofer crawl,” which sounds ridiculous until it works. Put the sub temporarily at the main seat, play bass-heavy content, then walk around the room to find where the bass sounds smoothest. That spot is often a better location for the sub.
Connections and Setup: Keep It Simple and Correct
Use HDMI ARC or eARC When You Can
If you are connecting a TV to a receiver or soundbar, use the HDMI port labeled ARC or eARC. This lets the TV send sound back to the audio system through one cable. eARC is better because it supports higher-bandwidth audio formats, including advanced surround formats such as Dolby Atmos and DTS:X, when the rest of your equipment supports them.
Use certified HDMI cables, connect the TV’s ARC/eARC port to the receiver or soundbar’s ARC/eARC port, and then make sure the TV audio settings are configured to send audio to the external system. If there is no sound, double-check the ports, enable HDMI-CEC if required, and make sure the devices agree on who is in charge. Electronics are very particular roommates.
Connect Sources the Smart Way
If you have an AV receiver, connect your streaming box, Blu-ray player, and game console to the receiver first, then run a single HDMI cable from the receiver to the TV. This allows the receiver to handle audio decoding and switching. If you are using a soundbar instead of a receiver, connection options vary, but the same rule applies: keep the signal path simple and use HDMI whenever possible.
Receiver Settings That Matter
Once everything is connected, name your inputs clearly, confirm the speaker layout in the receiver menu, and set all speakers to the correct configuration. Many systems also ask whether you have height speakers, surround backs, or one or two subwoofers. Be accurate here. This is not the moment for optimism.
For speaker size settings, many home theaters perform best with speakers set to Small so bass can be redirected to the subwoofer. A common crossover point is 80Hz, though small speakers may need a higher crossover and larger speakers may tolerate lower settings. If your receiver includes automatic room correction such as Audyssey or YPAO, use it. It checks wiring, speaker distances, levels, and often improves bass integration dramatically.
Calibration: The Part Most People Skip and Then Regret
Automatic calibration is not a gimmick. It is the grown-up part of the setup process that makes the whole system behave like a team. Use the included microphone, place it at seated ear height at the main listening position, and follow the on-screen instructions. Some systems ask for multiple measurement positions. Do them. Yes, all of them. This is not the time to become “good enough” personified.
Before running calibration, set the subwoofer sensibly. On many systems, if the sub has no direct mode, start with the volume around the middle and set the crossover on the sub itself to maximum or bypass, so the receiver controls bass management. After calibration, listen to familiar content and make only small adjustments. If dialogue still seems soft, a modest center-channel level bump is often better than turning the entire system louder.
Do Not Ignore Room Acoustics
Even the best gear sounds worse in a harsh room full of glass, bare floors, and echo. Sound does not care how much your speakers cost. It will still bounce off windows like it paid rent there.
The easiest acoustic improvements are wonderfully unsexy: area rugs, curtains, upholstered furniture, wall hangings, and bookshelves. These help reduce reflections and make the room sound more controlled. If you want to go further, acoustic panels at the first reflection points and bass traps in corners can tighten things up even more. Multiple subwoofers can also smooth bass across more seats, which is why serious home theater fans tend to start with “just one sub” and end up negotiating for a second.
Two Realistic Setup Examples
Example 1: The Everyday Living Room Theater
You have a 12-by-15-foot room, seating about 9 to 10 feet from the screen, moderate daylight, and no desire to run cables through walls right now. A 75-inch TV paired with a 3.1 or 5.1 system makes a lot of sense. Put the center below the TV, use bookshelf speakers on stands for the front left and right, and add a compact sub near the front wall. If you want simpler installation, a quality soundbar with a sub and rear speakers can also work well.
Example 2: The Dedicated Movie Room
You have light control, a rectangular room, and one main seating row. This is where a projector with a 100- to 120-inch screen and a 5.1.2 or 5.1.4 Atmos system starts to feel glorious. Use an AV receiver, place the front stage carefully, add overhead speakers, and spend extra time on calibration and acoustics. This is where little details pay off in a big way.
Common Mistakes to Avoid
- Mounting the TV too high.
- Putting the center speaker inside a resonant cabinet.
- Skipping the subwoofer because “the towers have enough bass.”
- Buying too many channels for a room that cannot support them.
- Ignoring ARC/eARC settings and blaming the HDMI cable.
- Running no calibration, then wondering why the bass sounds like weather.
- Choosing gear before measuring the room.
Final Thoughts
A great home theater system is not about chasing the most expensive box with the most logos. It is about matching the display to the room, choosing the right speaker layout, placing everything with intention, and then calibrating the system so it all works together. The best setups feel effortless once they are done. The dialogue is clear, the bass is deep without being sloppy, and the room disappears when the movie starts.
That is really the goal: not a room full of gear, but a room that lets stories land. When your setup is right, you stop noticing the speakers, the wires, and the menus. You just hit play and grin like an overqualified raccoon who finally got into the premium snack cabinet.
Field Notes: Real Experiences From Setting Up Home Theater Systems
The funny thing about home theater is that almost everyone learns the same lessons, just in slightly different socks. One person buys a gigantic TV before checking whether it will fit between two windows. Another spends a fortune on speakers, then places the center channel behind a decorative lattice because “it looks cleaner.” Someone else decides the subwoofer sounds best exactly where the dog bed used to be, which becomes a surprisingly political family issue. Home theater is part technology, part acoustics, and part domestic diplomacy.
One of the most common experiences is the immediate shock of hearing a proper center speaker for the first time. People go from constantly raising the volume during dialogue and lowering it during action scenes to suddenly hearing every line clearly. It feels like a magic trick, but it is really just what happens when the system stops asking the left and right speakers to do everything. This is why so many first-time builders say a 3.1 system felt like a bigger upgrade than they expected. It is not flashy. It is just smarter.
Another universal experience is wrestling with subwoofer placement. On paper, it seems simple: put the sub somewhere near the TV and enjoy explosions. In real life, one corner makes the bass sound huge but messy, another spot makes it sound weak, and one bizarre location near a side wall suddenly makes everything click. That moment teaches a useful truth: rooms shape bass as much as the subwoofer itself. People often assume bad bass means they need a more expensive sub. Sometimes they just need to move the one they already own three feet to the left.
There is also the first time someone runs room correction and realizes the receiver is not just doing nerd theater. Distances get corrected. Speaker levels even out. The sub blends better. The soundstage tightens. It is the home audio equivalent of getting prescription glasses and discovering leaves actually have edges. Many setups sound “pretty good” before calibration and “why did I wait so long?” afterward.
Living rooms add their own real-world lessons. Open floor plans can leak bass and make surround placement awkward. Hard floors make rooms sound lively in all the wrong ways. A giant coffee table can reflect more sound than you expect. Thick curtains, rugs, and a little furniture rearranging often help more than people think. The best home theaters are not always the most expensive ones. They are often the rooms where someone paid attention to the boring details and refused to let the center channel live inside a wooden echo chamber.
Then there is the emotional part, which is honestly the best reason to do any of this. The first movie night after a proper setup feels different. Dialogue locks to the screen. Rain falls from above in an Atmos mix. A soundtrack swells and the room suddenly feels larger than it is. People stop checking their phones. Even familiar movies feel refreshed because you are hearing details that used to get buried. That is the moment when a home theater stops being a project and becomes a place. Not a gadget shrine. Not a cable museum. Just a space where sports feel more alive, games feel bigger, and movies finally get the kind of presentation they have been begging for since the day your old TV speakers started sounding like a toaster with anxiety.