Table of Contents >> Show >> Hide
- First, the quick reality check (so you don’t waste 20 minutes)
- Method 1: Add a GIF in Instagram Stories (the built-in GIF sticker way)
- Method 2: Post a GIF to your Feed (or Reels) by converting it to an MP4
- Method 3: Make a “GIF-like” loop with Boomerang (or Live Photo loop vibes)
- Method 4: Use GIFs in Comments and DMs (the “quick reaction” method)
- Troubleshooting: When Instagram fights your GIF (and how to win)
- Which method should you use? A tiny decision guide
- Conclusion
- Field Notes: Real-World Experiences Using These 4 Methods (and what people actually run into)
You’ve got the perfect GIF: funny, dramatic, and just chaotic enough to deserve a spot on your Instagram.
Then Instagram hits you with the digital equivalent of “That’s nice, dear,” and your GIF either won’t upload
the way you wantor it shows up as a sad, frozen still image.
The good news: you can absolutely share GIFs on Instagram. The “secret” is that Instagram treats GIFs differently
depending on where you’re posting. Sometimes you add them as stickers (easy). Other times you convert them
into a video file (also easyjust one extra step). And if you want your own custom GIF to show up in Instagram’s
search, there’s a clean path for that, too.
First, the quick reality check (so you don’t waste 20 minutes)
Instagram doesn’t reliably handle a raw .gif file as an animated post in your feed. If you upload a GIF file
directly, it may appear as a still image instead of playing. That’s why most “GIF on Instagram” methods either:
- Use Instagram’s built-in GIF sticker search (powered through GIF libraries like GIPHY) for Stories/Reels, or
- Convert the GIF into an MP4 video so Instagram treats it like any other Reel/video post.
Think of it like this: Instagram loves videos, tolerates GIFs, and sometimes side-eyes them like they just walked in wearing Crocs.
Let’s get your GIF posted anyway.
Method 1: Add a GIF in Instagram Stories (the built-in GIF sticker way)
If your goal is “I want an animated GIF on Instagram right now,” Stories is the fastest route. Instagram Stories
include a GIF option in the sticker tray, letting you search and place GIFs directly on top of a photo or video background.
Step-by-step
- Open Instagram and tap + (or swipe right) to create a Story.
- Take a photo/video or choose one from your camera roll.
- Tap the Sticker icon (usually a smiley square).
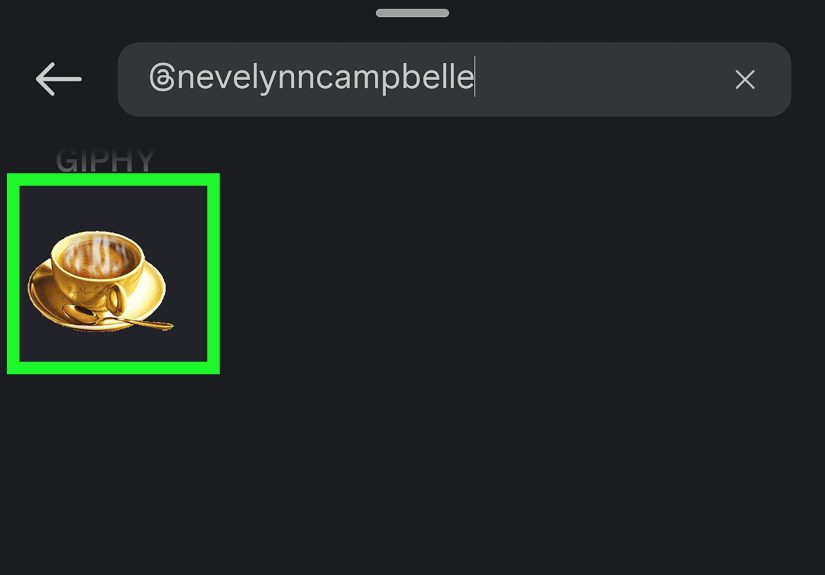
- Tap GIF.
- Search for what you want (e.g., “LOL,” “coffee,” “applause,” “subscribe,” “sale”).
- Tap a GIF to add it, then resize/rotate/drag it into place.
- Post to Your Story (or Close Friends).
Story GIF pro tips (the difference between “cute” and “clean”)
- Use specific search terms: “neon arrow,” “tap here,” “sparkle,” “new post,” “sale,” “link,” “review.” More specific = less scrolling.
- Layer with intention: One GIF can look polished; five can look like your Story fell down a sticker aisle.
- Boost readability: Place GIFs where they don’t cover faces, captions, or the link sticker.
- Brand look: If your account has a style, search for GIFs that match (minimal, pastel, bold, etc.).
Method 2: Post a GIF to your Feed (or Reels) by converting it to an MP4
Want your GIF to live on your profile grid like a normal post? Convert it to a video first. This works because Instagram
happily accepts video formats like MP4/MOV for uploads, and your “GIF” becomes a short looping video.
Many creators post GIF-style content as Reels because Instagram treats most short vertical videos as Reels and gives them
better discovery than a standard feed post. Either way, the core workflow is the same: GIF → MP4 → upload.
Option A: Convert using the GIPHY app (quick and beginner-friendly)
- Open the GIPHY app and find the GIF you want (or upload your own GIF into your library/app workflow).
- Use the share/export option that creates an MP4 (often a short loop, commonly around 15 seconds depending on the tool/workflow).
- Save the MP4 to your camera roll/files.
- Open Instagram → tap + → choose Post or Reel → select the MP4.
- Edit, choose a cover, write a caption, and share.
Option B: Convert online with Adobe Express or Kapwing (great on desktop)
If your GIF lives on your computer (or you want more control), an online converter is convenient:
upload the GIF, export as MP4, then upload the MP4 to Instagram.
- Open a converter tool (for example, Adobe Express or Kapwing) and upload your GIF.
- Trim/crop if needed (shorter is usually cleaner).
- Export as MP4.
- Upload the MP4 to Instagram as a Reel/video post.
Make it look good on Instagram (not like it was faxed)
- Choose the right shape: For Reels, vertical 9:16 is the usual sweet spot; avoid awkward borders when possible.
- Keep motion smooth: Reels generally look best at standard modern frame rates (Instagram guidance commonly references minimum frame rate expectations for Reels).
- Use a strong cover: Pick a readable frame and add text if neededyour grid is basically a billboard.
- Respect file limits: If your upload fails, your file is probably too bigcompress, shorten, or reduce resolution.
Example: If you have a “3-step recipe” GIF, convert it to an MP4, crop to 9:16, and add a short caption like
“Save this for later 🍳” so it performs like a Reel instead of a random silent loop.
Method 3: Make a “GIF-like” loop with Boomerang (or Live Photo loop vibes)
If you don’t already have a GIF filebut you want that same looping energycreate a short looped clip in the Instagram ecosystem.
Boomerang-style clips (forward-and-back loops) are basically “GIF culture” without the actual GIF file.
When this method is perfect
- You want a loop of a moment you can capture quickly (cheers, outfit spin, unboxing reveal).
- You want a fun effect without hunting for the right GIF.
- You want something that looks native to Instagram.
Quick steps
- Create a Story or Reel and look for a Boomerang-style capture option/effect (availability can vary by app version and device).
- Record a short motion clip (keep it simple and readable).
- Preview the loop, then add text or stickers if you want.
- Share to Story or publish as a Reel depending on your goal.
Pro tip: Boomerang loops work best when the motion is obvious and repeats cleanlythink waving, pouring, flipping a sign,
opening a box, or tossing confetti. If it’s subtle, it just looks like your video is buffering.
Method 4: Use GIFs in Comments and DMs (the “quick reaction” method)
Not every GIF needs to be a full post. Sometimes you just want to drop a GIF like a mic in a comment thread or message.
Instagram supports sending GIFs/stickers in chats, and many users also have access to GIF comments for posts/Reels
(availability can vary by region/account/app version).
How to send a GIF in Instagram DMs
- Open your Instagram Messages.
- Select a conversation.
- Tap the GIF option (or sticker/GIF area depending on your interface).
- Search for a GIF, tap it, and send.
How to comment a GIF (if your account has the feature)
- Open a post or Reel and tap the comment icon.
- In the comment field, look for a GIF button.
- Search, select, and post your GIF comment.
This method is underrated for engagement: you can reply fast, add personality, and keep the conversation moving
without making your profile grid look like a reaction-GIF museum.
Troubleshooting: When Instagram fights your GIF (and how to win)
Problem: “My GIF uploaded, but it’s not moving.”
- If you uploaded a .gif as a feed post, it may display as a still. Use Method 2 (convert to MP4) instead.
- If it’s a Story sticker GIF, try searching a different term, updating the app, or switching networks (Wi-Fi vs. cellular).
Problem: “The GIF looks crunchy/blurry.”
- Start with a higher-quality GIF (tiny GIFs will look tiny forever).
- Convert carefully: some converters compress aggressivelytry a different tool or export setting.
- Keep text big: small text inside a GIF can turn into pixel soup once uploaded.
Problem: “My upload fails.”
- Shorten the clip (cut the loop down).
- Reduce resolution (still aim for crisp, but don’t upload a file the size of a feature film).
- Compress the MP4 and try again.
Problem: “It got cropped weird.”
- For Reels, use a vertical-friendly layout so important stuff isn’t near the edges.
- Preview the crop before posting and reposition if needed.
- If your GIF is wide, consider placing it on a blurred background so it fits a vertical frame cleanly.
Which method should you use? A tiny decision guide
- You want it fast and casual: Method 1 (Stories GIF sticker)
- You want it on your profile grid: Method 2 (Convert GIF → MP4 → upload)
- You’re capturing something in the moment: Method 3 (Boomerang-style loop)
- You’re reacting or engaging: Method 4 (GIFs in comments/DMs)
Conclusion
Uploading a GIF to Instagram is less “one button” and more “choose your route,” but once you know the rules,
it’s genuinely easy. If you’re posting to Stories, use the built-in GIF sticker and call it a day. If you want
your GIF to live on your grid, convert it to MP4 and upload it like a normal video. And if you want custom branded
GIFs that people can search and reuse, set yourself up with a proper sticker workflow.
The best part? Once you get comfortable with these four methods, you’ll stop thinking “How do I upload this?”
and start thinking “Which version will get the most saves, replies, and ‘where did you find that?!’ messages?”
Field Notes: Real-World Experiences Using These 4 Methods (and what people actually run into)
In real life, most “I can’t upload my GIF” problems aren’t user errorthey’re expectation errors. People assume
a GIF is a universal, magical format that every platform treats the same way. Then Instagram (a video-first app)
responds like, “Cool file! I will now display one single frame of it… forever.” The first time this happens,
creators usually try three more uploads, restart their phone, and briefly consider whether Mercury is in retrograde.
The fix is boringbut effective: convert it to MP4 and move on with your day.
The second most common experience is the quality surprise. A GIF that looks sharp in your camera roll can
look softer after conversion and uploadespecially if the original GIF was small or heavily compressed. When that
happens, people often blame Instagram, but the real culprit is usually the source file. A tiny 320px-wide meme GIF
will not become cinema just because you exported it. The practical workaround is to start with a higher-resolution
GIF (or recreate it from the original video), then export as MP4 with a clean crop. Even better: if the GIF includes
text, make sure that text is bold and large enough to survive compression.
Stories GIF stickers come with their own “field notes.” The usual experience is: you search a term like “arrow,”
find 800 arrows, and none of them match your vibe. Or the perfect one exists… but only if you search “neon pointer”
instead of “arrow.” People eventually learn a few go-to keywords (like “tap,” “link,” “sale,” “new post,” “sparkle,”
“minimal,” “aesthetic”) and suddenly GIF stickers feel effortless. Another common pattern is over-layeringbecause
stickers are fun. The Story starts as a simple photo, then becomes a sticker lasagna. The best-looking Stories
usually use one “hero” GIF and one supporting element (like a subtle sparkle), not twelve dancing hot dogs.
For brands and creators who want custom GIFs, the real-world experience tends to be: “We made them… why can’t we find
them in Instagram search?” The missing piece is almost always distribution. Making a GIF is step one; getting it into a
searchable sticker ecosystem is step two. People do best when they design stickers with transparent backgrounds,
choose clear tags/keywords, and keep the motion simple so it reads instantly on a phone. A good branded sticker is
usually not a full sceneit’s a punchy accent: a logo wink, a cute “NEW,” a tiny sparkle in brand colors.
Finally, GIF comments and DMs are where people discover the “low effort, high personality” win. A lot of users try
to force GIFs into posts when what they really want is a reaction. Dropping a GIF in a comment thread can be the
difference between “nice post” and “I am emotionally invested in this conversation.” The most effective habit is to
keep a short list of your favorite reaction searches (like “clap,” “mind blown,” “this,” “chef’s kiss,” “deal,”
“sending love”) so you can respond quickly without doom-scrolling the GIF library for ten minutes.
Bottom line: once you experience each method a couple times, you’ll naturally use the right tool for the right job.
Stories for quick flair, MP4 conversion for permanent grid content, Boomerang-style loops for “in the moment” fun,
and GIF comments/DMs for instant personality. After that, Instagram stops feeling pickyand starts feeling like it’s
giving you four different stages to perform on. Use the one that matches your goal, and your GIF will finally get
the spotlight it deserves.