Table of Contents >> Show >> Hide
- Why Use a Mandoline Slicer?
- Mandoline Anatomy: Know Your Parts Before You Start
- Pre-Flight Safety Checklist (Do This Every Time)
- How to Use a Mandoline Slicer: Step-by-Step
- The Finger-Saving Rules (a.k.a. Mandoline Commandments)
- Common Cuts (and Exactly When to Use Them)
- Best Foods for a Mandoline (and When to Use a Knife Instead)
- Troubleshooting: Fix the Annoying Stuff Fast
- Cleaning a Mandoline Safely (Without Turning Dishwashing into a Stunt)
- Maintenance: Sharp, Stable Tools Are Safer Tools
- Quick, Specific Examples: What to Slice on a Mandoline Tonight
- Conclusion: Respect the Blade, Enjoy the Speed
- Extra: Real-Life Mandoline Experiences (So You Don’t Have to Learn the Hard Way)
A mandoline slicer is basically a tiny, tabletop superhero: it turns “ugh, I have to slice 3 onions” into
“wow, I just made restaurant-thin slices in 30 seconds.” It’s also famously dramatic. Treat it with respect,
and it rewards you with perfect potato gratin layers, whisper-thin cucumbers, and matchstick carrots that look
like they graduated from culinary school. Treat it like a toy, and it will try to collect a “finger tax.”
This guide covers how to use a mandoline slicer safely and confidently, with step-by-step technique, real-world
examples, and the safety habits that keep your hands fully intact. (Yes, all of them. Even the pinky.)
Why Use a Mandoline Slicer?
A mandoline slicer is made for speed and consistency. With a knife, you can absolutely make thin slices
but it takes time and practice to make them even. Mandolines excel at:
- Uniform thickness: helps food cook evenly (hello, potato chips and gratins).
- Very thin slices: great for shaved salads, pickles, and quick marinating.
- Julienne cuts: matchsticks for fries, slaws, stir-fries, and garnishes.
- Efficiency: big-batch prep without the “my wrist is filing a complaint” feeling.
Mandoline Anatomy: Know Your Parts Before You Start
Mandolines come in different styles (handheld, V-blade, flat-blade, “safe-slice” enclosed designs), but most have
the same core components:
- Slicing surface/runway: the flat plane where food glides.
- Main blade: the sharp edge that does the slicing (and the scaring).
- Thickness adjuster: a knob, lever, or dial that changes slice thickness.
- Julienne blades/teeth: optional inserts for matchsticks.
- Hand guard/food holder: a grip with spikes or prongs that holds the food.
- Feet/stand: non-slip base or folding stand to stabilize the tool.
Pre-Flight Safety Checklist (Do This Every Time)
1) Stabilize everything
A mandoline needs a firm, non-slip setup. Place it on a cutting board or sheet pan, and keep it from skating
around. If your mandoline doesn’t have a grippy base, set a damp kitchen towel or non-slip mat underneath the
board. Your goal is “stays put even if I sneeze.”
2) Choose your thickness (start thicker than you think)
Beginners do best with medium slices. Paper-thin is cool, but it’s also where people start rushing. Start with
a thicker setting, get comfortable with the motion, then move thinner once you’re steady.
3) Prep the food so it behaves
Most slicing disasters happen because the ingredient is rolling, wobbling, or too small to hold safely.
Fix that before the blade gets involved:
- Wash and dry produce so it doesn’t slip.
- Trim a flat side on round items (cucumber, potato, apple) so they don’t roll.
- Cut oversized items to fit the runway or safety chute.
- Peel when helpful (some skins snag on certain blades/settings).
4) Pick your safety tool: guard, glove, or both
The hand guard exists for a reason. Use it. If the guard feels awkward (some do), add a
cut-resistant glove to your “I like having fingers” toolkitespecially when slicing
small or slippery foods. If you’re a teen or new to mandolines, having a grown-up show you the first time is a
smart move.
How to Use a Mandoline Slicer: Step-by-Step
Step 1: Set the mandoline at a safe angle
If it’s a standing mandoline, rest it so the bottom is stable and the runway slopes down toward your cutting
board. If it’s handheld, brace it firmly on a board (not mid-airno need to add “juggling” to this hobby).
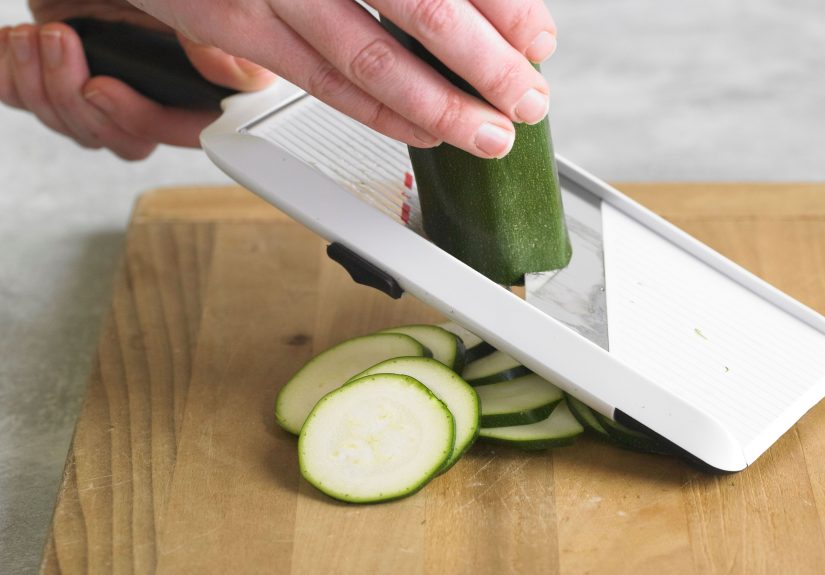
Step 2: Grip the food with the hand guard
Press the food into the spikes/prongs so it doesn’t slide around. Keep your hand centered over the guardnot
hanging off the edges like a “danger flag.”
Step 3: Slice with steady, even strokes
Use smooth back-and-forth or forward strokes (depending on your model). Let the blade do the work. Don’t smash
the food down with all your strengthcontrol beats speed every time.
Step 4: Stop before the “last nub” becomes a problem
When the ingredient gets too small to hold safely, stop. Save the remaining piece for the knife, toss it into a
stock bag, or snack on it. The mandoline doesn’t need you to “finish strong.” It needs you to finish with fingers.
The Finger-Saving Rules (a.k.a. Mandoline Commandments)
- Always use the hand guard or a cut-resistant glove (ideally both when you’re learning).
- Go slow near the end and quit earlyno heroics with tiny pieces.
- Keep your attention on the blade (no texting, no turning to answer a question mid-slice).
- Sharp is safer than dull: dull blades snag and cause slips.
- Don’t put it in the sink “for later.” Wash it immediately and intentionally.
- Store it safely with the blade covered/locked so you don’t grab a surprise edge.
One more glove note: cut-resistant gloves are made for cuts, not heat. They are not oven mitts, and your future
self will appreciate you remembering that.
Common Cuts (and Exactly When to Use Them)
Thin rounds: chips, salads, pickles
Use thin slices for potato chips, radish salads, shaved cucumber salads, and quick pickles. Thin slices absorb
dressing and brine faster, so flavors show up sooner.
Medium slices: gratins, stir-fries, roasting
Medium slices are your best everyday setting. They hold their shape, cook evenly, and don’t turn into floppy
mystery ribbons.
Julienne: matchsticks for fries and slaws
Swap in the julienne attachment for French-fry-style potatoes, carrots for slaw, or crisp apple matchsticks for
salads. Pro tip: slice a flat side first so the ingredient doesn’t wobble while you julienne.
Specialty cuts: crinkle or waffle (if your model supports it)
Some mandolines do crinkle/waffle cuts with a special blade and a rotate-and-slice technique. These cuts are
fun, but learn basic slicing firstwaffle fries are not worth graduating early into “advanced danger.”
Best Foods for a Mandoline (and When to Use a Knife Instead)
Mandoline-friendly foods
- Potatoes: chips, gratins, rosti, scalloped potatoes
- Cucumbers & zucchini: shaved salads, quick pickles
- Onions: even slices for caramelizing or burgers
- Radishes: paper-thin crunch for tacos and salads
- Fennel: shaved fennel salad (restaurant vibes at home)
- Apples & pears: thin fruit for tarts and salads
- Cabbage: fast, even slaw (especially with a wider mandoline)
Knife is smarter for these situations
- Very soft, overripe produce that collapses instead of slicing cleanly.
- Odd shapes you can’t stabilize safely.
- Very small items that are basically “finger traps” on a mandoline.
- Anything you’re nervous about (confidence matters with sharp tools).
Troubleshooting: Fix the Annoying Stuff Fast
Problem: Uneven slices
- Cause: food wobbling or rolling.
- Fix: cut a flat side first; keep consistent pressure; stabilize the tool and board.
Problem: Food gets stuck or tears
- Cause: blade is dull, setting is too thin for the ingredient, or the food is too soft.
- Fix: go slightly thicker; check blade sharpness; use firmer produce; slice with smoother strokes.
Problem: The mandoline slides around
- Cause: not enough grip underneath.
- Fix: damp towel/non-slip mat; use a sheet pan rim to “catch” the mandoline; keep the angle stable.
Cleaning a Mandoline Safely (Without Turning Dishwashing into a Stunt)
Cleaning is where a lot of people get careless, because the slicing is done and the brain goes,
“Yay, we survived!” Don’t let your guard down.
- Wash it right away. Dried-on starch and veggie bits make cleaning harder and riskier.
- Never drop it in a sink full of soapy water. That’s how hands meet hidden blades.
- Disassemble carefully (follow your model’s instructions) and keep fingers away from the cutting edge.
- Use a brush or sponge that keeps your fingertips at a distance from the blade.
- Dry thoroughly before storage to prevent rust and keep it performing well.
- Store with the blade covered or locked so it can’t surprise-grab you later.
Maintenance: Sharp, Stable Tools Are Safer Tools
If your mandoline is snagging, slipping, or needing extra force, treat that as a warning sign. Many models have
replaceable blades. If yours feels unstable, warped, or dull from heavy use, replacing parts (or the tool) is a
practical safety upgradenot kitchen drama.
Quick, Specific Examples: What to Slice on a Mandoline Tonight
- 5-minute shaved cucumber salad: thin cucumber + salt + rice vinegar + sesame oil + chili crunch.
- Potato gratin shortcut: mandoline potatoes + cream + garlic + cheese; bake until bubbly.
- Better slaw in minutes: cabbage + carrots + thin onion slices; toss with your favorite dressing.
- Apple fennel salad: shaved fennel + thin apple + lemon + olive oil + flaky salt.
- Homemade chips: thin potatoes, rinse and dry, bake or fry (carefully) until crisp.
Conclusion: Respect the Blade, Enjoy the Speed
A mandoline slicer is one of the fastest ways to upgrade your home cookingbecause uniform slices make everything
look better, cook better, and taste more consistent. The secret isn’t bravery. It’s boring, repeatable safety:
stabilize the tool, use the guard (and a cut-resistant glove if you can), slice with steady control, stop before
the last nub gets sketchy, and clean it immediately with full attention.
Do that, and your mandoline becomes less “kitchen horror story” and more “why didn’t I do this sooner?”
Your salads get prettier, your gratins get more even, and your fingers stay exactly where they belong: attached.
Extra: Real-Life Mandoline Experiences (So You Don’t Have to Learn the Hard Way)
Here’s the honest truth about mandolines: everyone starts out thinking the danger is exaggerated, because the first
few slices go fine. That’s the mandoline’s favorite trickmaking you feel safe right before you get confident.
Confidence is great. Overconfidence is how you end up inventing new words while searching for bandages.
The first time I used a mandoline for a big batch of potatoes, I learned the “flat side” lesson in under 30 seconds.
A whole potato rolls like it’s training for the Olympic gymnastics team. Once I sliced a thin strip off one side,
it suddenly behaved like a respectful citizen. From that day on, I treat “make it stable” like the opening act
before the slicing concert begins.
Next came the hand guard phase. Some guards feel clunky. The spikes don’t always grab, and certain vegetables
(hello, zucchini) can squirm away like they’re late for a meeting. The temptation is to “just hold it with my hand
for a second.” That sentence is the start of every cautionary tale. When a guard doesn’t grip, I either reposition
the food (cut a flatter surface, trim it shorter) or bring in the cut-resistant glove. The glove doesn’t make you
invincible, but it dramatically improves the odds that a mistake stays a mistake and doesn’t become a story.
One of the biggest “aha” moments is realizing that speed is not the goalrhythm is. The best mandoline users
don’t look frantic; they look calm. A steady pace keeps your strokes predictable, keeps the food aligned, and keeps
your brain engaged. The second you start racing because you’re “almost done,” you’re in the danger zone. The mandoline
loves “almost done.” “Almost done” is where the last nub appears, your grip changes, and your hand creeps closer to
the blade.
Speaking of the last nub: the most practical habit I ever adopted is the “quit early” rule. If there’s a small
leftover piece, I don’t treat it like wasted food. I treat it like a bonus snack, a stir-fry add-in, or a future
soup ingredient. The mandoline doesn’t need that final half-inch of cucumber sliced into perfect coins. A knife can
handle it safely, or you can toss it into the bowl and move on with your lifestill fully able to text, high-five,
and open jars.
Cleaning also teaches respect. After a long prep session, it’s easy to leave tools “to soak.” Mandolines do not soak.
They do not lounge in the sink like they’re on vacation. A sink is where visibility disappears, and hidden blades
become a surprise. The best habit is simple: wash it immediately, on purpose, with your eyes open, using a brush and
keeping fingers away from the edge. It takes two minutes, and it prevents the kind of “oops” nobody wants.
Finally, there’s the confidence payoff. Once you’re using the guard or glove automatically, the mandoline stops
feeling scary and starts feeling powerful. You begin reaching for it to level up everyday mealsthin onions for a
burger night, shaved cabbage for tacos, crisp cucumber ribbons for a salad that suddenly looks fancy. The tool didn’t
change. Your habits did. And that’s the whole game: the safest mandoline user isn’t fearlessthey’re consistent.