Table of Contents >> Show >> Hide
- What “Usable Art” Really Means
- Why Turning “Junk” Into Functional Art Is a Power Move
- The 14 Transformations (14 Pics Worth of Ideas)
- Pic #1: A Ladder Becomes a Leaning Shelf (That Doesn’t Scream “Basement”)
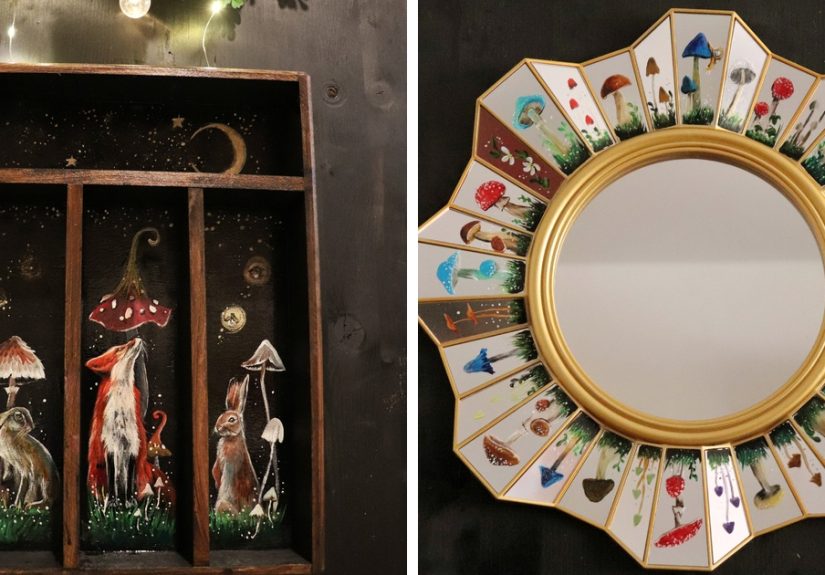
- Pic #2: A Drawer Turns Into a Floating Shadow-Box Shelf
- Pic #3: Mason Jars Become a Clean, Modern Vanity Organizer
- Pic #4: Old Jeans Become a No-Embarrassment Tote Bag
- Pic #5: A Suitcase Turns Into a Pet Bed With Boutique Energy
- Pic #6: Wine Corks Become a Bath Mat (Yes, Really)
- Pic #7: Tin Cans Become a Magnetic Herb Wall
- Pic #8: A Broken Skateboard Becomes a Wall Shelf With Attitude
- Pic #9: A Keyboard Becomes a Jewelry Organizer
- Pic #10: A Teacup Becomes a Bird Feeder (Instant Whimsy)
- Pic #11: A Picture Frame Becomes a Serving Tray
- Pic #12: Belts Become a Stool (Or at Least a Really Cool Seat)
- Pic #13: Pallet Wood Becomes a Coffee Table That Doesn’t Look Like a Pallet
- Pic #14: Bicycle Parts Become a Statement Light Fixture
- The “Make Anything” Toolkit (Without Buying a Workshop)
- Safety and Sanity Checks (Because Art Is Better With Both Eyes)
- Design Rules That Keep Upcycling From Looking Like a Yard Sale
- Extra of Real-World “Experience” Tips (So Your Projects Don’t Become a Pile)
- Conclusion
There are two kinds of people in this world: the ones who throw things away, and the ones who stare at an empty pickle jar and whisper,
“You could be a lamp.” If you’re reading this, congratulationsyou’re probably the second kind (or you live with one and you’re tired of
finding “future projects” in the garage).
This is a love letter to functional creativity: upcycled artalso known as turning normal, forgotten, or slightly embarrassing
household objects into usable art you actually want in your space. Think of it as decorating with stories… and occasionally
with things that used to be pants.
What “Usable Art” Really Means
“Usable art” sits in the sweet spot between pretty and practical. It’s the mug rack that looks like sculpture. It’s the storage
stool that makes guests say, “Where did you buy that?” and you get to say, “I didn’t. It used to be a drawer.” The art world has
a long history of elevating everyday objects into creative statements (hello, “readymades” and found-object art), but modern upcycling adds
a bonus level: the piece still earns its keep in real life.
Why Turning “Junk” Into Functional Art Is a Power Move
Upcycling isn’t just a crafty flexit’s also a smart way to reduce waste. Environmental guidance commonly prioritizes
reduce and reuse before recycling, because keeping an item in use typically saves more resources than breaking it down and remaking it.
Translation: the greenest thing you can buy is often the thing you already own… reimagined.
Plus, upcycled décor has a design advantage you can’t fake: patina. Scratches, faded edges, and “I’ve lived a life” texture can look
intentional when you pair them with clean lines and a good finish. In other words, your old stuff has character. Your new stuff is still trying.
The 14 Transformations (14 Pics Worth of Ideas)
Pic #1: A Ladder Becomes a Leaning Shelf (That Doesn’t Scream “Basement”)
Object: an old wooden ladder. New life: a leaning shelf for plants, books, or towels.
Picture: ladder angled against the wall, each rung holding a tray or plank like it was born to do this.
Sand lightly, seal the wood, and add cut boards across the rungs (or small baskets) for flat surfaces. Bonus points if you keep the original paint
in “artistically chipped” conditionjust seal it so it doesn’t shed like a nervous golden retriever.
Pic #2: A Drawer Turns Into a Floating Shadow-Box Shelf
Object: a single orphaned drawer. New life: a wall shelf with built-in “frame” depth.
Picture: drawer mounted sideways, acting like a display box for candles and small art.
Remove the hardware, reinforce corners if needed, then mount through studs (or use proper anchors). Add a coat of paint inside only for contrast.
It’s storage that looks curated, even when you’re hiding receipts and spare batteries.
Pic #3: Mason Jars Become a Clean, Modern Vanity Organizer
Object: mason jars (or candle jars). New life: countertop organization for brushes, cotton rounds, pens, or utensils.
Picture: a row of jars on a reclaimed wood base, screwed in with pipe clamps.
Secure jars with clamps to a board, stain/seal the wood, and label the tops if you want “apothecary chic.” The result: tidy, visible storage that
makes your bathroom feel like it has its life togethereven if you don’t.
Pic #4: Old Jeans Become a No-Embarrassment Tote Bag
Object: worn jeans. New life: a sturdy tote with built-in pockets.
Picture: denim bag with the back pockets still intactperfect for a phone or keys.
Cut the legs off, stitch the bottom closed, add a lining if you’re fancy, and make straps from the legs (or an old belt).
This is functional textile upcycling at its best: durable, washable, and weirdly satisfying.
Pic #5: A Suitcase Turns Into a Pet Bed With Boutique Energy
Object: vintage suitcase. New life: a pet bed that looks like décor.
Picture: suitcase open on short legs, padded with a fitted cushion and a small throw blanket.
Add furniture legs (or a low base) for stability, line the bottom, and drop in a washable pillow.
Your pet gets comfort; you get compliments; the suitcase gets to retire from its previous job of holding old cables.
Pic #6: Wine Corks Become a Bath Mat (Yes, Really)
Object: wine corks. New life: a squishy, spa-ish bath mat.
Picture: corks lined in rows, glued to a grippy shelf liner base.
Slice corks in half lengthwise for a flatter surface, glue them down, and keep the gaps tight.
It’s water-friendly, quick-drying, and gives your feet that “I booked a resort” feelingwithout the resort bill.
Pic #7: Tin Cans Become a Magnetic Herb Wall
Object: clean tin cans. New life: vertical planters for herbs or succulents.
Picture: painted cans on a metal board, each holding basil, mint, or thyme.
Punch drainage holes, paint the cans, and attach strong magnets (or mount with screws). Pair with a metal backsplash panel or a framed sheet of steel.
It’s kitchen art you can cook with. That’s a brag.
Pic #8: A Broken Skateboard Becomes a Wall Shelf With Attitude
Object: a snapped skateboard deck. New life: a curved shelf or wall hook rack.
Picture: deck mounted horizontally, showing off graphic art, holding small plants and books.
Sand the sharp edges, seal it, and mount securely. Add hooks underneath for keys or dog leashes.
It reads “urban gallery,” not “I fell at the skate park and kept the evidence.”
Pic #9: A Keyboard Becomes a Jewelry Organizer
Object: old computer keyboard. New life: a quirky tray or earring holder.
Picture: keys arranged in a shadow frame, with hooks holding earrings where letters used to be.
Pop the keys off, clean everything (seriously), and mount the board in a frame. Add tiny hooks or wire grid behind it.
It’s geeky, functional, and a great conversation starterespecially if you keep the “ESC” key somewhere dramatic.
Pic #10: A Teacup Becomes a Bird Feeder (Instant Whimsy)
Object: mismatched teacup and saucer. New life: a hanging feeder.
Picture: cup tilted on a saucer, suspended by chain, filled with seed.
Use waterproof epoxy to attach cup to saucer at an angle, then drill carefully (or use a hanging cradle).
Put it somewhere you’ll actually see birdsbecause “usable art” should come with a tiny live nature show.
Pic #11: A Picture Frame Becomes a Serving Tray
Object: old frame. New life: a tray with handles.
Picture: frame flipped flat, backing replaced with patterned paper or tile, handles on the sides.
Reinforce the back, add a new base, and seal the surface. Great for coffee tables, vanity setups, or “I’m hosting” illusions.
The best part: you can swap out the “art” inside whenever your mood changes.
Pic #12: Belts Become a Stool (Or at Least a Really Cool Seat)
Object: old leather belts. New life: woven seat webbing.
Picture: a simple wooden stool with a crisscross leather top.
Use a sturdy frame, weave belts tightly, and fasten with screws and washers. Condition the leather.
The look is rustic-modernlike a design catalog, but with way more personality (and fewer staged lemons).
Pic #13: Pallet Wood Becomes a Coffee Table That Doesn’t Look Like a Pallet
Object: pallets or scrap lumber. New life: a table with clean lines.
Picture: smooth top, simple legs, stained evenlyno splinter aesthetic.
Select heat-treated pallets, dismantle carefully, sand thoroughly, and build a modern shape (box base, hairpin legs, or a minimalist frame).
Finish with a durable sealer. The trick is intentional design: fewer boards, cleaner spacing, better finish.
Pic #14: Bicycle Parts Become a Statement Light Fixture
Object: old bike chainrings, spokes, or gears. New life: chandelier or pendant frame.
Picture: circular metal forms layered like sculpture, light glowing through spokes.
Clean and degrease parts, plan a balanced layout, and use a proper light kit rated for your setup.
It’s industrial art with functionproof that even rusty metal can glow up, literally.
The “Make Anything” Toolkit (Without Buying a Workshop)
- Cleaning supplies: degreaser, rubbing alcohol, microfiber cloths
- Prep tools: sandpaper, sanding block, wire brush
- Assembly basics: drill, screws, clamps, wood glue, epoxy (for ceramics/metal)
- Finishing: primer (when painting), sealant, wax or polyurethane
- Styling cheats: matte black spray paint, brass hardware, neutral stain
Safety and Sanity Checks (Because Art Is Better With Both Eyes)
If you’re sanding, cutting, or refinishing old materials, take safety seriously. Old painted surfacesespecially in homes built before 1978can contain
lead-based paint. Disturbing it can create hazardous dust. If you’re working on older furniture or architectural scraps, use lead-safe practices
(and consider professional guidance for high-risk projects). Also, wood dust from sanding and cutting can irritate lungs; proper ventilation and a quality
respirator/mask matter more than your “I’ll be fine” optimism.
The practical rule: if a project creates dust, fumes, or sparks, treat it like it does. Work outside or in a well-ventilated area, wear eye protection,
and keep a vacuum or dust collection strategy in play. “Usable art” should not come with a free cough.
Design Rules That Keep Upcycling From Looking Like a Yard Sale
- Pick a theme: modern minimal, rustic, coastal, industrialanything, as long as it’s consistent.
- Limit materials: two main textures usually look intentional; five looks like a craft drawer exploded.
- Unify with finish: one stain tone or one paint color can make mismatched parts look curated.
- Prioritize function: if it wobbles, leaks, snags, or sheds, fix that first. Beauty is not a substitute for stability.
- Leave one “tell”: keep a hint of the original object (a label, shape, or patina) so the story stays visible.
Extra of Real-World “Experience” Tips (So Your Projects Don’t Become a Pile)
Here’s what you’ll learn after you’ve done a handful of upcycling projectsespecially the kind where you proudly announce “This used to be a thing!”
and someone responds with a cautious, “Wow… neat.” First, you’ll realize the hardest part isn’t building; it’s choosing. Once you start
seeing potential in everything, you’ll be one yard sale away from adopting a second garage. A good trick is to set a simple rule: only bring home an item
if you can describe its new purpose in one sentence. “It could be something cool someday” is not a purpose. That’s a prophecy.
Second, you’ll learn that cleaning is the secret weapon nobody puts in the glamorous “after” photo. Degreasing metal, washing jars, stripping old adhesive,
and removing mystery grime turns “found object” into “finished piece.” If your project starts sticky, it will end stickyand nobody wants a sticky lamp.
Give yourself permission to spend real time on prep. Sanding and sealing aren’t punishment; they’re how you make an upcycled piece look intentional instead
of accidental.
Third, you’ll develop an eye for “structure.” Not everything is meant to hold weight, resist water, or survive daily use. A decorative wall piece can be
delicate; a shelf cannot. Functional art lives or dies by engineering basics: strong attachment points, balanced weight, and the right fasteners. This is
where you stop relying on hope and start relying on studs, anchors, and hardware rated for the job. (Hope is not load-bearing. That’s just science.)
Fourth, you’ll learn to prototype fast. Before you commit to glue, screws, or irreversible cuts, do a mock layout with painter’s tape, cardboard templates,
or temporary clamps. Ten minutes of testing can save you two hours of “creative language” later. You’ll also discover that “perfect” is rarely the goal in
upcycled design. Small flaws often look charminglike visible brush strokes or an imperfect edgeif the overall piece feels cohesive and stable.
Finally, you’ll learn the joy of finishing touches. Hardware swaps, a crisp coat of paint, a subtle stain, or a clean matte sealer can elevate a project by
a full tax bracket. And when you place the finished piece in your homeactually using ityou’ll feel that quiet satisfaction that comes from doing something
practical, creative, and a little rebellious against throwaway culture. You didn’t just make décor. You made a story that pulls its own weight.
Conclusion
Turning everyday objects into usable art is part creativity, part problem-solving, and part refusing to let a perfectly good “thing” become landfill drama.
Whether you start with jars, jeans, drawers, or bike parts, the goal is the same: build something that looks good, works well, and feels like you.
Pick one idea, finish it, and let the momentum do the rest. Your home gets character, your hands get busy, and your trash can gets noticeably less interesting.