Table of Contents >> Show >> Hide
- What Counts as Decorative Tile?
- Before You Begin: Pick the Right Tile for the Right Spot
- Tools and Materials You Will Likely Need
- Step 1: Measure the Area and Plan the Design
- Step 2: Dry-Lay the Tile Before Installing Anything
- Step 3: Prep the Surface Like You Mean It
- Step 4: Mark Reference Lines
- Step 5: Cut and Test-Fit Special Pieces
- Step 6: Mix and Apply the Adhesive Correctly
- Step 7: Set the Decorative Tile
- Step 8: Keep the Surface Clean as You Go
- Step 9: Let the Tile Set Before Grouting
- Step 10: Grout the Joints
- Step 11: Finish the Edges and Movement Joints
- Common Mistakes to Avoid
- Designer Tips for Better-Looking Decorative Tile
- How Long Does Decorative Tile Installation Take?
- When to Call a Pro
- Final Thoughts
- Real-World Experience: What Installing Decorative Tiles Actually Feels Like
- SEO Tags
Decorative tile has a special talent: it can make a perfectly normal wall, backsplash, fireplace surround, or floor suddenly look like it has its life together. One minute your space is saying, “I exist.” The next minute it is saying, “I have taste, thank you very much.” That is the magic of installing decorative tiles well.
The catch, of course, is that beautiful tile does not forgive sloppy prep. Decorative patterns, mosaics, geometric shapes, and statement pieces tend to highlight every crooked line, uneven cut, and “close enough” decision. The good news is that a careful DIYer can absolutely get professional-looking results by taking the process one step at a time.
This guide walks you through decorative tile installation from planning and surface prep to setting, grouting, and finishing. Whether you are installing a decorative tile backsplash, accent wall, patterned floor section, or trim border, the principles are the same: prep like a pro, lay out before you commit, and resist the urge to rush just because the tiles are pretty.
What Counts as Decorative Tile?
Decorative tile is any tile chosen as much for style as for function. That includes:
- Patterned ceramic or porcelain tile
- Mosaic sheets made of glass, stone, porcelain, or mixed materials
- Encaustic-look tile and geometric tile
- Accent strips, medallions, borders, and inserts
- Textured or dimensional wall tile
- Statement backsplash tile behind a range or vanity
Because decorative tiles often become the focal point of a room, accuracy matters even more than usual. A plain white tile can sometimes hide a minor wobble. A bold patterned tile? Oh no. It will introduce that wobble to every guest who walks in.
Before You Begin: Pick the Right Tile for the Right Spot
Before you fall in love with a tile that looks like it belongs in a luxury boutique hotel, make sure it belongs in your actual house. Decorative wall tile and decorative floor tile are not always interchangeable.
For backsplashes and accent walls
Glass mosaics, ceramic wall tile, porcelain mosaics, metal accents, and dimensional tiles are common choices. These are ideal where the tile is mostly decorative and does not need to handle foot traffic.
For floors
Choose tile rated for floor use, with enough durability and slip resistance for the location. A gorgeous polished tile may look amazing in a photo and feel less amazing when someone in socks finds out gravity still works.
For wet areas
Shower walls, tub surrounds, and other wet zones need proper substrate prep and waterproofing. Decorative tile does not replace moisture management. Pretty is not waterproof. Sorry.
Tools and Materials You Will Likely Need
- Tile and any trim pieces
- Tile spacers or leveling system, if appropriate
- Thinset mortar or other manufacturer-approved adhesive
- Notched trowel sized for your tile
- Level, straightedge, and tape measure
- Pencil or chalk for layout lines
- Tile cutter, wet saw, or tile nippers
- Rubber grout float
- Grout
- Sponges and clean buckets of water
- Painter’s tape and drop cloths
- Safety glasses and gloves
- Caulk matched to grout for movement joints and edge transitions
Always check the tile manufacturer’s installation instructions, especially for glass, natural stone, metal, large-format tile, or mixed-material mosaics. Decorative tile loves to be unique, which is fun until you use the wrong adhesive.
Step 1: Measure the Area and Plan the Design
Start by measuring the exact installation area: width, height, and any interruptions such as windows, outlets, switches, cabinets, or corners. Then decide how the decorative tile will be used. Are you covering the whole surface, creating a feature band, framing a niche, or centering a statement panel behind a stove?
This is the stage where smart tile projects are born. Do not skip it. Decorative tile installation is not the place for improvisational jazz.
Questions to answer during planning
- Where do you want the eye to land first?
- Will the pattern be centered?
- Where will cut tiles fall?
- Will trim pieces be used on exposed edges?
- How will the design line up with countertops, cabinets, corners, or fixtures?
When possible, avoid ending a layout with tiny slivers of tile at one side. Shift the layout so cuts are balanced and look intentional. Symmetry is your friend. Tiny awkward tile scraps are not.
Step 2: Dry-Lay the Tile Before Installing Anything
This may be the most underrated step in the entire project. Lay your tile out on a countertop, floor, or large flat surface with spacers included. If you are working with mesh-backed mosaics, lay out several sheets together to see how the pattern flows across seams.
Dry-fitting lets you catch problems before mortar enters the chat. You can see how patterned tiles repeat, whether colors vary between boxes, and how outlets or corners will affect the design.
Why dry layout matters
- It helps balance the pattern
- It reveals where cuts will land
- It lets you blend shade variation from multiple boxes
- It prevents last-minute design regret, which is harder to clean up than grout haze
If your decorative tile has noticeable color or pattern variation, mix pieces from several boxes during layout. That creates a more natural, blended appearance instead of accidental “dark corner meets light corner” drama.
Step 3: Prep the Surface Like You Mean It
No tile installation guide is complete without the least glamorous but most important truth: tile is only as good as the surface underneath it. The substrate must be clean, dry, flat, stable, and appropriate for tile.
For a backsplash or accent wall
Remove grease, dust, soap residue, and anything else that would interfere with adhesion. Patch holes, sand down humps, and make sure the wall is sound. Remove outlet covers and switch plates. Turn off power if you will be working around electrical boxes.
For a floor
The floor must be structurally sound and level enough for tile. Uneven spots, loose areas, and surface contamination should be corrected before installation begins.
For wet areas
Use the right backer board or waterproof tile substrate and follow the waterproofing system instructions. Decorative tile belongs on top of a properly prepared assembly, not on top of hope.
Step 4: Mark Reference Lines
Once the surface is prepped, mark level and plumb reference lines. These guide your installation and help keep a decorative pattern from drifting off course. For backsplashes, you may start from a level line rather than assuming the countertop is perfectly level. For feature walls or centered decorative sections, mark the vertical centerline and build outward.
If you are using trim profiles or edge pieces, include them in your measurement now. Decorative tile layouts can go sideways fast when the trim gets invited too late.
Step 5: Cut and Test-Fit Special Pieces
Before you spread adhesive everywhere, make a few test cuts around outlets, corners, or edge conditions. Use the right tool for the tile type:
- Manual cutter for many ceramic and porcelain straight cuts
- Wet saw for tougher material, cleaner cuts, and many decorative finishes
- Nippers for small adjustments and some mosaic cuts
- Utility knife for cutting mesh backing on mosaic sheets
Smooth rough edges where needed, especially on exposed cuts. A jagged cut next to a shiny decorative tile is like wearing sneakers with a tuxedo. Technically possible. Emotionally confusing.
Step 6: Mix and Apply the Adhesive Correctly
Now it is finally time to get sticky. Use the adhesive recommended for your tile and substrate. In many decorative tile installations, that means thinset mortar applied with the notched trowel size recommended by the tile or mortar manufacturer.
Best practices for this step
- Mix only as much mortar as you can use within its working time
- Spread adhesive over a manageable section, not the whole wall or floor
- Use the flat side of the trowel first to key in the mortar
- Then comb it with the notched side for consistent ridges
- If the mortar skins over, remove it and apply fresh mortar
For larger or thicker decorative tiles, back-buttering may help improve coverage. For glass, metal, and natural stone, always follow the tile maker’s recommendations. Fancy tile can be surprisingly picky. Respectfully.
Step 7: Set the Decorative Tile
Begin at your reference point and place each tile or sheet carefully into the mortar. Press firmly with a slight twisting or wiggling motion to achieve solid contact. Use spacers as needed to maintain even grout joints.
For mesh-backed mosaics
Align sheet edges carefully so the seams do not telegraph through the finished installation. Step back often and inspect from several angles. What looks straight from three inches away can look suspiciously optimistic from six feet back.
For patterned tile
Double-check orientation before setting each piece. It is very easy to rotate one tile the wrong way and accidentally create a new pattern called “Oops.”
For wall tile
Work in small sections and use support or a ledger when necessary so pieces do not slip. Around outlets and switches, make clean cuts and confirm the device will still sit correctly once covers are reinstalled.
Step 8: Keep the Surface Clean as You Go
Remove excess mortar from the tile face and from grout joints while it is still workable. This is not busywork. It is a gift from Present You to Future You.
If mortar hardens in the joints, grouting becomes harder. If it dries on the tile surface, cleanup gets more annoying. Decorative tile with texture or relief can be especially unforgiving, so wipe carefully and often.
Step 9: Let the Tile Set Before Grouting
Give the installation time to set according to the mortar and tile instructions. In many standard installations, that means waiting about 24 hours before grouting, but always verify the product guidance you are using.
Also resist walking on, bumping, scrubbing, or generally “just checking” the tile during this period. Fresh tile needs peace and quiet.
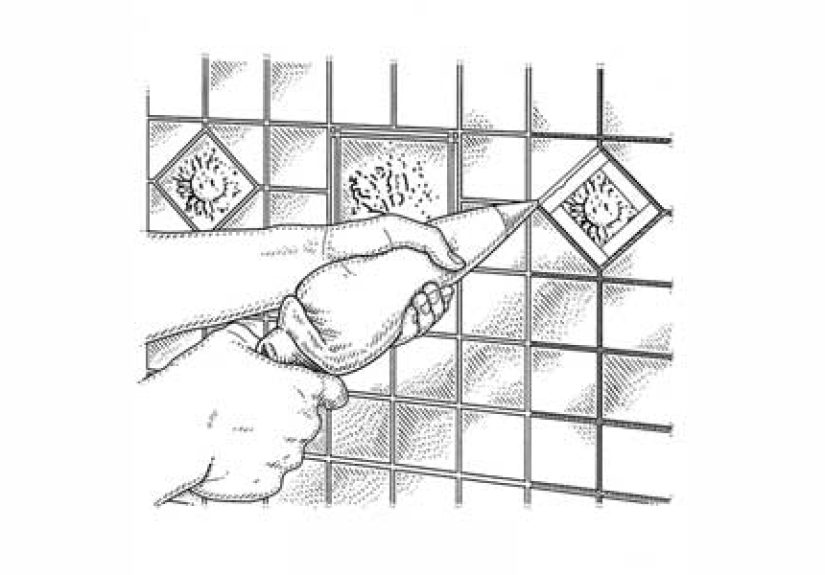
Step 10: Grout the Joints
Once the tile has set, remove spacers and grout the joints. Choose the grout type that fits the joint width and tile material. Some decorative surfaces, especially porous or textured tile, may benefit from extra care before grouting so cleanup is easier.
How to grout decorative tile
- Work grout into the joints with a rubber float
- Hold the float at an angle and pack joints fully
- Scrape off excess diagonally across the tile
- Let the grout firm up slightly
- Wipe with a damp sponge, rinsing often
- Polish off haze after the surface dries
Go gently on textured or delicate surfaces. Aggressive scrubbing can pull grout from joints or make cleanup harder. This is one of those moments where patience saves the day and also your vocabulary.
Step 11: Finish the Edges and Movement Joints
At changes of plane, perimeter edges, and certain transitions, use the appropriate flexible sealant instead of hard grout where required. Finish exposed edges with trim pieces, bullnose, metal profiles, or another edge treatment that suits the design.
These final details are what separate “DIY project” from “Wait, you did that yourself?” Decorative tile deserves a clean exit line.
Common Mistakes to Avoid
- Skipping surface prep: Dirt, grease, and uneven walls cause trouble fast.
- Not dry-laying the design: Decorative patterns need planning.
- Using the wrong adhesive: Always match adhesive to tile type and substrate.
- Ignoring shade variation: Blend from multiple boxes for a more natural look.
- Letting mortar skin over: Fresh mortar bonds better.
- Forgetting trim during layout: Edge pieces affect spacing and cuts.
- Rushing grout cleanup: Decorative surfaces can trap residue.
- Treating wet areas casually: Waterproofing is not optional in places that get soaked.
Designer Tips for Better-Looking Decorative Tile
Use decorative tile as a focal point
You do not always need to tile every square inch. A decorative section behind a stove, vanity, or fireplace can create a high-end look without overwhelming the room.
Balance bold tile with simpler surroundings
If your decorative tile has dramatic pattern, color, or texture, let it shine. Pair it with quieter cabinets, counters, or paint so the space feels curated rather than chaotic.
Run the tile higher for extra impact
In kitchens and baths, extending a decorative backsplash higher can make the space feel more custom. Done well, it looks intentional and architectural instead of like the tile simply stopped where it got tired.
How Long Does Decorative Tile Installation Take?
For a modest backsplash or accent wall, a careful DIYer can often handle prep, layout, tile setting, and grouting over a weekend or two. Floors, wet areas, complex patterns, and mixed-material mosaics take longer.
Complexity comes from cuts, layout precision, substrate repair, and drying times more than from square footage alone. A small decorative tile job with lots of outlets and pattern matching can be more demanding than a larger simple field tile install.
When to Call a Pro
There is zero shame in bringing in a professional tile installer when the project involves waterproof shower assemblies, uneven substrates, expensive handmade tile, complex stone work, or an elaborate pattern you would rather admire than gamble on.
DIY is wonderful. So is not turning a luxury tile purchase into a cautionary tale.
Final Thoughts
Installing decorative tiles is one of the most satisfying upgrades you can make in a home. It combines design, craftsmanship, and just enough precision to make you feel like a very stylish engineer. The real secret is not speed. It is preparation.
Measure carefully. Dry-lay the design. Prep the surface thoroughly. Use the right mortar, the right tools, and the right edge details. Then slow down and install with intention. Decorative tile rewards patience with the kind of finished result that makes the entire room feel smarter, sharper, and more expensive.
And when it is done, you get to casually say, “Oh that? I installed it.” Which is a pretty nice bonus for a wall that used to be boring.
Real-World Experience: What Installing Decorative Tiles Actually Feels Like
On paper, installing decorative tiles sounds wonderfully straightforward. Measure, prep, set, grout, done. In real life, the experience is a little more human. There is excitement when the boxes arrive, a mild identity shift when you buy tile spacers in bulk, and a very specific emotional moment when you realize the wall you thought was straight has apparently been freelancing.
One of the most common experiences people have is discovering that layout is everything. At first, it is tempting to start in a corner and keep moving like a determined raccoon with a trowel. Then the dry layout happens, and suddenly the whole project changes for the better. You notice that centering the pattern makes the space feel deliberate. You realize one outlet falls right in the middle of a floral medallion. You move things around. You save yourself from regrettable tile decisions. It is not glamorous work, but it is the difference between “nice” and “wow.”
Another common lesson is that decorative tile slows you down in a good way. Basic tile can sometimes be installed with a steady rhythm. Decorative tile asks for more attention. You check orientation. You compare sheets. You make sure the grout joints line up. You step back. You squint. You take one photo. You step back again. This sounds fussy, but it is really part of the craft. The experience becomes less about rushing to the finish and more about building something carefully enough that it looks intentional when viewed from across the room.
There is also the very relatable discovery that prep work, while deeply unglamorous, changes the whole outcome. Cleaning off grease behind a stove is nobody’s idea of interior design magic. Patching a wall is not the part anyone posts first. Yet those boring steps are often what make the tile look clean and sharp later. Many DIYers come away from the project saying some version of the same thing: the visible beauty came from the invisible prep.
Then there is grouting, which tends to be the emotional plot twist of tile projects. At first it looks messy enough to inspire panic. Suddenly your crisp decorative pattern is covered in a cloudy layer, and you may briefly wonder whether you have ruined everything and should move to another state. Then the sponge work begins, the haze clears, and the pattern comes to life. It is one of the most satisfying transformations in DIY. Few home projects offer such a dramatic before-and-after moment in a single afternoon.
Perhaps the best part of the experience, though, is what happens after the tools are cleaned up. Decorative tile changes how a space feels every day. A once-forgettable backsplash becomes a focal point. A plain powder room gains personality. A fireplace surround finally looks finished. People notice. You notice. Even making coffee feels slightly more sophisticated when your kitchen wall has its act together.
That is why so many homeowners remember tile projects so vividly. Installing decorative tile is not just a technical job. It is part puzzle, part design decision, part endurance event, and part victory lap. Yes, it takes patience. Yes, it can test your relationship with measuring tape. But when the final tile is set and the room clicks into place, it feels absolutely worth it.