Table of Contents >> Show >> Hide
- Why a Kids Art Gallery Wall Works (Beyond Being Cute)
- Step 1: Pick the Perfect Wall (Location Is Everything)
- Step 2: Decide Your “Gallery Style” (So It Looks Intentional)
- Step 3: Pick a Display System That Matches Your Real Life
- 1) Front-opening frames (the “swap in seconds” option)
- 2) Clipboards in a grid (the “office supply chic” option)
- 3) Picture ledges (the “no nails for every frame” option)
- 4) Wire + clips (the “gallery rail” option)
- 5) Corkboard or bulletin wall (the “pin it and forget it” option)
- 6) Pegboard + clips (the “customizable display wall” option)
- 7) Washi tape “frames” (the renter-friendly, low-commitment option)
- Step 4: Layout Like a Pro (Without Becoming One)
- Step 5: Hang It Safely (Because Gravity Is an Overachiever)
- Step 6: Curate the Art (So You Don’t Drown in Paper)
- Room-by-Room Ideas You Can Steal Immediately
- Budget-Friendly Shopping List (No Fancy Stuff Required)
- Common Mistakes (And How to Avoid Them)
- of Real-World Experience: What Actually Happens When You Make a Kids Art Gallery Wall
- Final Thoughts
- SEO Tags
The refrigerator door is a proud workplace. It’s also a chaotic onewhere glitter-glue masterpieces
battle for territory with takeout menus and a mysterious magnet shaped like a pineapple.
If you’ve ever thought, “My child is a creative genius… and my kitchen looks like an art supply aisle
exploded,” a kids art gallery wall is your peace treaty.
Done right, it celebrates your child’s creativity, reduces paper piles, and upgrades your home décor
with the most meaningful “prints” you’ll ever own. And the best part? You don’t need to be an interior
designer. You just need a plan, a simple display system, and permission to treat crayon drawings like
they’re priceless (because to your kid, they are).
Why a Kids Art Gallery Wall Works (Beyond Being Cute)
A kids art gallery wall is more than a decorative moment. It’s a practical, confidence-building system
that can actually make daily life easier.
- It turns “random papers” into a curated collection. When art has a home, it stops living on every surface.
- It boosts confidence. Displaying work signals, “Your ideas matter.” That’s powerful (and cheaper than therapy).
- It creates a living timeline. You’ll see how their drawing skills and interests evolvedinosaurs today, outer space tomorrow.
- It encourages more creativity. Kids often make more art when they know it might be “exhibited.”
Think of it as a tiny museum, except the gift shop sells snack crumbs and the curator asks for help opening glue sticks.
Step 1: Pick the Perfect Wall (Location Is Everything)
Before you buy frames or start hammering, choose a spot that matches how your family actually lives.
The best kids art gallery wall is the one you’ll maintain without sighing dramatically.
Great places for a kids art gallery wall
- Hallway: A built-in “gallery stroll” that doesn’t compete with furniture.
- Kitchen nook or breakfast area: Easy to swap art while coffee is brewing.
- Homework station: Great for motivation and pride-of-place.
- Playroom: High energy room, high tolerance for color explosions.
- Stair wall: A dramatic spotjust prioritize secure hanging and safe materials.
Quick location checklist
- Light: Natural light helps, but avoid direct sun on paper if you want pieces to last longer.
- Traffic: Busy areas are perfect for showing offjust keep frames secure.
- Height: Decide if this is for adults to admire, kids to interact with, or both.
- Swap speed: If new art arrives weekly, choose a display method that makes changing pieces painless.
Step 2: Decide Your “Gallery Style” (So It Looks Intentional)
Kids’ art is wonderfully unpredictable. Your display system should be the calm, steady friend in the relationship.
Choosing a style doesn’t mean making it boringit means creating a little visual order so everything feels cohesive.
Three easy styles that always look good
- Clean and modern: Matching frames (white, black, or natural wood) in simple shapes.
- Playful and eclectic: Thrifted frames, mixed sizes, a few bright colors, and lots of personality.
- “Mini museum” look: A consistent grid, even spacing, and simple labels with dates or titles.
Choose one “unifier”
If your kid uses every color known to humankind, pick one unifying element so the wall still feels designed:
matching frames, consistent spacing, a limited color palette for mats, or a repeating layout pattern.
Step 3: Pick a Display System That Matches Your Real Life
The secret to a low-stress kids art gallery wall is choosing the right system for how often you rotate artwork.
Below are the most practical, design-friendly optionswith pros, cons, and who they’re best for.
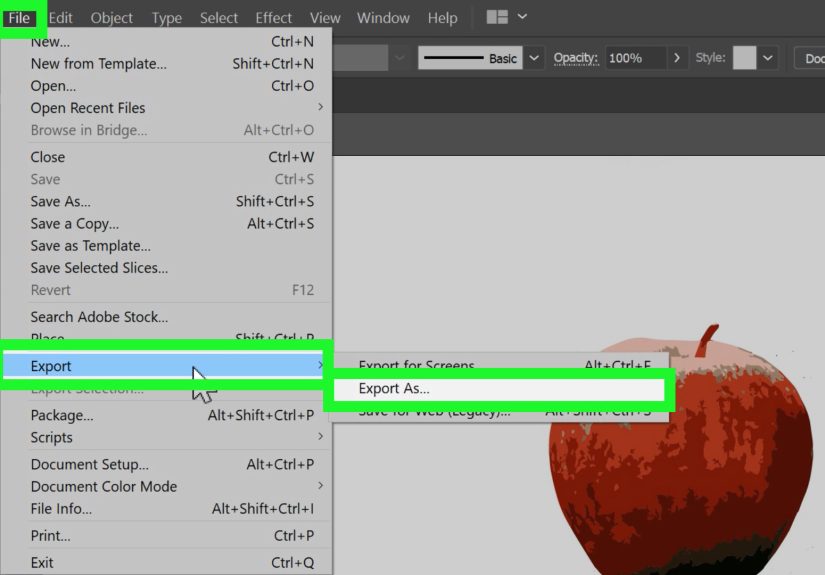
1) Front-opening frames (the “swap in seconds” option)
These frames open from the front, so you can change art without removing the frame from the wall.
Many versions also store a stack of older pieces behind the displayed onelike a tiny art archive.
- Best for: High-volume artists (a.k.a. kids who create daily)
- Why it works: Fast rotation without new holes, new tape, or new stress
- Tip: Use uniform frame sizes so the wall stays tidy even when artwork sizes vary.
2) Clipboards in a grid (the “office supply chic” option)
Clipboards are a fan favorite because swapping art is as easy as unclipping and reclippingno glass, no fuss.
Arrange identical clipboards in neat rows for a clean, modern look that still feels playful.
- Best for: Weekly (or daily) rotation
- Why it works: Instant updates and consistent structure
- Design move: Paint all clipboards the same color or choose natural wood for a warmer look.
3) Picture ledges (the “no nails for every frame” option)
A shallow ledge lets you lean frames, canvases, and even small 3D crafts. You can rotate the display constantly
without re-hanging anything. Bonus: it looks stylish even when the “art” is a stick figure family and a rainbow
with 11 suns.
- Best for: Families who want flexibility and a layered look
- Why it works: Easy to refresh, great for mixed sizes
- Safety note: Anchor the ledge properly and avoid heavy frames on top shelves in kids’ rooms.
4) Wire + clips (the “gallery rail” option)
Clip artwork to a taut wire or line mounted across the wall. This is ideal for constantly changing paper art.
You can do one row or stack multiple rows for a “real gallery” vibe.
- Best for: Lots of paper art, minimal framing
- Why it works: Fast swaps, playful look, easy to scale
- Extra polish: Use matching clips and keep rows evenly spaced.
5) Corkboard or bulletin wall (the “pin it and forget it” option)
A corkboard wall (or a large board framed like art) is perfect if you want maximum change with zero friction.
It’s also great for including notes, awards, or school memories.
- Best for: Very frequent rotation and mixed paper sizes
- Why it works: Fast updates, no measuring for each piece
- Upgrade tip: Frame the corkboard or paint the border for a finished look.
6) Pegboard + clips (the “customizable display wall” option)
Pegboard isn’t just for garages anymore. With clips, shelves, and small hooks, you can display artwork,
tiny sculptures, medals, and “important rocks” your child insists are museum-worthy.
- Best for: Mixed media art and 3D projects
- Why it works: Flexible, modular, and interactive
- Design tip: Paint the pegboard the wall color for a sleek look.
7) Washi tape “frames” (the renter-friendly, low-commitment option)
Washi tape creates an instant border around paper art and makes swapping pieces easy. This is a great solution
if you rent, if you fear nails, or if you simply want to test-drive a gallery wall before committing.
- Best for: Temporary displays, seasonal themes, quick changes
- Why it works: Low cost, easy removal, fun colors
- Reality check: Not ideal for heavy paper, textured walls, or humid areas.
Step 4: Layout Like a Pro (Without Becoming One)
A kids art gallery wall can look charmingly eclecticor accidentally chaotic. The difference is planning your layout
before making holes. Don’t worry: this is not math class. It’s more like playing puzzle games with frames.
Two layout styles that are almost impossible to mess up
- The grid: Same-size frames or clipboards, aligned rows and columns, even spacing. Clean and modern.
- The “anchored” gallery: One larger piece in the center (or slightly off-center), surrounded by smaller pieces.
Spacing rules that keep the wall calm
- Keep gaps consistent: Aim for a steady gap between frames so the wall feels cohesive.
- Align by centers when mixing sizes: This helps varied pieces look intentional, especially in hallways.
- Start with your “hero” piece: Place the biggest frame first, then build around it.
Easy planning methods
- Floor first: Arrange frames on the floor until you like the layout, then transfer it to the wall.
- Paper templates: Trace frames on paper, cut them out, and tape them on the wall to preview spacing.
- Painters tape outline: Use tape to mark the gallery boundary or map key frame edges.
Pro tip: Take a quick phone photo of your floor layout. It becomes your blueprint when you start hanging.
Step 5: Hang It Safely (Because Gravity Is an Overachiever)
Kids run, jump, and occasionally interpret “indoors” as “parkour arena.” So safety mattersespecially in bedrooms,
playrooms, and stairways.
Smart safety choices
- Choose lightweight frames: Acrylic glazing can be safer than glass for kid zones.
- Use hardware that matches the weight: Always check the rating for hooks, anchors, or adhesive strips.
- Stabilize frames: A small amount of museum-style putty at the bottom corners can help prevent shifting.
- Avoid heavy items above beds: If you wouldn’t want it bonking you at 2 a.m., don’t hang it there.
Damage-free hanging tips (especially for renters)
Adhesive hanging strips can be helpful when used correctly: start with a clean, dry wall; follow the weight limits;
and remove using the recommended pull/stretch method (not the “yank and hope” technique).
If you’re unsure, use adhesive solutions for lighter frames and paper displays, and reserve traditional anchors for heavier pieces
or areas with lots of bumps and vibrations (like stairwells).
Step 6: Curate the Art (So You Don’t Drown in Paper)
Let’s address the glittery elephant in the room: you cannot keep everything forever unless you live in a museum warehouse.
The goal is to celebrate the art and keep your home functional.
A simple curation system that works
- Choose a rotation rhythm: weekly, biweekly, or monthlywhatever feels realistic.
- Create a “Yes” bin: A folder or portfolio for pieces you might want to keep longer.
- Photograph the rest: A quick snapshot preserves the memory without the clutter.
- Pick seasonal favorites: Rotate by themewinter snowmen, spring flowers, summer oceans, fall monsters.
Make it extra meaningful (and adorable)
- Add a small label: title, date, age, and a one-sentence “artist statement.”
- Ask your child to pick their “featured piece of the week.”
- Create a tiny “opening night” tradition: a quick family walk-by and one compliment per person.
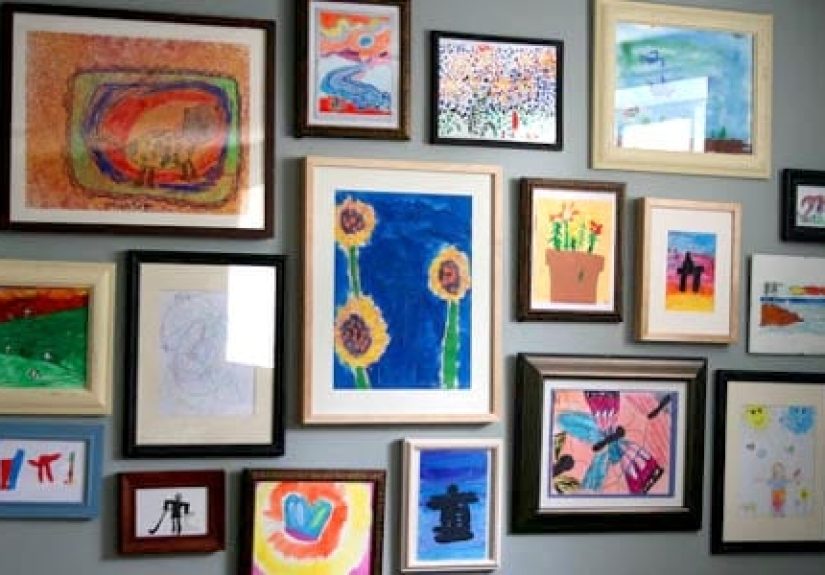
Room-by-Room Ideas You Can Steal Immediately
The hallway “museum stroll”
Use matching frames or clipboards in a straight line. Keep it at a height that works for adult viewing,
but consider adding a lower row for little artists to interact with.
The kitchen “rotating exhibit”
Install two picture ledges above a breakfast bench. Keep current pieces up top and “new arrivals” on the lower ledge.
You’ll change art while waiting for toastmaximum efficiency.
The homework station “mini gallery”
Hang a wire-and-clip row above the desk for current work, plus one framed “personal best” piece on the side.
It’s part décor, part motivation.
The playroom “creative command center”
Combine a corkboard section for rotating paper art and a small pegboard for scissors, tape, and supplies.
It becomes both display and creation zone.
Budget-Friendly Shopping List (No Fancy Stuff Required)
- Frames (matching or thrifted)
- Clipboards or binder clips (for quick swaps)
- Painter’s tape (for layout planning)
- Level + measuring tape
- Picture hanging hardware or adhesive strips (rated for weight)
- Museum-style putty (optional stabilizer)
- Labels or cardstock (for titles/dates)
- A portfolio folder or storage bin (for “keepers”)
If you want an instant upgrade: add mats (even simple white ones). Mats make kid art look “gallery legit” in about three seconds.
Common Mistakes (And How to Avoid Them)
Mistake: Hanging without planning
Fix it by laying everything out on the floor or using paper templates first. Fewer holes, fewer regrets.
Mistake: Inconsistent spacing chaos
Pick a gap and stick to it. Your wall will look calmer even if the art features a purple giraffe driving a rocket ship.
Mistake: Making it too hard to update
If swapping art feels like assembling furniture with feelings, you won’t do it. Use clipboards, front-opening frames, or wires and clips.
Mistake: Forgetting safety
Go lightweight in kid zones, secure anything heavy with appropriate anchors, and stabilize frames so they don’t shift over time.
of Real-World Experience: What Actually Happens When You Make a Kids Art Gallery Wall
In real homes, a kids art gallery wall quickly becomes more than décorit becomes part of the family’s rhythm.
Many parents notice a shift almost immediately: kids slow down and actually look at their own work once it’s displayed.
That scribbly “monster” drawing stops being a throwaway page and starts being “the monster I made for the hallway.”
When you hang art at a child-friendly height or use a clip system they can help with, kids often take ownership of the wall.
You’ll hear things like, “That one is old, we should change it,” delivered with the confidence of a museum director.
The next thing that happens is volume. Once children realize their work might be featured, production can increase.
It’s sweet… and also a gentle reminder that you may be living with a tiny, enthusiastic art department.
That’s why the display system matters. Families who choose hard-to-open frames often stop rotating art after the first burst of motivation.
Families who choose clipboards, wire-and-clips, or front-opening frames tend to keep going because updates are quick.
The easier it is, the more the wall stays freshand the more it feels like a living, changing story rather than a one-time project.
Another common experience: the “surprise masterpiece.” Not every piece that matters looks impressive at first glance.
Sometimes the most treasured art is a messy page with a wobbly sentence like “I LUV U MOM” (spelling included, because authenticity).
People who curate only the “best-looking” pieces often regret it later. A helpful approach is to mix “gallery picks”
(the ones that look great) with “heart picks” (the ones that capture a moment). A wall that includes both feels personal and joyful,
not staged.
Kids also love context. Adding a tiny labeldate, age, and a titleturns the wall into a timeline.
It becomes obvious when a child’s drawings change from giant heads and stick arms to actual bodies, backgrounds, and stories.
Siblings often get competitive in a funny way: “Why does she have three pictures up and I have two?” The easy fix is to give each child
a dedicated row, a dedicated frame set, or a monthly “featured artist” rotation so everyone gets equal wall time.
Finally, the wall affects visitors. Grandparents, friends, and neighbors naturally stop to lookbecause it’s real, local art with
actual emotional value. Kids notice that attention, too. It’s one of the simplest ways to make a home feel warm and lived-in:
a space that says, “Creative people live here,” even if there’s a stray marker cap under the couch.