Table of Contents >> Show >> Hide
- Before You Start: Understand What Kind of Background You Have
- Way 1: Use Remove Background for a Fast Transparent Cutout
- Way 2: Use the Pen Tool and a Clipping Mask for Precise Control
- Way 3: Remove White or Solid Backgrounds with Image Trace, Magic Wand, or Select Same
- Which Background Removal Method Should You Choose?
- How to Export with a Transparent Background
- Common Mistakes to Avoid
- Extra Experience: Practical Lessons from Removing Backgrounds in Illustrator
- Conclusion
Removing a background in Adobe Illustrator sounds like one of those tiny design chores that should take twelve seconds. Then you open the file, zoom in, meet 4,000 suspicious anchor points, and realize the background has chosen violence. The good news: Illustrator gives you several practical ways to separate a subject from its background, whether you are working with a logo, product image, scanned sketch, icon, sticker design, or vector illustration.
The trick is choosing the right method. Illustrator is a vector design tool, so it handles paths, shapes, masks, logos, and editable artwork beautifully. For complex photo retouching, Photoshop is still the heavyweight champion. But if your goal is to remove a white background, isolate an object, create a transparent PNG, clean up a vector file, or prepare artwork for print and web, Illustrator can absolutely get the job done.
In this guide, we will walk through three reliable ways to remove backgrounds in Adobe Illustrator: using the built-in Remove Background feature, creating a clipping mask with the Pen Tool, and removing background colors with Image Trace, Magic Wand, or Select Same. Each method has a personality. One is fast, one is precise, and one is perfect for flat-color artwork. Think of them as the design world’s breakfast trio: coffee, eggs, and the mysterious third thing you pretend is healthy.
Before You Start: Understand What Kind of Background You Have
Before you start clicking like a caffeinated woodpecker, identify the type of image you are editing. This single step can save you time and prevent the classic “Why did Illustrator delete half my logo?” situation.
If your file is a raster image, such as a JPG, PNG, or scanned photo, Illustrator sees it as a rectangle of pixels. You cannot directly grab the background unless you trace it, mask it, or use a background-removal feature. If your file is already vector artwork, such as an AI, SVG, EPS, or editable PDF, the background may be a separate shape that can be selected and deleted.
Also decide whether you want to truly delete the background or simply hide it. Deleting is clean when the unwanted area is a separate object. Masking is safer when you may need to adjust the cutout later. In professional workflows, non-destructive editing is usually the smarter choice. Your future self will thank you, possibly with coffee.
Way 1: Use Remove Background for a Fast Transparent Cutout
The fastest modern way to remove a background in Adobe Illustrator is the Remove Background feature, available in newer Illustrator versions. It identifies the subject in an image and turns the surrounding area transparent. This is the “please do the hard part for me” option, and when the image has a clear subject, it can be wonderfully efficient.
Best for
This method works best for product photos, portraits, objects on simple backgrounds, packaging mockups, social media graphics, and quick layout experiments. For example, if you have a photo of a sneaker on a plain wall and you want to place it on a poster, Remove Background can give you a usable cutout quickly.
How to do it
- Open your document in Adobe Illustrator.
- Place your image by choosing File > Place, then select the photo or raster image.
- Use the Selection Tool to click the image.
- Choose the Remove Background option from the available contextual controls or task panel, depending on your version.
- Wait for Illustrator to process the subject and replace the background with transparency.
- Turn on View > Show Transparency Grid to check whether the background is truly transparent.
- Export the final artwork as a PNG, SVG, PDF, or another format that supports your intended use.
Pro tips for better results
Use high-resolution images whenever possible. A blurry 300-pixel product shot cannot magically become a luxury billboard asset just because Illustrator had a positive attitude. Clear contrast between subject and background helps the tool detect edges more accurately. If the subject has hair, glass, smoke, lace, shadows, or fuzzy edges, inspect the result carefully before using it in a client file.
Remove Background is excellent for speed, but it is not always perfect. After removing the background, place a temporary colored rectangle behind the subject. Try black, white, and a bright color. This reveals leftover halos, jagged edges, or missed areas that may not appear on the transparency grid. The transparency grid is useful, but it is also polite; a neon test background is brutally honest.
If the automatic result looks rough, consider finishing the cutout with a clipping mask or moving the photo into Photoshop for detailed pixel-level refinements. Illustrator is great for layout and vector control, but Photoshop is usually better for advanced photo masking.
Way 2: Use the Pen Tool and a Clipping Mask for Precise Control
The Pen Tool plus clipping mask method is the classic Illustrator way to remove a background from an image. Technically, you are not deleting the background; you are hiding everything outside a vector path. This is often better because you can edit the path later. It is clean, flexible, and precise. It is also where beginners discover that the Pen Tool is both a design instrument and a personality test.
Best for
Use this method when you need a clean cutout around a product, person, object, illustration, or irregular shape. It is especially useful for images with defined edges, such as furniture, electronics, bottles, shoes, tools, food packaging, or flat-lay objects. It also works well when the automatic background remover misses important details.
How to do it
- Place your image in Illustrator using File > Place.
- Lock the image temporarily if needed so you do not accidentally move it.
- Select the Pen Tool and set the fill to None.
- Zoom in closely around the subject.
- Click to create anchor points around the object. For curves, click and drag to create handles.
- Continue around the subject until your path closes.
- Place the path above the image in the layer order.
- Select both the path and the image.
- Choose Object > Clipping Mask > Make, or right-click and choose Make Clipping Mask.
- Use the Direct Selection Tool to adjust anchor points if the edge needs cleanup.
Why clipping masks are so useful
A clipping mask hides artwork outside a selected vector shape. That means the hidden background is still there, tucked away like a snack you forgot in your desk drawer. You can release the mask later, move the image inside the mask, adjust the outline, or create a new mask without destroying the original photo.
This makes clipping masks ideal for brand layouts, catalogs, web graphics, and print files where you may need revisions. A client might say, “Can we show a little more of the product?” If you used a clipping mask, that request is manageable. If you permanently deleted pixels somewhere else and flattened the file, that request becomes a small thunderstorm.
Pen Tool advice for cleaner cutouts
Use fewer anchor points than you think you need. New Illustrator users often create a point every three pixels, turning a smooth object into a nervous porcupine. Smooth curves come from thoughtful anchor points and well-managed handles. For round objects, use longer handle pulls. For sharp corners, click without dragging or convert the point as needed.
When cutting out products, stay slightly inside the edge if the photo has a light halo. When cutting out people or organic objects, stay close to the natural edge but avoid chasing every microscopic bump. A clean, believable silhouette usually looks better than a mathematically anxious one.
Way 3: Remove White or Solid Backgrounds with Image Trace, Magic Wand, or Select Same
The third method is best for logos, icons, scanned drawings, simple illustrations, stickers, black-and-white artwork, and files with flat-color backgrounds. Instead of masking a photo, you are selecting or converting artwork so the background becomes editable and removable.
Option A: Use Image Trace for scanned artwork or logos
Image Trace converts raster images into editable vector artwork. This is extremely helpful when you have a scanned sketch, black logo on a white background, simple icon, or high-contrast graphic. After tracing, you can expand the result and remove the unwanted background shapes.
- Select the image in Illustrator.
- Open Window > Image Trace.
- Choose a preset such as Black and White Logo, Sketched Art, or High Fidelity Photo, depending on the artwork.
- Adjust settings such as threshold, paths, corners, and noise.
- If available and appropriate, use the option that ignores or removes white areas.
- Click Expand to convert the trace into editable vector objects.
- Select leftover white shapes and delete them, or use Select > Same > Fill Color to select similar background areas.
This workflow is great for turning a black logo on a white JPG into a transparent vector logo. However, do not expect Image Trace to produce perfect results from every photo. It simplifies pixels into vector shapes, which can create too many paths, strange color blobs, or edges that look like they had a stressful morning.
Option B: Use the Magic Wand Tool for vector backgrounds
If your artwork is already vector-based, the Magic Wand Tool can select objects with similar visual attributes, such as fill color, stroke color, opacity, or blending mode. This is perfect when the background is a flat white, black, blue, or other solid color.
- Select the Magic Wand Tool, or press Y.
- Click the background color you want to remove.
- Adjust the Magic Wand settings if it selects too much or too little.
- Press Delete to remove the selected background objects.
- Turn on the transparency grid to confirm that the background is gone.
Option C: Use Select Same for quick cleanup
Another useful command is Select > Same > Fill Color. Click one background shape, choose the command, and Illustrator selects other objects with the same fill color. This is a lifesaver when a vector file contains many separate white background pieces hiding between letters, icons, or decorative shapes.
For example, imagine you traced a black hand-lettered logo from a white JPG. After expanding the trace, you may have black letter shapes and white background shapes. Select one white shape, choose Select > Same > Fill Color, then delete. Suddenly your logo has a transparent background and you look like the kind of person who definitely knows where all their keyboard shortcuts live.
When this method works best
This method is ideal for simple artwork with clean edges and limited colors. It is less effective for detailed photos, soft shadows, hair, transparent glass, or complex gradients. If the background and subject share similar colors, Magic Wand may select parts of the subject too. Always zoom in before deleting, because Illustrator will not whisper, “Are you sure you wanted to remove that eyeball?”
Which Background Removal Method Should You Choose?
| Method | Best Use | Main Advantage | Main Limitation |
|---|---|---|---|
| Remove Background | Photos and product images | Fastest option | May need edge cleanup |
| Pen Tool + Clipping Mask | Precise cutouts and client work | Editable and controlled | Takes more time |
| Image Trace, Magic Wand, Select Same | Logos, icons, scanned art, flat backgrounds | Great for vector cleanup | Not ideal for complex photos |
If you are in a hurry, start with Remove Background. If the result needs professional precision, refine it with a clipping mask. If the artwork is a logo, icon, or simple drawing, use Image Trace or selection tools to remove the unwanted background color directly.
How to Export with a Transparent Background
Removing the background is only half the job. Exporting correctly is the other half, and this is where many good designs accidentally put on a white cardboard hat.
To keep transparency, choose a format that supports it. PNG is the most common choice for web images, social graphics, product cutouts, and stickers. SVG is excellent for scalable vector graphics. PDF can preserve transparency for many print and design workflows. JPG does not support transparency, so if you export as JPG, the background will be filled with a solid color.
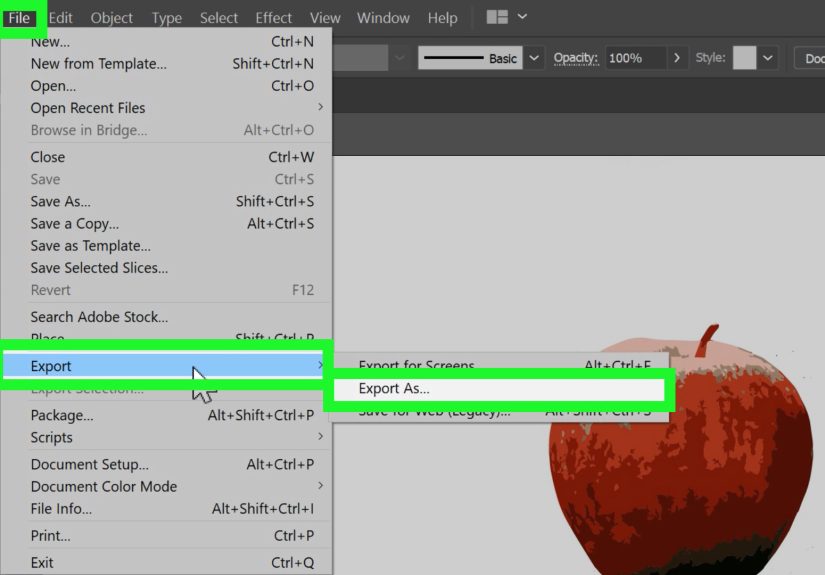
To check your file before exporting, turn on View > Show Transparency Grid. If you see the checkerboard behind your artwork, the background is transparent. Then use File > Export or Export for Screens, choose PNG or SVG, and confirm the export settings. When exporting PNG, make sure the background is set to transparent when the option appears.
Common Mistakes to Avoid
Deleting the wrong white object
In vector artwork, white shapes are not always backgrounds. Sometimes they are highlights, eyes, shine marks, or intentional negative space. Before deleting all white fills, zoom in and inspect the artwork. Otherwise, your cute mascot may suddenly become a haunted potato.
Using Image Trace on every photo
Image Trace is powerful, but it is not a universal background eraser. It works best on high-contrast artwork, logos, and simplified images. On detailed photos, it can create messy vector results and huge files.
Forgetting to check edges
Always place your cutout on different colored backgrounds before final export. White halos show up on dark backgrounds. Dark fringes show up on light backgrounds. Transparent leftovers often reveal themselves only after the file is uploaded to a website, which is the design version of a jump scare.
Exporting as JPG
If you need a transparent background, do not export as JPG. Use PNG for raster transparency or SVG for clean vector artwork. JPG is great for photos, but it will not preserve transparency.
Extra Experience: Practical Lessons from Removing Backgrounds in Illustrator
After working with background removal in Illustrator for real projects, one lesson becomes obvious: the best method depends less on the software and more on the artwork. A clean black logo on a white background is a five-minute job. A curly-haired model standing in front of trees is not. That second file is a trap wearing a friendly filename.
For logos, the best starting point is usually Image Trace, but only if the image is high enough quality. A crisp 2000-pixel logo will trace better than a tiny screenshot taken from a website header. Before tracing, it helps to increase contrast in the original image if needed. Once the trace is expanded, use Select Same to remove the white background, then simplify or clean up paths if the file feels too heavy.
For product photos, I usually try automatic Remove Background first because it is fast. Even if the result is not perfect, it gives a useful preview of whether the image is suitable. If the edges are clean, I keep it. If the tool struggles around shadows, reflections, or transparent packaging, I switch to a clipping mask. For e-commerce images, consistency matters. A slightly imperfect cutout repeated across twenty products looks less professional than a simple, consistent silhouette.
The Pen Tool is still the most dependable method when precision matters. It takes patience, but it gives you control over every edge. For hard-surface objects like bottles, boxes, laptops, furniture, and cosmetics, the Pen Tool can create beautiful results. The secret is not speed; it is restraint. Use fewer points, make smoother curves, and avoid overcorrecting every tiny pixel. Real edges are not always perfectly clean, but design edges should look intentional.
One practical habit is to keep an untouched copy of the original image on a hidden layer. This makes revisions much easier. Another habit is naming layers clearly: “Original Photo,” “Cutout Mask,” “Background Test,” and “Final Export.” It sounds boring until you reopen the file three weeks later and realize Past You was either a genius or a raccoon with a mouse.
For social media graphics and quick blog images, speed often wins. For brand files, packaging, print production, or client logos, precision wins. For editable vector artwork, clean structure wins. The best Illustrator users do not force one tool to solve every problem. They look at the image, choose the most logical method, and keep the file flexible enough for future changes.
Finally, always test the export. Place the finished PNG on a dark background, a light background, and a busy background. If it survives all three, the background removal is probably solid. If you see halos, missing areas, or strange white chunks, go back and clean the mask or vector shapes before publishing. A transparent background should feel invisible, not like it left crumbs all over the design.
Conclusion
Learning how to remove backgrounds in Adobe Illustrator is less about memorizing one magic button and more about understanding the artwork in front of you. For quick photo cutouts, the Remove Background feature can save time. For precise, editable results, the Pen Tool and clipping mask method is the reliable classic. For logos, scanned sketches, icons, and solid-color backgrounds, Image Trace, Magic Wand, and Select Same can clean up artwork efficiently.
The best workflow is flexible: start with the fastest method, inspect the result, then refine only where needed. Keep original files, use transparency checks, and export in a format that supports transparent backgrounds. Do that, and your Illustrator files will look cleaner, your web graphics will behave better, and your backgrounds will stop showing up uninvited like that one friend who says, “I was in the neighborhood.”
Note: Menu names and feature availability may vary slightly depending on your Adobe Illustrator version. For highly detailed photo cutouts with hair, smoke, glass, or soft shadows, use Illustrator for layout and vector work, but consider Photoshop for advanced pixel-level masking.