
Table of Contents >> Show >> Hide
- Why 215th Street Feels Like a Secret Studio
- Why Oil Pastels + Colored Pencils Are the Perfect Subway Duo
- My Subway-Safe Kit (a.k.a. “Don’t Be That Person With the Giant Easel”)
- Reading the Light at 215th: How “Blazing” Happens
- Step-by-Step: How I Built the Oil Pastel + Colored Pencil Subway Sketch
- 1) Thumbnail first (yes, even if you’re impatient)
- 2) Light pencil map: horizon, vanishing, big shapes
- 3) Oil pastel blocking: sky, steel, shadows
- 4) Blend strategically (not everywhere, not always)
- 5) Push the heat: warm highlights and reflected color
- 6) Colored pencil detail pass: edges, texture, typography hints
- 7) Final contrast check: do I have a real focal point?
- Drawing in the NYC Subway Without Becoming a Public Nuisance
- Finishing & Protecting Oil Pastel + Colored Pencil Work
- Common Mistakes (and how to dodge them like a closing subway door)
- Three Subway Sketch Variations to Try From 215th Street
- FAQ: Oil Pastels, Colored Pencils, and Subway Sketching
- Conclusion: What 215th Street Taught Me About “Blazing” Color
- Bonus: of Real-Life 215th Street Subway Sketching Experiences
I stepped off the 1 train at 215th Street with two things in my bag: a fistful of oil pastels and the completely irrational confidence that I could tame New York City’s most unpredictable subjectan elevated subway stationusing nothing but waxy sticks and pointy pencils. Because if the subway has taught me anything, it’s that you should always arrive prepared… and still expect chaos.
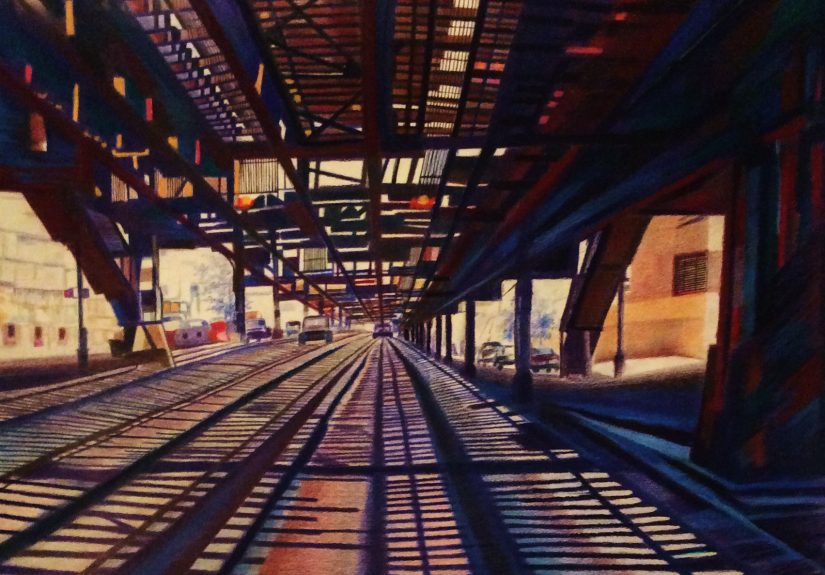
This piece“My Blazing Oil Pastel And Colored Pencil Subway From 215th St Nyc”started as a simple goal: capture the steel, the sky, the shadow-grid under the tracks, and that particular uptown calm where Manhattan starts whispering instead of yelling. What I got instead was a crash course in light, color, and how to draw while pretending you’re not drawing (the ultimate NYC talent).
Why 215th Street Feels Like a Secret Studio
The 215th Street station sits up in Inwood, where Manhattan stretches its legs and remembers it has trees. It’s an elevated station, which means you get that dramatic “steel ribs and daylight” look: repeating beams, long perspective lines, and shadows that slice the sidewalk into graphic patterns like the city accidentally became a modern art poster.
Quick station snapshot (so your sketch has a spine)
- Line: 1 train (Broadway–7th Avenue Line service)
- Location: West 215th Street & 10th Avenue (Inwood, Manhattan)
- Structure: Elevated (hello, big sky)
- Platforms: Two side platforms
- Transfers: None (it’s a “commit to the vibe” station)
The neighborhood mood board: steel above, forest nearby
One of the best parts of sketching this far uptown is the contrast. A few blocks and you’re flirting with natureInwood Hill Park is famous for being the “last natural forest” area in Manhattan, with trails, ridges, and that feeling that the city briefly took its shoes off. That tensionindustrial structure versus green escapecan power your composition. It’s not just a station portrait; it’s a story about where the city loosens its tie.
Why Oil Pastels + Colored Pencils Are the Perfect Subway Duo
Oil pastels are basically the extroverts of the art world: loud, creamy, ready to party on paper. Colored pencils are the introverts: precise, patient, and quietly capable of making you look more competent than you feel. Together, they’re a dream team for an NYC subway sketchespecially at an elevated station where light and geometry do half the composition work for you.
What oil pastels do best on an elevated subway scene
- Big, bold color blocks: sky, signage, platform canopies, painted steel.
- Fast gradients: the sky shifting from winter blue to “I swear it’s spring” haze.
- Texture: scumbling for gritty steel, smudgy shadows under the tracks.
- Glow: that “blazing” feeling when warm sunlight hits cool metal.
Where colored pencils save the day (and your sanity)
- Crisp edges: beams, railings, station name plates, and the fine lines that oil pastel would happily bulldoze.
- Controlled shading: small value shifts inside shadows so they don’t turn into one giant gray pancake.
- Burnishing & blending: smoothing transitions without adding more greasy layers.
- Details that sell the scene: bolts, typography hints, tiny figures, and that one pigeon acting like it pays rent.
My Subway-Safe Kit (a.k.a. “Don’t Be That Person With the Giant Easel”)
If you want to draw the NYC subway without turning into a moving obstacle, your kit should be small, fast, and not require a second MetroCard swipe. Here’s what I carry for a piece like this:
- Small sketchbook (hardcover helps when you’re balancing on your knee)
- Oil pastels (a curated palette beats hauling the entire rainbow)
- Colored pencils (a few darks, a white, and a blender pencil if you have one)
- One kneaded eraser (for lifting graphite or softening mistakes)
- Paper towel or blending stump (optionalfingers work, but you also have to touch subway poles)
- Scrap paper (to test colors and avoid surprise “why is my sky neon?” moments)
Important note: fixative sprays and varnishes are for later, at home, in a ventilated area. The subway is many things; it is not your spray booth. Also, your fellow riders did not consent to a surprise cloud of “Eau de Chemicals.”
Reading the Light at 215th: How “Blazing” Happens
“Blazing” isn’t just about using orange. It’s about temperature contrast: warm highlights against cool shadows. Elevated stations give you strong directional light and dramatic cast shadows. Under the tracks, you’ll often see:
- Warm hits where the sun catches steel edges and platform signage.
- Cool pools under the structureblue-gray shadow shapes that repeat like a pattern.
- Sky reflections tinting metal surfaces with subtle blues.
My favorite trick: pick one “hero warm” (a hot yellow-orange), one “hero cool” (a deep blue), and let them argue politely across the page. That argument is what makes the scene feel alive.
Step-by-Step: How I Built the Oil Pastel + Colored Pencil Subway Sketch
1) Thumbnail first (yes, even if you’re impatient)
I start with two-inch thumbnails: one focusing on the platform perspective, one focusing on the shadow patterns below the tracks. The goal is to decide what the drawing is about. For this piece, it was the repeating geometry of the elevated structure, with the sky acting like a stage light.
2) Light pencil map: horizon, vanishing, big shapes
With a light graphite or light-colored pencil, I place the horizon line and rough perspective rails. I mark: the major beams, the platform edge, and the big shadow blocks. This is not the time for tiny detailsdetails come later when you’ve earned them.
3) Oil pastel blocking: sky, steel, shadows
I lay down oil pastel in broad strokes: sky first (it sets the color mood), then the steel structure, then the deepest shadows. I keep pressure moderate so I don’t instantly create a waxy “no more layers allowed” situation.
4) Blend strategically (not everywhere, not always)
I blend sky gradients lightlyeither with a clean finger or a bit of tissue. For the steel, I avoid over-blending; too smooth and it loses that industrial bite. Instead, I let broken strokes show.
5) Push the heat: warm highlights and reflected color
Here’s where “blazing” shows up. I punch in warm tones on edges: the underside of a canopy, the rim of a beam, a spot of signage catching sun. Then I sneak a little of that warm tone into nearby areas, like reflected light bouncing off painted surfaces. That repetition ties the palette together without turning everything into a bonfire.
6) Colored pencil detail pass: edges, texture, typography hints
Once the big oil pastel shapes are down, colored pencil becomes my scalpel. I sharpen edges, add linear texture to beams, and suggest lettering on station signs without drawing every character like I’m carving a tombstone. For shadows, I use colored pencil to add subtle value shiftsdark-to-darker-to-darkestso they feel dimensional, not flat.
7) Final contrast check: do I have a real focal point?
I step back (or, in a subway context, I lean back without elbowing anyone) and ask: Where does my eye land? If the answer is “everywhere and nowhere,” I boost contrast at the focal areausually where structure meets sky, or where shadow shapes create a strong pattern. A few crisp pencil lines and a small blast of warm pastel can fix a wandering composition fast.
Drawing in the NYC Subway Without Becoming a Public Nuisance
Sketching on transit is equal parts art and manners. The MTA generally allows photography/filming in stations and on trains, but restricts extra equipment like tripods and lights. Translation: your sketchbook is fine; your portable studio lighting rig is not. (Also: don’t block stairs, doors, or the flow of human beings trying to get places on time.)
My personal “don’t get side-eyed” rules
- Stay compact: lap-sized sketchbook, minimal supplies out at once.
- Mind the choke points: avoid stair landings and platform edges.
- Draw people respectfully: quick gestures, no intrusive staring, and don’t treat strangers like zoo exhibits.
- Keep it moving-friendly: the train will lurch; accept it as “free gesture drawing.”
Finishing & Protecting Oil Pastel + Colored Pencil Work
Oil pastel is famously smudge-prone. Colored pencil can also rub off, especially in dark passages. The solution is not “panic and spray everything immediately.” The solution is: test, protect, and store smart.
Practical protection options
- Interleaving: store with glassine or clean paper between pages so nothing transfers.
- Fixative (for dry media): workable fixatives can help reduce smudging on pencil layers.
- Oil pastel varnish/sealant: some products are made specifically to reduce smearing on oil pastel surfaces.
- Frame under glass: the classic, reliable “museum doesn’t trust your fingers either” approach.
Always test on a small corner or scrapoil pastels can react differently depending on brand and paper tooth, and you don’t want your “blazing” masterpiece to become “mysteriously dulled regret.”
Common Mistakes (and how to dodge them like a closing subway door)
Making mud instead of shadows
If you keep layering complementary colors with heavy pressure, oil pastel will happily turn your dramatic shadow into a tired brown-gray. Fix it by limiting your palette in shadow areas and using colored pencil for subtle value changes instead of adding more pastel.
Over-burnishing colored pencil too early
Burnishing is powerful, but it can create a waxy buildup that makes further layering harder. Build up with lighter pressure first; burnish near the end, when you’re confident about the color relationships.
Forgetting the sky is a light source
Elevated stations don’t just have sunlightthey have sky glow. That cool blue can creep into metal surfaces and shadow edges. A tiny hint of blue in your grays can make the whole scene feel more real.
Three Subway Sketch Variations to Try From 215th Street
1) Under-the-tracks shadow pattern study
Focus on the repeating shapes beneath the elevated structure. Treat it like abstract design: crisp geometry, controlled values, and a few warm highlights where light leaks through.
2) Platform perspective with a “vanishing point drama” look
Aim down the platform and let the beams and rails pull your eye into the distance. Use colored pencil to keep perspective lines clean. Add oil pastel warmth where the platform canopy catches light.
3) The “train blur” moment
Let the arriving 1 train be a streak of color and shape instead of a detailed rendering. Oil pastel is perfect for thisbold, fast marks that feel like motion.
FAQ: Oil Pastels, Colored Pencils, and Subway Sketching
Can I sketch inside the station?
Practically speaking, yesmany artists sketch in stations. Stay out of the way, keep your setup minimal, and follow posted rules and staff directions.
What’s the best paper for oil pastel + colored pencil?
Look for paper with tooth (texture) so it can grab pastel, but not so rough that pencil details become scratchy. A mixed-media paper or heavier drawing paper often works well.
How do I keep oil pastel from smearing in my sketchbook?
Interleave with glassine, avoid stacking fresh work face-to-face, and consider appropriate sealants after you’re home and can test safely.
Conclusion: What 215th Street Taught Me About “Blazing” Color
The 215th Street station doesn’t just offer a place to catch the 1 trainit offers a crash course in structure, rhythm, and light. Oil pastels gave me the fearless color. Colored pencils gave me the discipline. And the subway gave me the deadline: “finish this thought before the next train arrives.”
If you try your own version of oil pastel subway art from 215th Street (or anywhere in NYC), don’t chase perfection. Chase the energy: the repeating beams, the sky glow, the warm highlights punching through cool shadow. That’s the real New York portraitbold, layered, and always slightly in motion.
Bonus: of Real-Life 215th Street Subway Sketching Experiences
Let me tell you about the first time I tried to sketch “casually” on the subway platform like some kind of cinematic genius. I opened my sketchbook with the confidence of a person who has never dropped a pencil tip-first onto concrete. Immediately, the wind reminded me that elevated stations have opinions. My paper tried to become a kite. My oil pastelsnormally calm, well-behaved sticks turned into tiny escape artists rolling toward the edge of my bag like they were late for the Bronx.
Then came the sound: the rattle overhead, the hum in the distance, the faint conversation, and the occasional “announcement voice” that feels like it’s being broadcast from inside a metal garbage can. Oddly, it helped. The noise made me stop overthinking. With oil pastel, hesitation is the enemy. The medium rewards bold decisions. The station’s steel beams aren’t shy, so why should my marks be?
A few minutes in, I noticed the shadows under the tracks forming a repeating gridlike someone laid a geometric stencil over the street. That’s when the piece clicked. I stopped trying to draw “a station” and started drawing patterns of light. I blocked in shadow shapes with cool blues and purples, then hit the sunlit edges with warm yellow-orange. The contrast felt electriclike the moment your MetroCard works on the first swipe and you briefly believe in miracles.
Of course, the subway also provides surprise plot twists. A train arrived, and the wind shifted, and suddenly my carefully placed pastel dust decided to relocate. I learned to work in stages: big pastel shapes first, then pause. Details later. Patience is easier when your subject literally shakes the ground every few minutes.
The best interaction happened when someone glanced at my page, nodded, and said, “That’s the real New York right there.” No sarcasm. No interrogation. Just a drive-by complimentNew York’s version of a warm hug, delivered at speed. It reminded me why I love sketching in public: you’re not just collecting a picture. You’re collecting a moment. The station becomes a shared stage, and your drawing becomes proof you were there, paying attention, turning everyday infrastructure into something worth looking at twice.
By the time I closed the sketchbook, my hands were a little messy, my edges weren’t perfectly straight, and my shadows had a few wobbly lines thanks to a passing train. But honestly? That wobble is part of the truth. The NYC subway isn’t a still life. It’s a living thingmoving, vibrating, and absolutely uninterested in being “neat.” My blazing 215th Street piece felt better because it kept that energy. Sometimes the city doesn’t want you to draw it perfectly. It wants you to draw it alive.


