
Table of Contents >> Show >> Hide
- What Exactly Is Colored Dotwork?
- How One Colored Dotwork Piece Comes to Life
- Inside the 15-Piece Colored Dotwork Series
- The Reality of Spending 25–30 Hours on Dots
- Why Dotwork Art Resonates With Viewers
- Tips for Anyone Who Wants to Try Colored Dotwork
- Conclusion: A Universe in Dots
- Extra: My Personal Experience Creating 25–30 Hour Dotwork Pieces
At first glance, my colored dotwork pieces look like ordinary illustrations: glowing moons, surreal landscapes, animals that seem to step off the paper.
But get closerreally closeand you’ll see the truth: they’re built from thousands (sometimes what feels like millions) of tiny dots.
Each artwork takes around 25–30 hours to complete, spread over 4–5 days of careful, slightly obsessive, point-by-point work.
This style is known as dotwork or stippling, a cousin of classic pointillism.
Instead of painting broad strokes, I build shape, shading, and color with countless individual marks. It’s slow, it’s oddly meditative,
and it’s absolutely not friendly to people who hate repetitive tasks. But for me, colored dotwork is the perfect mix of patience, precision,
and play. In this article, I’ll walk you through what colored dotwork is, how I create these 15 pieces, and what it’s really like to pour
25–30 hours of your life into dots.
What Exactly Is Colored Dotwork?
Dotwork (also called stippling) is an art technique where you use dots instead of lines or solid shading to create an image.
In traditional stippling, you usually work in black ink on white paper, building depth by placing dots closer together for darker areas
and spacing them out for lighter sections. Pointillism, made famous by artists like Georges Seurat and Paul Signac, uses tiny colored
dots of paint that visually blend when viewed from a distance.
My colored dotwork sits somewhere between stippling and pointillism:
- Tools: I use colored liners, gel pens, and fineliners instead of brushes.
- Surface: I love working on colored or black paper, which makes bright inks pop.
- Technique: I layer dots of different hues to build gradients, light, and shadow.
Because every shadow, curve, and highlight is made of dots, even a small piece can take many hours to finish.
That’s one of the reasons dotwork illustrations and dotwork tattoos are known for being time-consuming and extremely detailed.
How One Colored Dotwork Piece Comes to Life
1. The Idea and the First Sketch
Every dotwork illustration starts with a simple idea: a moonlit forest, a cosmic whale, a portrait framed in tiny constellations.
I usually sketch the basic shapes lightly in pencil. At this stage, it’s all about composition:
- Where will the main subject sit?
- Where does the light come from?
- Which areas will be full of dense dots and which will “breathe” with empty space?
The sketch is deliberately loose. Dotwork is slow enoughthere’s no need to spend extra hours making the pencil drawing perfect when
the real magic will come from ink.
2. Choosing Colors and Paper
Since these are colored dotwork pieces, color choices are crucial. I often pick:
- Black paper for high-contrast, glowing effects with white, blue, and neon shades.
- Craft or toned paper when I want a warm, vintage feeling with soft reds, browns, and creams.
- Bright liners for highlights and surreal details like stars, sparks, and reflections.
The paper color becomes part of the composition, acting as the mid-tone around which I build lighter and darker dots.
3. Laying Down the First Layer of Dots
This is where patience officially becomes a required material. I begin by blocking out the mid-tones:
lightly dotting the areas where the main forms will be. At this stage, I’m not worried about deep shadows or bright highlights.
I just want to gently “grow” the subject from the paper.
The rhythm is simple: tap, lift, tap, lift, tap, lift. Thousands of times. It feels a little like typing in slow motion,
except your keyboard is a sheet of paper and one typo can’t be backspaced.
4. Building Depth and Texture
After the mid-tones are in place, I start deepening the shadows by layering more dots, closer together.
In dotwork, density equals darkness. Shadows around eyes, under chins, and behind objects are built dot by dot,
sometimes with several overlapping colors. For example:
- A purple-and-blue mix for cool, deep shadows.
- Layers of red and brown for warmth in animal fur or human skin.
- Soft yellows and whites for glowing light sources.
One of my favorite parts is creating smooth gradients using nothing but tiny dots.
From a distance, the dots visually blend, and the forms look almost airbrushed. Up close, it’s pure organized chaos.
5. Highlights and Final Details
The last 5–10 hours of a piece are where the illustration really snaps into focus. I reinforce highlights with white ink,
sharpen edges, and add those little details that reward people who zoom in: hidden stars, tiny constellations, subtle textures in hair or feathers.
This is also the moment of danger. When you’ve already spent over 20 hours on a drawing, every new dot feels risky.
One impatient mark in the wrong spot can’t easily be undone, so I slow down even more.
It’s like the final 5 minutes of a video game boss fightyou’ve made it this far, don’t lose now.
Inside the 15-Piece Colored Dotwork Series
This particular series contains 15 colored dotwork pieces, each with its own mood and story.
Some are cosmic, some are nature-inspired, and some are just excuses for me to see how many tiny dots I can fit into a single square inch
before my hand complains to HR.
1. Night Sky Portraits
Several of the illustrations combine portraits with starry sky elements: faces framed by galaxies, hair melting into constellations,
eyes reflecting moons. The colored dotwork here is all about luminous gradients:
- Blue and violet dots for shadows.
- White and pale yellow for starlight.
- Occasional bright color pops (like pink or turquoise) to keep the composition playful.
These pieces often become favorites because they feel both intimate and cosmic at the same time.
2. Surreal Landscapes and Dream Worlds
Other pieces in the set lean into surreal, Bored Panda–style whimsy: floating islands, overlapping moons, forests that glow as if lit from within.
Dotwork works beautifully here because the technique naturally creates texture and depth.
Tiny dots become:
- Fog drifting between trees.
- Rocks and cliffs full of detail.
- Glowing orbs and light trails weaving through the scene.
When viewers zoom in, they notice that nothing is solideverything is made of points. It reinforces the dreamlike, almost digital feeling,
even though everything is drawn by hand.
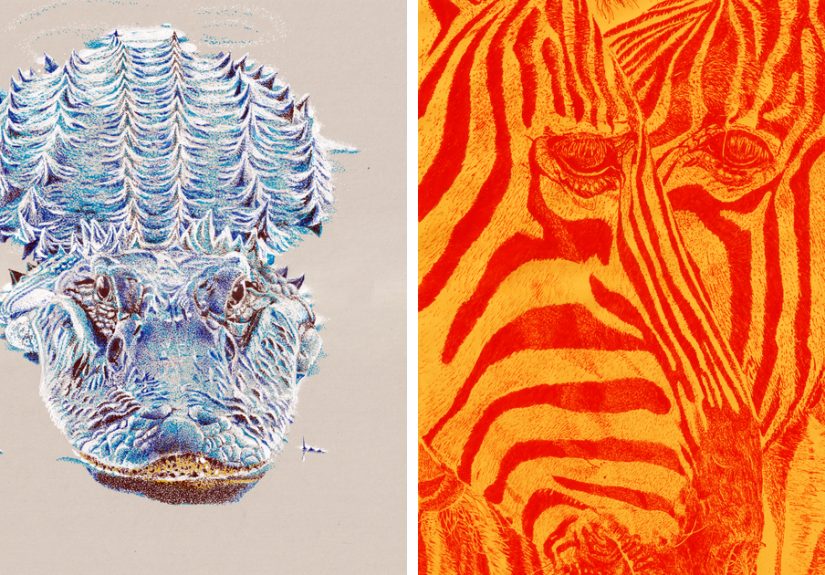
3. Animal Studies in Dots
Animals are perfect subjects for colored dotwork. Feathers, fur, scales, and antlers all come to life with tiny textures and careful shading.
In this 15-piece series, you’ll find creatures like birds, wolves, or deer rendered in dots, often combined with plants, planets, or geometric shapes.
Building animal portraits dot by dot forces me to really study the structure of the subject: the curve of a beak,
the light in an eye, the thickness of fur. Nothing can be rushed or approximatedif the dots are off, the animal looks “wrong,”
and there’s no blending brush to rescue you.
The Reality of Spending 25–30 Hours on Dots
The Physical Side: Hands, Eyes, and Posture
Let’s be honest: making colored dotwork isn’t exactly ergonomic. Long sessions of stippling can leave your hand tired,
your neck stiff, and your eyes convinced they’re permanently seeing tiny specks. I’ve learned to:
- Work in blocks of 1–2 hours with short breaks.
- Stretch my fingers, wrists, and shoulders regularly.
- Alternate between larger and smaller areas so I’m not micro-focusing all the time.
Good lighting becomes non-negotiable. When you’re placing thousands of dots, shadows from a bad lamp can trick your brain into
thinking an area is darker or lighter than it really is.
The Mental Side: Meditation in Slow Motion
The surprising benefit of dotwork is how calming it can be. The repetitive motion, the slow build-up of an image,
the way the drawing gradually emerges from what used to be empty paperit all feels a bit like meditation.
After the first hour or so, I slip into a quiet mental space where everything is reduced to this one simple task:
place the next dot.
Of course, there are also moments of frustration. Sometimes a piece doesn’t come together as fast as I’d like.
Sometimes a color combination doesn’t work and I have to adjust mid-way. But seeing the finished dotwork illustrationknowing
it’s the result of 25–30 hours of focused attentionis incredibly rewarding.
Why Dotwork Art Resonates With Viewers
People are naturally drawn to detailed work. When viewers find out that each highlight, shadow, and gradient is made of dots,
they almost always lean closer, zoom in, and start counting (and then give up quickly).
Colored dotwork hits a particularly sweet spot:
- From far away: It looks smooth, vibrant, and cohesive.
- Up close: It reveals patterns, textures, and the evidence of patient craftsmanship.
On platforms like Bored Panda, Instagram, and Pinterest, dotwork and stippling art performs well because it’s both visually striking
and fascinating on a process level. People don’t just like the finished piecethey’re curious about how much time it took and how it was made.
Tips for Anyone Who Wants to Try Colored Dotwork
Start Small (Your Hand Will Thank You)
If you’re new to dotwork art, don’t jump straight into a full A3 illustration that you expect to finish in one weekend.
Start with:
- A simple object (like a leaf, moon, or gemstone).
- A limited color palette (two or three colors plus white).
- Smaller paper sizes so you can complete a piece in a few hours instead of a few days.
Use the Right Pens and Paper
Fineliners and gel pens that don’t blob or skip are essential. Look for:
- Fine tips (0.1–0.3 mm) for detailed areas.
- Slightly thicker tips for filling large dark regions faster.
- Paper that doesn’t bleed easily and can handle many layers of ink.
If you want that glowing effect, try drawing on black or dark-toned paper with bright inks.
Colored dotwork really comes alive when light hues float over a dark background.
Embrace the Slow Process
There’s no “fast mode” for dotwork. That’s the point. Let yourself enjoy the rhythm. Put on music, a podcast, or an audiobook and think of every dot as a tiny investment in the final piece. The magic of this art style isn’t just in the resultit’s in the hours you pour into it.
Conclusion: A Universe in Dots
Each illustration in my “My Colored Dotwork That Takes 25–30 Hours To Complete (15 Pics)” collection is a small universe of dots.
From the outside, it might seem like a wild amount of time to spend on a single drawingbut for me, that time is exactly what makes
the finished artwork feel so alive. Every dot is a decision. Every shadow, highlight, and glow is the result of thousands of tiny choices.
Whether you’re curious about dotwork art, looking for inspiration for your own stippling illustrations, or just enjoying the view,
I hope these 15 colored pieces show what’s possible when you slow down and let your imagination unfold one dot at a time.
From the first pencil sketch on black or toned paper to the final shimmering highlights, you’ll see why every drawing takes 25–30 hours to completeand why the process feels like both meditation and marathon.
Learn what colored dotwork is, how I layer ink to create glowing portraits, surreal landscapes, and animal studies, and why this painstaking technique captivates viewers who zoom in to inspect every dot.
If you’ve ever wanted to try stippling or pointillism yourself, you’ll also find practical tips on tools, paper, and staying patient, plus an honest look at what it’s really like to spend days building a universe one dot at a time.
Extra: My Personal Experience Creating 25–30 Hour Dotwork Pieces
Spending 25–30 hours on a single colored dotwork piece sounds intense on paperand honestly, it is.
But like most creative obsessions, it started with something small. A few years ago, I received a sketchbook with dark pages and a single white gel pen.
I had no plan. I drew a quick moon, shaded it with dots, and suddenly realized how satisfying it felt to build light from nothing but tiny marks.
That little experiment turned into a full-on series and, eventually, these 15 works you’re seeing now.
The first thing I learned was that time behaves strangely during dotwork sessions.
I’ll sit down “just for half an hour,” and suddenly three hours have passed and my coffee has gone cold.
The repetition pulls you into a kind of flow state. You’re aware of the music or podcast you’ve got on in the background,
but at the same time, your whole focus is on the area you’re dotting: this shadow on the cheek, that highlight on the branch,
the transition between twilight sky and deep cosmic blue.
There’s also a huge emotional arc to each piece. The first 10–15 hours are exciting because you can see the drawing gradually emerge.
The composition becomes clear, and you start to get glimpses of how the final piece will look.
Somewhere around hour 18, however, the “middle crisis” kicks in. This is the stage where:
- The big shapes are done, but all the tiny finishing work still lies ahead.
- Your brain has already pictured the completed masterpiece, but your hand is still stuck in “dot forever” mode.
- You start questioning your life choices just a little.
Pushing through that middle stage is where discipline kicks in. I’ve learned to break the piece into zones and give myself mini-goals:
“Finish the left side of the hair tonight,” or “Complete the glow around the moon before stopping.”
Each small section completed feels like crossing a finish line inside the bigger marathon.
One of my favorite memories from working on this 15-piece series comes from a night when I was finishing a cosmic animal illustration.
I had been layering cool blues, purples, and pinks into the background for hours.
When I finally added the last row of bright white dots to suggest distant stars, the entire piece suddenly “clicked.”
It went from looking like an unfinished experiment to a complete, glowing world. I remember literally leaning back in my chair and laughing because the transformation felt so suddeneven though it was actually the result of 25 hours of slow work.
Sharing these drawings online has been a fascinating experience too. People often react with a mix of curiosity and disbelief:
“Wait, how long did this take?” is probably the most common comment.
Some viewers zoom in and send screenshots of tiny areas, pointing out details I’d forgotten I even drew.
Others message me saying they’ve started their own stippling journey after seeing the process, which might be the best compliment of all.
The most surprising lesson from this project is how working dot by dot mirrors a lot of things in life.
You can’t rush it, and big results come from a ridiculous number of small, consistent actions.
It taught me to trust the process, even when progress feels microscopic. There were moments when I was sure a piece wasn’t working,
but by patiently building up the values and colors, the artwork slowly turned into something I was proud to sign.
If you’re thinking of trying colored dotwork yourself, my biggest piece of advice is this: don’t worry about matching anyone else’s style or speed.
Your first pieces might look rough or patchy. That’s normal. The control, the smooth gradients, the confident color choicesthose all come from time spent at the desk, tapping dots into the paper.
Start with something small. Celebrate every finished piece, even the imperfect ones. And most importantly, enjoy the quiet satisfaction that comes from building entire worlds out of tiny, patient marks.
In the end, these 15 colored dotwork illustrations aren’t just images; they’re records of time.
Each piece holds 25–30 hours of music playlists, late-night thoughts, tiny decisions, and relentless dots.
And if you ask me whether it’s worth it, my answer will always be yesone dot at a time.


