
Table of Contents >> Show >> Hide
- What Is a Peek-A-Boo Centerpiece From a Window Box?
- Why a Window Box Makes a Great Centerpiece Base
- Materials You Need
- How to Make a Peek-A-Boo Centerpiece From a Window Box
- Seasonal Ideas for Your Peek-A-Boo Centerpiece
- Design Tips for a Professional Look
- Common Mistakes to Avoid
- Creative Variations
- Care, Storage, and Reuse
- Extra Experience: What It Is Really Like to Make and Use This Centerpiece
- Conclusion
- SEO Tags
A window box usually lives outside, smiling politely under a window while petunias do all the dramatic work. But give that same humble box a table, a removable insert, a few seasonal stems, and a hidden candle compartment, and suddenly it becomes the guest at dinner everyone wants to talk about. That is the charm of a Peek-A-Boo Centerpiece From Window Box: it looks like a lush floral arrangement from the top, then surprises you with a second display underneath.
This project is part DIY centerpiece, part upcycled home decor, and part “I made this, please admire me responsibly.” It uses a long flower box or window planter as the base, a fitted pegboard insert as the flower holder, and a lower compartment filled with sand, glass gems, or decorative stones to cradle candles or LED lights. When the floral layer is in place, the piece becomes a full, garden-inspired table centerpiece. When the insert is lifted, peek-a-boo, you reveal a glowing accent beneath.
The best part is flexibility. You can design it for spring brunch, summer patio dinners, fall harvest tables, winter holidays, weddings, baby showers, or everyday farmhouse decor. Change the stems, swap the filler, repaint the box, or trade candles for battery-powered lights. One basic structure can wear more outfits than a lifestyle influencer packing for a weekend trip.
What Is a Peek-A-Boo Centerpiece From a Window Box?
A peek-a-boo window box centerpiece is a table arrangement made from a rectangular planter or flower box. Instead of planting real flowers directly in soil, you create a removable top layer, often with pegboard, foam board, chicken wire, or a drilled wood panel. Faux flowers, dried stems, greenery, or lightweight seasonal picks are inserted through the holes. Under that insert, the box holds another decorative layerusually candles, glass stones, sand, ornaments, fairy lights, or small themed accents.
The “peek-a-boo” part comes from the surprise. From above, guests see a beautiful floral display. Lift the insert, and a hidden second centerpiece appears. It is like the decor version of finding fries at the bottom of the takeout bag: unexpected joy.
This idea borrows from several reliable design principles. Container gardening often uses the “thriller, filler, spiller” method: one bold focal element, supporting volume, and trailing or softening pieces. Floral design follows similar rules of height, scale, balance, repetition, and texture. A long window box gives you the perfect stage for all of that because it stretches across the table without blocking conversationunless your flowers are trying to join the group chat.
Why a Window Box Makes a Great Centerpiece Base
It has the right shape for a table
Round centerpieces are lovely, but rectangular tables often need length. A window box naturally follows the line of a dining table, console table, buffet, mantel, or kitchen island. It creates a centerpiece that feels generous without taking over every square inch needed for plates, glasses, elbows, and the emergency bread basket.
It is sturdy and easy to customize
Window boxes come in wood, plastic, resin, metal, and composite materials. A wooden box brings rustic warmth. A black metal or dark resin box feels modern. A white-painted flower box gives cottage charm. A plastic planter is lightweight, affordable, and easy to repaint. Because the base is simple, you can decorate it to match almost any style: farmhouse, coastal, garden party, boho, holiday glam, minimalist, or “I found this in the garage and made it fabulous.”
It offers built-in depth
The depth of a flower box is what makes the hidden compartment possible. You need enough room to hold the lower layer while still supporting the removable floral insert. For most tables, a box between 15 and 30 inches long works well. A shorter box suits coffee tables and small dining tables; a longer box can anchor a holiday table or wedding reception setup.
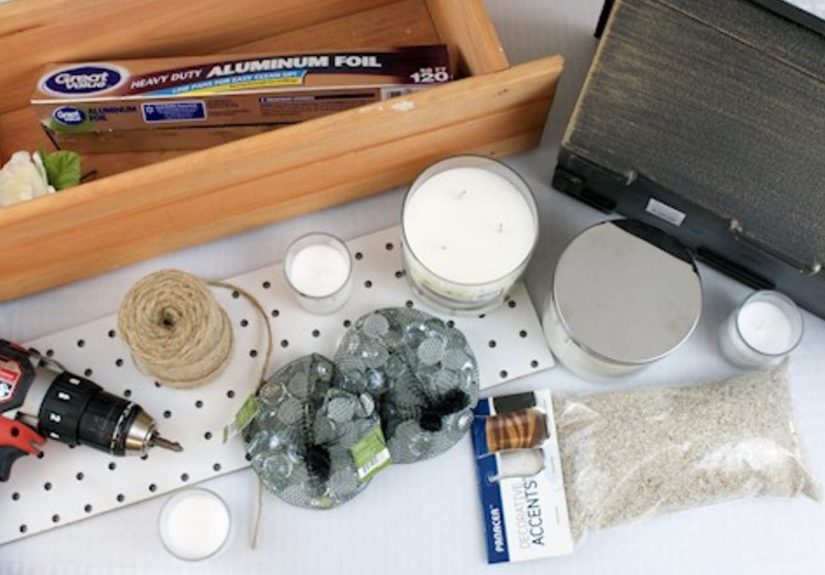
Materials You Need
You do not need a professional workshop to make this project. You need a few basic supplies, a little patience, and the emotional strength to measure twice before cutting once. Here is a practical supply list:
- A plastic, resin, metal, or wooden window box
- Pegboard, thin plywood with drilled holes, foam board, or floral mesh for the removable insert
- Tape measure and pencil or dry erase marker
- Jigsaw, utility knife, or hand saw, depending on insert material
- Sand, glass gems, vase filler, small pebbles, or decorative beads
- Glass jar candles, flameless LED candles, or battery fairy lights
- Faux flowers, greenery, dried stems, seasonal picks, or fresh flowers in water tubes
- Paint, stain, or spray paint if you want to update the box
- Twine, ribbon, small drawer pulls, or discreet finger holes for lifting the insert
- Optional felt pads for protecting the table surface
For safety and convenience, flameless candles are the easiest choice, especially if your centerpiece includes faux greenery or dried materials. If you use real candles, choose candles in glass containers, keep flames away from stems and ribbons, and never leave the display unattended. Pretty decor should not audition for a fire department training video.
How to Make a Peek-A-Boo Centerpiece From a Window Box
Step 1: Choose the right window box
Start with a box that fits your table and your storage space. A 24-inch window box is a versatile size for a dining table because it feels substantial without becoming a floral aircraft carrier. For a narrow table, choose a slim planter. For a buffet or mantel, a longer box can look elegant and intentional.
Check the depth. The box should be deep enough to hold your lower display and still allow the insert to sit near the top. If you plan to hide jar candles, make sure the candles are shorter than the rim of the box. If they are too tall, the insert will not sit correctly, and the whole “hidden surprise” becomes more of a “visible planning issue.”
Step 2: Paint or finish the box
If the planter already looks good, you can leave it alone. If it has seen better days, paint it. Matte black creates a dramatic modern look. Soft white feels clean and classic. Sage green works beautifully with botanical stems. Natural stain highlights wood grain and gives the centerpiece a handcrafted feel.
For plastic planters, use paint designed for plastic surfaces. For wood, lightly sand rough areas before painting or staining. Allow the finish to dry fully before adding filler or candles. This is not the moment to rush; wet paint and glass gems create a situation nobody asked for.
Step 3: Measure the inside opening
Measure the interior length and width of the window box where the insert will sit. Subtract about one-eighth of an inch from each measurement so the insert can lift in and out easily. If the box tapers inward, measure both the top opening and the depth where the insert will rest. Some planters are sneaky like that.
Step 4: Cut the removable insert
Pegboard is a favorite choice because it already has evenly spaced holes for stems. Cut the pegboard to fit inside the planter. Sand or trim any rough edges. Test the fit before decorating. It should rest securely but not wedge so tightly that you need a rescue team to remove it.
If you do not have pegboard, you can use foam board or thin plywood and make your own holes. Foam board is easier to cut but less durable. Plywood is stronger but requires drilling. For a soft, natural floral look, chicken wire can also work, although it needs to be secured to a frame or tucked firmly along the sides.
Step 5: Add a lifting handle
The insert needs a discreet way to be lifted. Tie a short loop of jute twine through two holes near the center or at both ends. You can also attach small ribbon loops, mini drawer pulls, or leather tabs. Keep handles low enough that flowers hide them, but accessible enough that you do not have to dig through your arrangement like a raccoon looking for snacks.
Step 6: Fill the lower compartment
Add sand, glass gems, decorative stones, or vase filler to the bottom of the box. This layer holds candles in place and adds weight so the centerpiece feels stable. Sand gives a coastal or rustic look. Clear gems feel dressier and reflect candlelight beautifully. White stones create a clean spa-like style. For holiday versions, try faux snow, cranberries, ornaments, pinecones, or metallic beads.
Place your candles or lights in the filler. Keep everything level and stable. If using LED candles, make sure you can switch them on and off without dismantling the entire arrangement. Otherwise, you will be the person lifting flowers at dinner while everyone pretends not to watch.
Step 7: Build the floral top
Insert stems through the pegboard holes. Begin with your tallest or boldest pieces, then add medium flowers, greenery, and trailing accents. Use the thriller-filler-spiller idea: a few showy blooms or branches for drama, softer greenery and flowers for fullness, and trailing vines or wispy stems to soften the edges.
For a low dining table arrangement, keep most stems under 12 inches tall so guests can see each other. For a mantel or entry table, you can go taller and more dramatic. Rotate the box as you work so the design looks good from all sides. A centerpiece should not have a “good side” and a “please don’t look over here” side.
Seasonal Ideas for Your Peek-A-Boo Centerpiece
Spring: fresh, bright, and cheerful
Spring is perfect for tulips, daffodils, hyacinths, faux cherry blossoms, moss, and soft greenery. Use pastel flowers with white or natural wood for a fresh brunch look. Hide LED tea lights underneath with clear gems or moss. For Easter, add small eggs or bunny accents in the lower compartment.
Summer: relaxed and colorful
Summer versions can lean coastal, garden-party, or picnic-ready. Try sunflowers, daisies, lavender, eucalyptus, lemon stems, or bright zinnias. Fill the bottom with sand, shells, sea glass, or blue vase filler. A white or aqua-painted window box looks especially summery.
Fall: cozy and textured
Fall is where this project truly earns its keep. Use mini pumpkins, faux mums, maple leaves, wheat stems, berries, eucalyptus, and dried grasses. Put amber glass votives or flameless candles below. A stained wooden box, bronze accents, and warm orange tones create that “someone baked something” atmosphere, even if the cookies came from a package.
Winter: festive without being fussy
For winter, combine evergreen picks, pinecones, red berries, white flowers, silver ornaments, and warm LED lights. Fill the bottom with faux snow, glass gems, or metallic ornaments. This version works beautifully for Christmas, New Year’s Eve, or a general winter table that says, “Yes, it is cold, but we have sparkle.”
Design Tips for a Professional Look
Keep the height comfortable
For dining tables, keep the arrangement low enough for conversation. A good rule is to sit at the table and look across it. If the centerpiece blocks faces, lower the flowers or move the tallest pieces toward the ends. No one wants to ask the centerpiece to pass the salt.
Repeat colors and textures
Choose two or three main colors and repeat them across the arrangement. Add texture through leaves, berries, seed pods, grasses, or ribbons. Repetition makes the piece feel intentional instead of random. Random can be fun in a playlist; it is less helpful in centerpiece design.
Use odd numbers
Groups of three or five often look more natural than pairs. Try three focal flowers, five small accent blooms, or three candle jars beneath the insert. Odd numbers create movement and help the eye travel through the arrangement.
Hide the mechanics
The pegboard or insert should disappear under greenery and flowers. Angle leaves over exposed holes. Use moss, faux vines, or low filler stems to cover gaps. The secret compartment is allowed to be mysterious; the construction method does not need to file a public report.
Common Mistakes to Avoid
Using stems that are too tall
Tall stems can make the arrangement top-heavy and awkward on a dining table. Trim stems gradually and test the look as you go. You can always cut more, but you cannot politely ask a stem to grow back by dessert.
Forgetting table protection
Add felt pads under the box, especially if it is wood, metal, or heavy with stones. This protects your table from scratches and makes the centerpiece easier to slide into place.
Overfilling the bottom layer
The lower compartment should be attractive but functional. Too much filler can push candles too high or make the insert unstable. Leave enough clearance so the top layer rests flat.
Mixing real flame with risky materials
Dried flowers, paper accents, ribbon, and faux greenery should never sit near open flames. Use flameless candles when in doubt. They give you the glow without the tiny panic attack.
Creative Variations
One of the best things about a Peek-A-Boo Centerpiece From Window Box is how easily it adapts. For weddings, paint the box white and use roses, eucalyptus, baby’s breath, and soft LED candles. For a farmhouse table, use a stained wood box, galvanized accents, lamb’s ear, and cream flowers. For a kids’ party, use bright faux flowers on top and small themed toys or wrapped candies below. For a Halloween table, use black branches, purple flowers, mini pumpkins, and flickering LED candles. For Thanksgiving, use wheat, berries, faux leaves, and small gourds.
You can also turn the hidden compartment into a practical surprise. Place wrapped notes, conversation cards, small party favors, or name tags beneath the insert. At the right moment, lift the floral top and reveal the hidden goodies. It is an easy way to make a dinner table feel interactive without forcing everyone into a complicated game involving rules nobody remembers.
Care, Storage, and Reuse
If you use faux flowers, dust them lightly before storing. Keep seasonal stems grouped in labeled bags or bins so next year’s decorating session does not become a treasure hunt with artificial berries. Store the box, insert, and filler separately if the centerpiece is heavy. Glass gems in particular can add surprising weight. Your future self will appreciate not lifting a centerpiece that feels like it secretly contains bricks.
For fresh flowers, use water tubes or small hidden jars instead of pushing wet stems directly into the insert. Remove wilted flowers promptly. If the box is wood, avoid standing water unless it has a liner. Moisture can stain, warp, or damage the base over time.
Extra Experience: What It Is Really Like to Make and Use This Centerpiece
The first time you make a Peek-A-Boo Centerpiece From Window Box, the biggest surprise is how quickly a basic planter starts looking like something from a boutique home store. At the beginning, it may feel unimpressive: just a box, a cut panel, and a pile of stems. Then the flowers start going in, the greenery covers the edges, the candles settle into the lower filler, and suddenly the project has personality. It becomes one of those DIY pieces that makes you step back and say, “Wait, did I just become crafty?”
In real use, the removable insert is the feature that makes the project feel special. Guests may admire the flowers first, but the hidden layer is what makes them lean closer. When you lift the top and reveal the candles or lights underneath, the reaction is usually a mix of surprise and immediate questions: “How did you make that?” “Is that a window box?” “Can I copy this?” The correct answer to the last question is yes, because good DIY ideas deserve to travel.
The most important experience-based tip is to test the centerpiece before the event. Place it on the actual table, sit down, and check the height. What looks gorgeous on a counter may feel too tall during dinner. Trim the stems, spread the greenery wider, or move taller pieces to the ends. A centerpiece should improve the table, not create a leafy privacy fence between guests.
Another practical lesson is to keep the lower display simple. It is tempting to fill the hidden compartment with every charming object you own: candles, gems, shells, tiny pumpkins, miniature signs, fairy lights, and possibly a small ceramic squirrel. Resist the urge. The lower section looks best when it has one clear idea. Sand and candles. Gems and LED lights. Faux snow and ornaments. Moss and fairy lights. Simplicity makes the reveal feel polished rather than crowded.
Weight also matters. A window box filled with glass gems can become heavier than expected. If you plan to move the centerpiece often, use lightweight filler such as faux moss, crinkle paper, foam risers hidden under a thin top layer of stones, or battery candles instead of heavy glass jars. For a permanent dining room display, weight can be helpful because it keeps the box stable. For a party setup, lighter is friendlier.
The best seasonal versions are the ones that reuse the same base while changing the mood. In spring, the centerpiece feels fresh with pastel flowers and moss. In summer, it becomes casual with white daisies, lemons, and sand. In fall, it turns cozy with leaves, berries, and warm lights. In winter, it looks festive with evergreens and ornaments. Once the structure is built, updating it takes far less time than starting from scratch. That is the real beauty of this project: it is not a one-time craft. It is a reusable decorating system wearing a cute little disguise.
Finally, the project has a handmade quality that store-bought centerpieces often miss. Tiny imperfections do not ruin it. A slightly angled stem, a visible knot of twine, or a hand-painted edge gives the piece character. The goal is not factory-perfect decor. The goal is a centerpiece that feels personal, clever, and useful. And when someone discovers the hidden compartment, you get the small but deeply satisfying reward of saying, “Oh, that? I made it from a window box.”
Conclusion
A Peek-A-Boo Centerpiece From Window Box is a smart, affordable, and wonderfully reusable DIY decor project. It turns a simple planter into a two-in-one table display: flowers on top, hidden glow underneath. With the right box, a fitted insert, safe lighting, and seasonal stems, you can create a centerpiece that works for everyday decorating, holidays, parties, and special events.
The project succeeds because it combines structure with surprise. The window box gives shape, the insert gives flexibility, the flowers give beauty, and the hidden compartment gives the “wait, what?” moment. Whether your style is rustic, romantic, modern, colorful, or proudly experimental, this centerpiece can be customized again and again. It is practical, pretty, and just a little bit sneakyin the most charming way.
SEO Tags
Note: This article is written as original web-ready content based on practical DIY centerpiece methods, container-design principles, floral styling techniques, and safe decorating practices.


