Table of Contents >> Show >> Hide
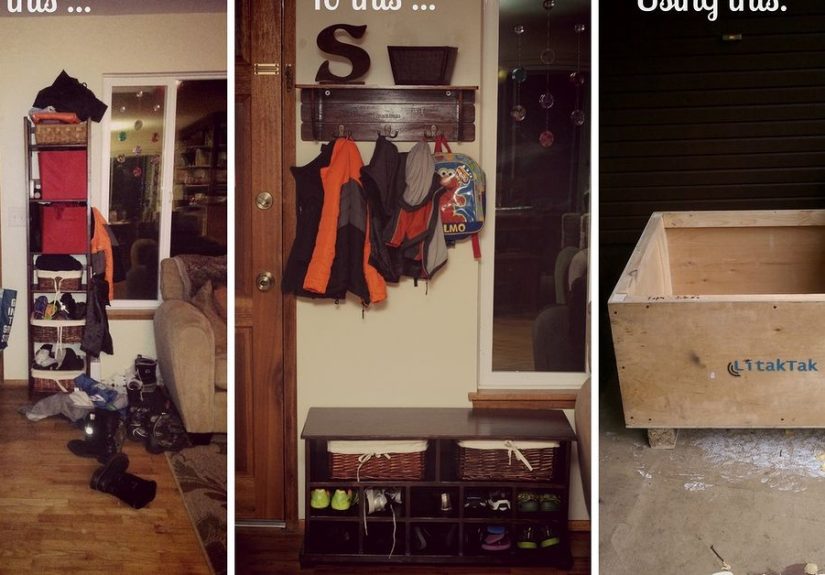
- Why a Shipping Crate Makes a Surprisingly Great Foyer Organizer
- Before You Build: The Two-Minute “Is This Crate Safe?” Check
- Plan Your Organizer Like a Pro (So It Actually Stays Organized)
- Tools and Materials
- Step-by-Step: Turn a Shipping Crate Into a Wall-Mounted Foyer Organizer
- Step 1: Clean it like it’s moving in permanently
- Step 2: Sand for hands, sleeves, and sanity
- Step 3: Strengthen the crate (optional, but recommended)
- Step 4: Create mail slots inside
- Step 5: Add a “pocket shelf” for everyday essentials
- Step 6: Install hooks for keys, leashes, and “I’m late” items
- Step 7: Finish it (paint, stain, or clear coat)
- Step 8: Mount it safely (this is non-negotiable)
- Customization Ideas That Make It Look Built-In (Without Actually Being Built-In)
- Styling Tips (So It’s Functional and Cute)
- Troubleshooting: Common DIY Speed Bumps (and Fixes)
- Maintenance: Keeping Your Entryway Organizer Working
- Wrap-Up: A Smarter Doorway, One Crate at a Time
- Real-World Experiences: What People Learn After Living With a Shipping Crate Foyer Organizer
Your foyer has one job: stop the chaos at the door before it sprints deeper into your home.
Shoes multiply. Keys vanish. Mail forms a paper mountain range on the nearest flat surface.
And somehow your sunglassesyour one pairhave developed the magical ability to teleport.
The fix doesn’t have to be expensive, bulky, or “built-in or bust.” One of the smartest (and most satisfying) DIY upgrades is turning a wooden shipping crate into a foyer organizer:
a wall-mounted drop zone that corrals mail, keys, leashes, and daily grab-and-go essentialswhile looking like you meant to do it all along.
This guide walks you through a practical, good-looking build with safety checks, customization ideas, and pro-level organization logicwithout turning your entry into a furniture showroom or your weekend into a three-season saga.
Why a Shipping Crate Makes a Surprisingly Great Foyer Organizer
Shipping crates are basically rugged wooden boxes designed to survive shipping, stacking, and the general indignities of logistics. Translation: they’re sturdy, simple, and often made from real wood (not the “crumbly vibes” of flimsy composites).
That built-in structure gives you instant compartments and a frame you can screw into without a lot of fussy joinery.
What you get from one crate
- Instant vertical storage: A wall-mounted organizer uses “air space,” not floor space.
- Natural compartments: The crate becomes the body for mail slots, shelves, or bins.
- Customizable layout: Hooks underneath, shelf on top, dividers insideyour door’s your rules.
- Warm, textured style: Wood brings character, even in tiny entryways.
Before You Build: The Two-Minute “Is This Crate Safe?” Check
Most DIY regret comes from skipping the boring part. So do the boring part. It’s fast, and it prevents you from accidentally turning your foyer organizer into a “mystery chemical air freshener.”
1) Look for a stamp or markings
Many wood packaging materials used in international shipping are marked to show they were treated to prevent pests. You may see codes like HT (heat treated) or MB (methyl bromide fumigated).
If you see MB, don’t use it for an indoor projectchoose a different crate.
2) Use your senses (yes, really)
- Strong chemical odor? Pass.
- Oily stains, unknown spills, or sticky residue? Pass.
- Visible mold or soft, punky wood? Pass.
3) Basic prep rules
Even a “clean-looking” crate should be scrubbed, dried completely, sanded for splinters, and sealed for indoor durabilityespecially if it will hold mail, wallets, and anything you touch daily.
Plan Your Organizer Like a Pro (So It Actually Stays Organized)
The best entryway systems are simple enough to use on autopilot. If it’s complicated, nobody will use itthen your organizer becomes decorative wall art for your clutter.
Build your crate organizer around the items that reliably show up at the door every day.
Choose your “Doorway Essentials” (most households)
- Keys (hooks)
- Mail (slots or basket)
- Sunglasses / wallet (small shelf or tray area)
- Dog leash (sturdy hook)
- Outgoing items (one labeled spot: “OUT”)
Decide where it will live
Put it near the door you use most. Not the “formal” front door that gets opened twice a year when a delivery person can’t find the other entrance.
If you have a narrow foyer, wall-mounting is your best friend.
Pick a layout (three reliable options)
- The Minimalist Drop Zone: top shelf + inside bin + 4–6 hooks.
- The Mail Commander: vertical dividers inside for mail + “OUT” slot + hooks underneath.
- The Family Launchpad: labeled sections per person + mini chalkboard/cork strip + charging shelf.
Tools and Materials
You can keep this beginner-friendly. Power tools help, but you’re not building a yachtjust a hardworking home landing strip.
Tools
- Measuring tape + pencil
- Level
- Drill/driver + bits
- Screwdriver
- Sander or sanding block
- Stud finder (helpful) or stud-finding method
- Clamps (nice, not required)
Materials
- Wooden shipping crate (solid, not warped)
- Sandpaper (80/120/180–220 grit range)
- Wood screws (assorted: 1″ to 2″)
- Optional: 1/4″ plywood backer (for strength and easy mounting)
- Hooks (key hooks + heavy-duty hook for leash/bag)
- Optional: small cup hooks (for keys) + larger coat hooks (for bags)
- Finish: paint, stain, or clear sealer/topcoat
- Mounting hardware: screws into studs and/or rated wall anchors
- Optional add-ons: small basket, label tags, cork strip, chalkboard paint
Step-by-Step: Turn a Shipping Crate Into a Wall-Mounted Foyer Organizer
Step 1: Clean it like it’s moving in permanently
Remove nails/staples, vacuum out dust, and wipe it down with a damp cloth and mild soap.
Let it dry completely. Wood + moisture = the start of a mold hobby you didn’t ask for.
Step 2: Sand for hands, sleeves, and sanity
Start with a coarser grit to knock down splinters and rough edges, then move to finer grits for a touch-friendly surface.
Pay extra attention to the top edge (where hands land) and the bottom edge (where coats and bags love to snag).
Step 3: Strengthen the crate (optional, but recommended)
If the crate slats have gaps, add a thin plywood backer to the rear. This does three great things:
it stiffens the whole organizer, gives you a clean surface for mounting, and stops mail from doing a dramatic slow-slide into the void.
- Cut plywood to the crate’s outer dimensions.
- Pre-drill holes to avoid splitting slats.
- Screw the backer on every 6–8 inches along the edges.
Step 4: Create mail slots inside
Decide how many sections you want (2–4 works well). Cut thin wood strips or use spare crate slats as dividers.
Install them vertically inside the crate with screws or brad nails.
A simple, high-function layout:
IN (incoming mail), OUT (to send), and TO FILE (paperwork you’ll handle this week).
It’s not glamorous, but neither is digging for your property tax bill under a coupon flyer from 2019.
Step 5: Add a “pocket shelf” for everyday essentials
Attach a narrow shelf to the top or just under the crate’s bottom edge (depending on your crate shape).
This becomes the landing zone for wallets, sunglasses, and the tiny things that disappear the second you stop making eye contact with them.
- Use a board about 3–5 inches deep.
- Pre-drill, then screw from the inside of the crate into the shelf board.
- Keep the shelf shallow so it doesn’t crowd the walkway.
Step 6: Install hooks for keys, leashes, and “I’m late” items
Hooks are the MVP of entryway organization because they use vertical space and require almost zero effort.
Place 4–6 smaller hooks for keys under the crate, then add 1–2 sturdier hooks for leashes or bags.
Spacing tip: give hooks enough breathing room so keys don’t jingle-fight each other like they’re auditioning for a percussion section.
Step 7: Finish it (paint, stain, or clear coat)
A finish makes the organizer easier to clean and helps prevent splinters and grime from becoming a lifestyle.
Your choice depends on your vibe:
- Clear coat: keeps the “found-object” crate character.
- Stain + topcoat: richer color, more polished look.
- Paint: best for modern foyers or when the crate is visually… enthusiastic.
For indoor projects, water-based protective finishes are popular because they’re lower odor and dry faster. Whatever you choose, apply in thin coats, let it dry fully, and sand lightly between coats if recommended for a smoother finish.
Ventilation mattersopen a window, run a fan, and avoid finishing in a tiny closed space unless you enjoy “eau de fumes.”
Step 8: Mount it safely (this is non-negotiable)
A foyer organizer gets pulled on, bumped into, and loaded with real weight. Mounting it properly is what keeps it from becoming a surprise floor organizer.
- Best option: screw into wall studs (use a level and mark locations).
- If studs don’t line up: use wall anchors rated for the load (and choose anchors with a safety margin).
- Use at least two mounting points so it can’t twist.
Customization Ideas That Make It Look Built-In (Without Actually Being Built-In)
Add a message strip
A thin cork strip, mini whiteboard, or chalkboard-painted panel turns your organizer into a command center:
appointment reminders, school notes, “don’t forget the library books,” and the occasional motivational message like “PANTS?”
Create a charging nook
Add a small shelf with a cord pass-through hole and mount a power strip behind the crate (where safe and accessible).
Keep it simple: one spot for charging, not a tangled nest of cables auditioning for modern art.
Make it renter-friendly
If you can’t drill a lot, choose a lighter crate, keep contents minimal, and use heavy-duty picture hanging methods rated for the weight.
But whenever possible, a stud-mounted install is still the most secure solution.
Label it so your system survives real life
A label turns “random slot” into “the only place this goes.” Use simple tags:
IN, OUT, TO PAY, KIDS, CAR, etc.
Your future self will thank youprobably while running out the door with coffee in one hand and dignity in the other.
Styling Tips (So It’s Functional and Cute)
- Keep surfaces shallow: deep shelves invite clutter piles.
- Match hardware finishes: black hooks for modern, brass for warm, brushed nickel for classic.
- Add one “softener”: a small plant, a framed photo, or a mini vasejust one, not a whole botanical garden.
- Mind the height: hooks for adults around shoulder height; add a lower hook row for kids if needed.
Troubleshooting: Common DIY Speed Bumps (and Fixes)
“My crate feels wobbly.”
Add a plywood backer or corner braces inside. Tighten screws and replace any split boards.
If the wood is too thin or damaged, swap cratesstability is the whole point.
“The finish looks streaky.”
Lightly sand, wipe clean, and apply a thinner coat with consistent strokes. Don’t rush dry times.
Most finish problems come from impatience and thick coats trying to do the job of two coats in one.
“Hooks are pulling loose.”
Use longer screws, install hooks into thicker wood, or add a solid hook rail (a separate board) attached firmly to the crate.
For heavy items like bags, choose hooks designed for weight and mount them where the wood is strongest.
Maintenance: Keeping Your Entryway Organizer Working
A foyer organizer isn’t a one-and-done projectit’s a tiny system that thrives on light habits:
- Daily: keys go on hooks, wallet goes on shelf.
- Weekly: sort mail and clear “IN” down to what matters.
- Monthly: reset seasonal overflow (gloves, sunscreen, umbrellas).
The goal isn’t perfection. The goal is fewer frantic “WHERE ARE MY KEYS?” moments that echo through the house like a distress signal.
Wrap-Up: A Smarter Doorway, One Crate at a Time
Repurposing a shipping crate into a foyer organizer is one of those rare DIY wins that looks good, costs less than a store-bought “entryway system,”
and actually makes daily life easier. You’re taking an object built for function and giving it a second life as a home landing strip:
mail sorted, keys visible, essentials contained, and your entryway finally acting like the helpful gateway it was meant to be.
Build it sturdy, keep it simple, and customize it for how your household really behavesnot how it behaves in staged catalog photos.
Your foyer will thank you. Your mornings will thank you. Your keys might still try to disappear, but now they’ll have fewer places to hide.
Real-World Experiences: What People Learn After Living With a Shipping Crate Foyer Organizer
Once the organizer is up and running, the “after” phase beginsthe part where real life stress-tests your beautiful plan. The most common experience is that the crate organizer becomes the household’s default
landing spot within a day or two. That’s a good sign: if people naturally use it, your layout matches your habits. If they don’t, the organizer won’t magically teach them discipline; it needs to be even easier.
Many DIYers report that hooks are the first feature everyone adopts, because hanging keys takes one motion and zero decision-making. Mail slots take a little longer to become routine, especially if the “IN” section becomes a paper parking lot.
A useful lesson is that shallow wins. Deep shelves look helpful on day one and become clutter magnets by week two. People who keep the top shelf slim (just enough for a wallet, sunglasses, or a small tray)
tend to maintain a cleaner entryway long-term. Another repeated experience: the “OUT” slot is either life-changing or completely ignoreddepending on whether it’s placed where you can’t miss it.
If the outgoing mail spot is hidden inside the crate, it’s easy to forget. If it’s the front-most divider or a clearly labeled pocket, it gets used.
Households with kids often discover that one shared key rack is not the same as “organized.” The organizer works best when each person has a predictable zone:
one hook per backpack, one labeled mail section for school papers, and a lower hook row for little hands. Without that, the crate organizer becomes a single crowded cluster,
and then everyone starts “temporarily” dropping items on the nearest surface again (classic foyer relapse). Pet owners frequently add one heavier hook after the fact for a leash or harness,
because leashes are awkward and tend to fall off smaller hooksso overspec that part from the start.
Another common experience: finishing the wood is not optional if you want a smooth daily interaction. Unsealed wood can feel rough, shed dust, and snag fabric.
People who apply a clear protective coat (even a simple water-based finish) say the organizer stays cleaner and feels more “furniture-like” over time. The same goes for sanding: if you think you sanded enough,
run your hand along every edge again. Your sleeves will find the one missed splinter faster than you can say “why is my sweater unraveling.”
Finally, there’s the “I didn’t realize how much stuff lived at my door” moment. Many DIYers end up editing their entryway inventory:
fewer shoes kept by the door, fewer random items allowed to camp there, and a habit of clearing mail weekly. The organizer doesn’t just store thingsit reveals patterns.
If it constantly overflows, that’s not a sign you need a bigger crate; it’s a sign you need a clearer system (and maybe a five-minute weekly reset).
The best long-term setups aren’t the fanciestthey’re the ones that stay easy on your busiest day, when you’re tired, late, and operating on autopilot.