Table of Contents >> Show >> Hide
- Why Palm Seeds Are Different (and Why They Test Your Patience)
- Step 1: Choose Seeds That Actually Want to Grow
- Step 2: Clean the Seed (Yes, It Matters)
- Step 3: Decide Whether to Pre-Soak (Usually a Good Idea)
- Step 4: Pick Your Germination Setup
- Step 5: Nail the Two Big ConditionsWarmth and Moisture
- What Sprouting Looks Like (So You Don’t Mistake Success for a Worm)
- Realistic Timelines (Because “Any Day Now” Can Mean Many Things)
- Common Problems (and How to Fix Them Without Losing Your Mind)
- After the Sprout: How to Raise a Palm Seedling Like a Pro
- Should You Store Palm Seeds or Plant Immediately?
- A Simple, Reliable Palm Seed Routine (Recap)
- Grower Notes: of Real-World “This Is What It’s Actually Like”
- Conclusion
Growing a palm from seed is basically signing up for a long-term relationship with a plant that refuses to be rushed.
If you’re the type who checks the oven window every 45 seconds, palms will build character. The payoff, though, is
huge: you get a unique, often tougher plant than a pampered nursery transplant, and you get bragging rights that
last longer than most streaming subscriptions.
This guide walks you through how to sprout palm trees from seedstep by stepwith the “why” behind each move.
You’ll learn how to pick good seeds, clean them safely, create the warm conditions palms love, and keep seedlings
alive past the “tiny green noodle” stage.
Why Palm Seeds Are Different (and Why They Test Your Patience)
Palms don’t behave like tomato or zinnia seeds. Many species germinate slowly and unevenly because the embryo inside
the seed can be small or not fully developed when the fruit drops. Translation: the seed sometimes needs extra time
just to “finish growing” internally before it can sprout.
The good news: you can dramatically improve your odds by controlling three things palms care about more than your
motivational quotes do: freshness, cleanliness, and warmth.
Step 1: Choose Seeds That Actually Want to Grow
Fresh beats fancy every time
If you only remember one thing: fresh palm seed is usually best. Many palm seeds lose viability fast,
and even the ones that store well tend to sprout faster when they’re newly cleaned and planted.
Where to get palm seeds
- Local palms (with permission): You know the fruit’s age and ripeness, which is a big advantage.
- Reputable seed sellers: Look for harvest dates, cleaning details, and realistic germination timelines.
- Fallen fruit in warm climates: Often ripe, often viablejust don’t “borrow” from protected areas or private property.
Quick viability checks (no lab coat required)
-
Cut test (best for a small sample): Split a few seeds. Healthy endosperm is typically firm, not mushy.
The embryo area shouldn’t look shriveled or discolored. -
Float test (use with caution): Some non-viable seeds float, but many palm species naturally float in
water. Floating is not an automatic “trash it.” -
Coconut “sloshing” test (if you’re sprouting coconuts): A mature, viable nut often has liquid you can
hear when you shake it.
Step 2: Clean the Seed (Yes, It Matters)
Most palm seeds are wrapped in fleshy fruit pulp that should be removed before planting. That pulp can harbor fungi,
inhibit germination in some cases, or simply rot and turn your pot into a science experiment.
Safety note: wear gloves when needed
Some palm fruit pulp can irritate skin (certain species contain needle-like calcium oxalate crystals in the pulp).
If you’re not sure what you’re handling, use gloves. Your future self will thank you.
Easy cleaning method for home growers
- Soak the fruits in water to soften the pulp. If possible, change the water daily.
- Rub or peel off the softened pulp by hand or with a brush. Rinse thoroughly.
- Air-dry the cleaned seeds for a day or two in a shaded, well-ventilated place (not direct sun).
If you’re processing a lot of seeds, growers use more aggressive methods (screens, abrasion, and so on). For most
home setups, soaking + rubbing + rinsing is plenty.
Step 3: Decide Whether to Pre-Soak (Usually a Good Idea)
A water soak helps rehydrate seeds and can speed early stages of germination. Many recommendations fall in the
1–7 day range, and some extension guidance suggests about 3 days for certain palms,
changing the water daily.
How to soak palm seeds
- Place cleaned seeds in a container of room-temperature water.
- Change the water daily if you can.
- After soaking, plant immediately. Don’t soak and then storesome seeds respond poorly to that switch.
Step 4: Pick Your Germination Setup
You can sprout palm seeds in pots, trays, or the famously low-drama “baggie method”. The best method is
the one you’ll actually maintain without turning it into a forgotten “future project” behind the cereal boxes.
Option A: Pots or seed trays (classic and simple)
Best for: growers who want seedlings ready to stay put once they sprout.
- Container: nursery pot with drainage holes (palm roots hate swamp living).
-
Medium: a well-draining seed-starting mix (think airy, not dense). Many growers add perlite for
extra drainage. - Planting depth: a common rule is to plant about as deep as the seed is thick, or partly buried.
- Moisture: evenly moist, not soggy.
Option B: The baggie method (excellent for slow or rare seeds)
Best for: keeping moisture stable and checking progress without digging up the seed.
- Moisten a small amount of clean seed-starting mix or sphagnum moss (damp like a wrung-out sponge).
- Place seeds in a zip-top bag with the damp medium (don’t pack them tightly together).
- Seal the bag and label it with the species and date.
- Keep it in a warm spot (more on temperature below).
- Check every 1–2 weeks for mold and sprouting. Vent briefly if condensation is extreme.
When you see a root or a clear “button”/sprout structure (depending on the species), move the seed gently into a pot.
Handle sprouting seeds carefullytiny roots are dramatic and will faint at the slightest insult.
Step 5: Nail the Two Big ConditionsWarmth and Moisture
Temperature: your secret weapon
Many palms germinate best in warm conditions, often in the neighborhood of mid-80s to mid-90s °F.
Some species respond well to bottom heat, like a seedling heat mat with a thermostat.
If your house runs cool, your palm seeds may not be “dead”they may just be “thinking about it.” Warmth can turn
“months” into “weeks” for certain species.
Moisture: consistent, not swampy
Palm seeds typically want steady moisture. Letting the medium dry out can stop progress, but keeping it waterlogged
invites rot. Aim for “moist cake,” not “wet soup.”
What Sprouting Looks Like (So You Don’t Mistake Success for a Worm)
Palms have two main germination styles that can look very different:
-
Remote germination: a tube-like structure grows away from the seed, then roots and a shoot develop
at a distance. People often mistake the early structure for a root. -
Adjacent germination: a swollen “button” forms right next to the seed, and the root and shoot emerge
from that structure.
In both cases, the seed often stays attached and continues feeding the seedling for a surprisingly long time. Don’t
panic if the seed is still there doing its job.
Realistic Timelines (Because “Any Day Now” Can Mean Many Things)
Palm seed timelines range from “pretty quick” to “did I plant a rock?” Even within one species, germination can be
unevensome pop early, others show up late like they’re making an entrance.
Examples you may encounter
- Sabal palmetto (cabbage palm): can sprout relatively quickly under warm, uniformly moist conditions.
- Washingtonia robusta (Mexican fan palm): often germinates fast in warm conditions.
- Syagrus romanzoffiana (queen palm): commonly germinates slowly and irregularly, often weeks to months.
- Roystonea regia (royal palm): can take many monthsits embryos may be immature when the fruit drops.
- Bismarckia nobilis (Bismarck palm): often a slow starter that appreciates high heat and patience.
The takeaway: if your setup is warm, moist, and clean, give seeds time before you declare defeat. Some palms are just
late bloomers with good PR.
Common Problems (and How to Fix Them Without Losing Your Mind)
Problem: Mold in the bag or pot
- Cause: too wet, poor airflow, or leftover fruit pulp.
- Fix: rinse seeds, refresh to a cleaner medium, reduce moisture slightly, and vent briefly as needed.
Problem: Seeds rot before sprouting
- Cause: waterlogged medium, cold temps, or non-viable/immature seeds.
- Fix: improve drainage, increase warmth, start with fresher seed next round.
Problem: “Nothing happens” for weeks
- Cause: temperature too low, or species naturally slow/uneven.
- Fix: add bottom heat, keep moisture steady, and keep waiting (yes, really).
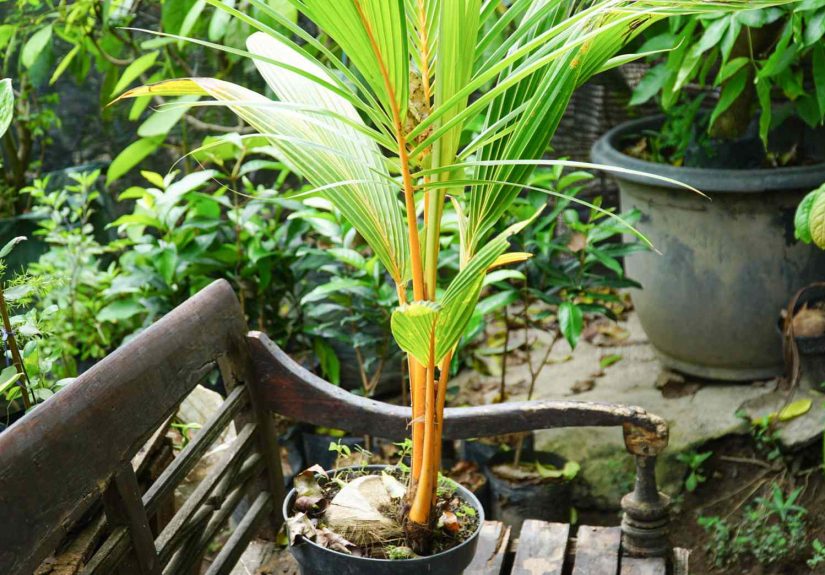
After the Sprout: How to Raise a Palm Seedling Like a Pro
When to pot up
If you used the baggie method, pot sprouted seeds once you see a clear root or sprouting structure. If your seed
sprouted in a pot, wait until it’s stable and producing its early leaves before you disturb it.
Light
Seedlings usually do well in bright, indirect light at first. Some palms tolerate more sun as they mature, but tiny
seedlings can scorch if you go from “indoors” to “full afternoon sun” overnight.
Watering
Keep the mix lightly moist. Let the top surface dry slightly between waterings, but don’t allow the root zone to
become bone-dry for long periods.
Feeding
Avoid heavy fertilizing early on. Once the seedling has a few leaves and is actively growing, a gentle, balanced
fertilizer at a low rate can help. Overfeeding can burn young roots and cause more harm than good.
Airflow and disease prevention
Palms can be susceptible to root problems when soils stay overly wet and oxygen-poor. Use a well-drained mix and
don’t let pots sit in standing water. Healthy roots like air as much as leaves like light.
Should You Store Palm Seeds or Plant Immediately?
In general, planting soon after cleaning is the safest path. If you must store seeds, many recommendations emphasize
warm storage (not a cold fridge) for tropical palms. Some species tolerate storage better than others, but low
temperatures can reduce viability for many tropical types.
If you’re buying seeds, ask about harvest date and storage conditions. “Fresh” is not a vibeit’s a timestamp.
A Simple, Reliable Palm Seed Routine (Recap)
- Get ripe, fresh seed when possible.
- Remove all fruit pulp; rinse well; air-dry briefly.
- Soak 1–3 days (up to a week for some growers), changing water daily; plant immediately afterward.
- Use a clean, well-draining medium and consistent moisture.
- Keep it warmoften mid-80s to mid-90s °F is the “sweet spot.”
- Be patient and monitor for mold/rot.
- Pot up gently and grow seedlings in bright, indirect light with careful watering.
Grower Notes: of Real-World “This Is What It’s Actually Like”
Most people imagine sprouting palm trees from seed as a tidy timeline: Day 1 you plant it, Day 10 it sprouts, Day 30
you’re basically running a tropical resort. In reality, it’s more like: Day 1 you plant it, Day 14 you start
negotiating with the seed, Day 60 you Google “palm seed germination time” again like it’s going to change, and Day
120 you suddenly notice a tiny structure that wasn’t there yesterday and do a victory lap around the kitchen.
One of the most common “aha” moments for new palm growers is realizing that the first visible growth might not look
like a normal sprout. Some species send out a tube-like structure that looks like a pale root or a weird drinking
straw. Others form a chunky “button” that seems to cling to the seed like it’s refusing to let go of the past. Both
can be totally normal. The key is resisting the urge to dig, tug, or “just check.” Palm seeds reward calm curiosity,
not constant excavation.
Warmth is usually the make-or-break factor people underestimate. A seed-starting setup that works for basil can be
too cool for palms. Many growers see a big difference when they add bottom heat or move seeds to a consistently warm
spot. The temperature doesn’t need to be extreme, but it should be steady. A seed that sits in “kind of warm”
conditions can stallthen suddenly take off when the heat becomes reliable.
Moisture is the second surprise. Beginners often swing between two extremes: keeping the medium so wet it could host
tadpoles, or letting it dry out because they’re scared of mold. The “just right” zone feels boring: evenly moist,
airy, and not dramatic. If you use the baggie method, condensation can trick you into thinking the mix is wetter
than it is. A quick squeeze test helpsif water drips, it’s too wet; if it holds shape but doesn’t drip, you’re
usually in a good range.
Another reality check: germination can be uneven even when you do everything correctly. You might get one seed that
sprouts early, one that sprouts months later, and one that never sprouts at all. That isn’t always “user error.”
Seed maturity, storage history, and natural variation all play a role. Many hobbyists improve their success simply
by planting more seeds than they think they need and by labeling everything. Time blurs together when you’re waiting
on palmslabels keep you honest.
Finally, seedling care is where palm growing becomes less like “sprouting” and more like “raising.” Tiny palms can
look like grass at first, and it’s tempting to treat them like any other seedling. But palms often prefer a careful,
steady approach: bright light without harsh scorch, moisture without suffocation, and gentle feeding once growth is
consistent. If you can master “steady and boring,” you’ll look up one day and realize you’ve got a real palmbuilt
from a seed you almost gave up on. That’s the fun part: the seed teaches patience, then rewards it with a plant that
makes your space feel a little more like vacation.
Conclusion
To sprout palm trees from seed successfully, focus on fresh, fully cleaned seeds, steady warmth, and consistent
moisture in a well-draining medium. Choose a method you can monitor easily (pots or the baggie method), avoid
waterlogging, and prepare for timelines that range from quick to months-long depending on the species. If you keep
conditions stable and resist the urge to over-handle sprouting seeds, you’ll dramatically improve germination rates
and raise stronger seedlingsone slow, satisfying leaf at a time.