
Table of Contents >> Show >> Hide
- Why Penny Tile + a Floating Shelf Works So Well
- Plan First: Layout, Height, and Shelf Placement
- Tools and Materials You’ll Need
- Step-by-Step: Installing a Penny Tile Backsplash
- How to Install a Floating Shelf Over a Penny Tile Backsplash
- Design Tips: Grout Color, Shelf Finish, and Styling
- Maintenance and Cleaning
- Common Mistakes to Avoid
- Real-Life Experiences and Extra Tips for Success
Penny tile looks tiny and cute, but don’t let those little circles fool youthis is a high-impact
upgrade that can totally change your kitchen or bathroom. Pair it with a simple wood floating shelf
and suddenly your basic sink wall looks like it belongs in a design magazine (or at least on
Remodelaholic). The catch? Penny tile can be a bit fussy, and drilling into your brand-new backsplash
for a floating shelf is mildly terrifying if you don’t have a plan.
This guide walks you through how to install a penny tile backsplash and safely hang a floating
shelf over it. We’ll talk layout, thinset, grout, drilling into tile, and how to avoid the dreaded
“you can see every sheet seam from across the room” problem. Sprinkle in a few real-life lessons
learned and you’ll be way ahead of the curve before you even open the first box of tile.
Why Penny Tile + a Floating Shelf Works So Well
Penny round tile is basically texture for your walls. The small, round pieces catch light, add subtle
movement, and create a timeless backdrop that works with everything from modern black cabinets to
classic white shaker fronts. The pattern also helps disguise minor imperfections in walls better than
a huge flat slab would.
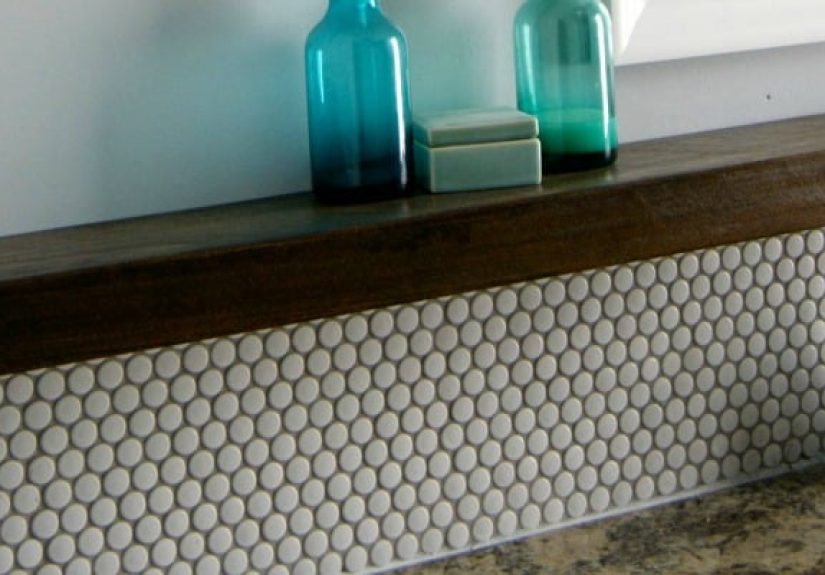
A simple wood floating shelf layered over the penny tile adds:
- Warmth: Wood balances the cool, glossy feel of tile.
- Function: You gain storage for everyday items or décor right above the sink.
- Visual break: The horizontal shelf line breaks up the vertical height of your wall so it doesn’t feel like a giant panel of tile.
The trick is sequencing and planning: you need to know where that shelf will go before you set
the tile, or you’ll be drilling blindly later and hoping you hit a stud instead of just your nerves.
Plan First: Layout, Height, and Shelf Placement
1. Decide Your Backsplash Height
For kitchens, penny tile backsplashes usually go from the countertop to the bottom of the upper
cabinets, or at least 18 inches above the counter. In bathrooms, they might stop a few inches above
the faucet, or go all the way up behind the mirror for a full feature wall. Decide this early so you
know how many rows of penny rounds you’ll need.
2. Mark Your Shelf Line and Studs
Before tiling, use a stud finder to mark studs along the wall and lightly mark them with painter’s
tape. Then decide where the floating shelf will go and draw a level line for the top or bottom of the
shelf supports. This line will guide both your tile cuts and your bracket placement later.
If you can align your shelf brackets with at least two studs, do it. That gives your floating shelf a
solid anchor even if you’re using tile-safe wall anchors in other spots.
3. Dry-Fit Your Penny Tile Sheets
Penny tiles usually come on mesh-backed sheets. Lay them out dry (no thinset) on the countertop and up
the wall to see where seams will land and how cuts will fall around outlets or the shelf line. Dry
fitting is especially important with penny tile because obvious sheet lines can ruin the look if
they’re not aligned well.
Start your dry layout from the most visible corner or the focal point (usually behind the faucet or
range) and work outwards. That way, your nicest symmetry is front and center, and any weird cuts are
pushed into less-visible corners.
Tools and Materials You’ll Need
- Penny round tile sheets
- Thinset mortar (for walls) and a notched trowel (usually 3/16″–1/4″, per tile instructions)
- Tile spacers and a straight spacer or ledger at the countertop line
- Tile cutter and/or wet saw; tile nippers for tricky spots
- Grout (sanded or unsanded depending on your grout line width)
- Grout float and large sponge
- Bucket and mixing paddle for thinset and grout
- Caulk (paintable, kitchen/bath silicone or latex-silicone blend)
- Grout sealer
- Floating shelf brackets (blind shelf supports or heavy-duty brackets)
- Drill with masonry or diamond-tipped bits
- Tile-safe wall anchors (if you can’t hit studs everywhere)
- Level, tape measure, painter’s tape, pencil
Step-by-Step: Installing a Penny Tile Backsplash
Step 1: Prep the Wall
Remove any old backsplash, scrape off loose adhesive, and patch holes. The wall should be smooth,
clean, and dry. If there’s glossy paint, lightly scuff-sand and wipe off dust so the thinset bonds
better.
Along the countertop, install a temporary, perfectly level ledger (like a straight board) if your
counters aren’t dead level. This supports the first row of tile sheets and keeps everything looking
straight, even if the counter dips a bit.
Step 2: Mix and Spread Thinset (But Don’t Overdo It)
Mix thinset to about peanut-butter consistencythick enough to hold ridges but still spreadable. Only
mix enough that you can use within 20–30 minutes so it doesn’t start curing in the bucket on you.
Use your notched trowel to spread a thin, even coat on a small section of the wall, then comb ridges in
one direction. With penny tile, less is more: too much thinset will ooze between the little circles
and make grouting a nightmare. Aim for good coverage without squeeze-out.
Step 3: Set the Penny Tile Sheets
Press each sheet into the thinset, using light, even pressure. Don’t slide the sheet around or you’ll
smear your pattern. Use a grout float or a flat board to gently tap the tiles so they sit evenly and
stay flat.
Pay special attention at the seams where one sheet meets the next. Stagger the sheets or slightly
adjust individual tiles so the seams blend in and don’t create visible lines. If a tile is crooked,
slide it a touch or even pull it off the mesh and set it individually. This extra effort pays off in
that seamless look.
Step 4: Mind the Gap at the Countertop and Shelf Line
Leave a tiny gap (usually 1/8″) where the tile meets the countertop or any solid surface (like the
future shelf). Use spacers along the counter as you set your first row so the line stays straight and
you don’t end up with tiles touching the counter directly. This gap gets caulked later to allow a
little movement and prevent cracks.
Around the planned shelf area, you can tile right over the areas where brackets will eventually go.
You’ll drill through the tile later, so just make sure you know which tiles sit over studs and mark
them on a drawing or phone photo.
Step 5: Cut Tiles Around Outlets and Edges
For outlets, switches, or window trims, you’ll likely need to snip some individual tiles off the
mesh and place them one by one. Use tile nippers or a wet saw for partial cuts. Keep the circular
shape intact as much as possible so the pattern stays smooth.
Continue setting sheets and individual tiles until the entire backsplash area is covered. Wipe off
any thinset on tile faces with a damp sponge before it dries. Then let the thinset cure according to
the manufacturer’s instructions (often 24 hours).
Step 6: Choose and Apply Grout
Grout color matters a lot with penny tile. A grout that’s close to the tile color gives you a soft,
tone-on-tone, more modern look. A contrasting grout color highlights every circle and makes the wall
busier and more graphic. Think about how much visual energy you want.
Mix the grout to a thick, creamy consistency and apply with a rubber float in sweeping, diagonal
motions. The goal is to pack grout into all the gaps without leaving low spots. Work in small
sections; after a few minutes, wipe with a barely damp sponge, rinsing frequently, to remove excess
grout haze. Don’t over-scrub or you’ll pull grout back out of the joints.
Once the grout has set and the final haze is buffed off with a soft cloth, apply a grout sealer to
help resist stains and make future cleaning easier. This is especially important behind sinks or in
small kitchens where splashes are daily life.
Step 7: Caulk the Edges
At the edges where the backsplash meets the countertop, side walls, or cabinets, use a flexible
kitchen/bath caulk instead of grout. Caulk lets surfaces expand and contract without cracking and
creates a neater transition line.
How to Install a Floating Shelf Over a Penny Tile Backsplash
Step 1: Choose the Right Shelf and Brackets
For a clean, modern look, many people choose a simple slab of wood (like oak, maple, or walnut) with
hidden “blind” shelf supports. These supports screw into studs and slide into holes drilled in the
back of the shelf, making it appear to float.
If you can’t use blind supports, heavy-duty brackets that sit under the shelf and screw through the
tile into studs or wall anchors are another option. Just remember: floating shelves put a lot of
leverage on the fasteners. Don’t skimp on quality hardware, and don’t overload the shelf with heavy
dishes or appliances.
Step 2: Mark Bracket Locations on the Tile
With the backsplash finished, transfer your earlier stud marks and shelf height to the tiled wall.
Use painter’s tape on the tile to mark where you’ll drill holes. This tape also helps keep your drill
bit from wandering on the smooth tile surface.
Step 3: Drill Through the Penny Tile
Use a carbide or diamond-tipped masonry bit slightly larger than the screw or anchor you’re using.
Start slowly, with light pressure, and let the bit do the work. Once you’re through the tile and
thinset, switch to a wood or multi-purpose bit if needed to finish the hole into the stud.
If you’re not hitting a stud at a particular bracket, use a heavy-duty tile-safe anchor rated for the
expected load. Follow the manufacturer’s instructions carefully so the anchor fully expands behind the
drywall.
Step 4: Install Brackets and Mount the Shelf
Screw the brackets or blind supports into place, checking that they’re perfectly level and aligned.
Then slide or set the shelf onto the supports. If you’re using hidden supports, you may need to
pre-drill holes in the back of the wood shelf to match your bracket spacing.
Step back and check that the shelf looks level relative to the tile pattern and countertops. Make any
small adjustments now, before styling it with plants, cups, or your favorite “this used to be in the
cabinet” clutter.
Design Tips: Grout Color, Shelf Finish, and Styling
Match or Contrast the Grout?
If your kitchen or bathroom is already busy with pattern and color, using grout that’s close to the
tile color keeps the backsplash subtle and chic. On the other hand, if your space is mostly neutral, a
darker grout can turn your penny tile into a statement wall.
Picking the Floating Shelf Finish
A few popular combos:
- White penny tile + natural oak shelf for a Scandinavian, airy vibe.
- Gray penny tile + dark walnut shelf for a more dramatic, modern feel.
- Glossy white penny tile + painted shelf matching the cabinets for a seamless, built-in look.
Seal or finish the shelf with something that can handle splashes and steam, especially over a kitchen
sink. A clear matte or satin finish keeps the wood looking natural but protected.
Styling the Shelf
Keep shelf styling balanced and functional:
- Everyday items: Stacks of bowls, mugs, jars of cooking essentials.
- Pretty things: A small plant, framed art, a candle, or a decorative bottle.
- Negative space: Leave some open space so your eyes can rest and still admire the penny tile behind everything.
Maintenance and Cleaning
Penny tile backsplashes are generally low maintenance if properly sealed. Wipe them down regularly with
a mild soap-and-water solution. Avoid abrasive pads that could dull the glaze on the tiles or scratch
metal finishes nearby.
Clean grout lines occasionally with a soft brush and a gentle cleaner. If you notice stains or
discoloration, a grout-safe cleaner can help, and resealing the grout every year or two keeps it
protected from future splashes, sauce explosions, and coffee mishaps.
Floating shelves just need a quick dusting and an occasional wipe-down. If they’re wood, use a
cleaner that’s safe for the finish so you don’t strip any protective coating.
Common Mistakes to Avoid
- Using too much thinset: It oozes between tiles and makes grouting harder.
- Ignoring sheet seams: If you don’t blend sheets carefully, you’ll see a grid pattern, not a smooth field of circles.
- Not planning shelf support: Installing tile first and then guessing where to drill is a recipe for missed studs and wobbly shelves.
- Overloading the shelf: Floating shelves look strong but have limits. Display dishes and décor, not your entire cast-iron collection.
- Skipping sealer: Unsealed grout stains faster, especially in kitchens and bathrooms.
Real-Life Experiences and Extra Tips for Success
If you talk to people who’ve actually installed penny tile and floating shelves, a few themes come up
over and over again: patience, small batches, and learning when to walk away for the day.
One common lesson learned the hard way is about timing thinset and grout. It’s tempting to mix a big
batch so you “only have to clean the bucket once,” but thinset and grout both have a working time. If
you mix too much and get distracted by tricky outlet cuts, your beautiful, smooth mortar can turn into
a lumpy, half-cured mess before you even finish one wall. Mixing smaller batches keeps everything
workable and far less stressful.
Another insider tip: take photos of your tile as you go, especially under different lighting. Our eyes
can get used to what we’re seeing in the moment, but a quick phone photo often reveals things like
sheet lines, crooked rows, or a slightly off-level first course that you stopped noticing after
staring at it for an hour. Catching those issues early is a lot easier than trying to fix them once
the entire wall is tiled and grouted.
Floating shelves over tile also come with their own set of “wish I’d known” comments. Many DIYers
report that they wish they’d taken more time to line up brackets with studs from the beginning.
Anchors can work well when used correctly, but nothing beats the solid feel of a bracket lagged into a
stud. If your ideal shelf position doesn’t line up with studs, consider using more brackets or
slightly adjusting the length and placement of the shelf so at least two supports land in solid wood.
Drilling into freshly installed tile is another moment where people get nervous. The most common
mistake is using too much pressure or the wrong drill bit. Let the bit slowly grind through the glaze
and body of the tile instead of forcing it. A strip of painter’s tape where you’re drilling helps keep
the bit from wandering, and starting at a low speed gives you more control. Once you’re through the
tile, the rest of the drilling feels much more familiar.
On the design side, many homeowners say they’re happiest when they kept the overall palette fairly
simple. Penny tile already has a lot of movement, so pairing a busy countertop, strong cabinet color,
and high-contrast grout can feel overwhelming. If you love bold details, try focusing on just one or
two areas: maybe the penny tile and grout combo is the star, while the cabinets and counters stay
quiet and neutral. Or go the opposite way with soft, tone-on-tone penny tile and let a dramatic wood
shelf and styled accessories steal the show.
Finally, remember that this is a detailed project, not a race. Penny tile often takes longer than
subway tile or large-format pieces because there are so many small tiles to align and clean. Breaking
the project into phasesday one for layout and half the wall, day two for the rest, another day for
grout, and a final session for shelves and stylingkeeps the process manageable. When you’re done,
you’ll have a backsplash and floating shelf combo that looks custom, feels intentional, and makes that
entire wall work harder and look better.
The best part? Every time you walk into the room and see that shimmering penny tile behind your
perfectly placed floating shelf, you’ll know exactly how much care went into each small circle and
carefully drilled hole. It’s a big payoff for a small-tile project.


