Table of Contents >> Show >> Hide
- Why an Oatmeal Container Makes a Great Hair Accessory Organizer
- What You Need for This Easy Upcycled DIY
- How to Turn an Oatmeal Container Into a Hair Accessory Organizer
- Best Ways to Organize Hair Accessories Inside the Container
- Creative Design Ideas for an Oatmeal Container Organizer
- Common Mistakes to Avoid
- Where This Organizer Works Best
- Why This DIY Is Better Than You Might Expect
- Experience: What It Is Really Like to Use an Upcycled Oatmeal Container Hair Accessory Organizer
- Conclusion
If your bathroom drawer looks like a tiny tornado of scrunchies, claw clips, headbands, bobby pins, and mystery elastics that somehow multiply overnight, you are not alone. Hair accessories are small, useful, easy to buy, and apparently trained in the martial art of disappearing right when you need them most. The good news is that you do not need a fancy acrylic tower or a celebrity-sized vanity to get them under control. Sometimes the answer is hiding in your recycling bin, staring back at you with the humble confidence of an empty oatmeal container.
Turning an oatmeal canister into a hair accessory organizer is one of those upcycling projects that feels suspiciously smart. It is inexpensive, practical, customizable, and genuinely cute when finished. Even better, it solves a real-life problem: how to store lots of little accessories in one compact place without making your room look like a glittery disaster zone. This project works especially well for small spaces, shared bathrooms, kids’ rooms, dorm setups, and busy households where hair ties roam free like escaped livestock.
In this guide, you will learn how to transform a plain oatmeal container into a stylish, functional hair accessory organizer that actually earns its spot on your dresser. We will cover supplies, step-by-step instructions, decorating ideas, organizing strategies, common mistakes, and real-world tips for keeping the whole setup useful long after the craft glue dries. Because a DIY project should not become tomorrow’s clutter with a ribbon tied around it.
Why an Oatmeal Container Makes a Great Hair Accessory Organizer
An oatmeal container is almost weirdly perfect for this job. It is lightweight, sturdy enough for dry accessories, tall enough for headbands and brushes, compact enough for a vanity, and easy to decorate with paper, fabric, paint, or labels. The cylinder shape also helps maximize vertical storage, which matters when you are trying to organize a lot of small items without taking over every inch of your countertop.
Unlike random boxes that swallow things into a dark abyss, a repurposed oatmeal container can be designed with sections, wraps, pockets, and dividers that make accessories easier to see at a glance. That matters more than people realize. If you can see your scrunchies, you will use your scrunchies. If you cannot see your scrunchies, you will buy more scrunchies. This is how innocent crafts turn into economic policy.
There is also the sustainability angle. Upcycling an oatmeal canister keeps a useful container in circulation longer and reduces the need to buy another plastic organizer for a problem you can solve with materials you already have. That makes this project budget-friendly, eco-conscious, and satisfying in the very specific way that only practical crafts can be.
What You Need for This Easy Upcycled DIY
- 1 empty oatmeal container with lid, cleaned and fully dried
- Scissors or a craft knife
- Ruler or measuring tape
- Pencil
- Glue, decoupage medium, or hot glue for trim and heavier pieces
- Decorative paper, wrapping paper, fabric, felt, or peel-and-stick vinyl
- Optional paint or acrylic craft paint
- Ribbon, twine, labels, buttons, or other embellishments
- Optional cardboard scraps for dividers
- Optional empty toilet paper rolls or smaller tubes for inner compartments
This is a flexible project, so do not panic if your craft drawer is more “creative chaos” than “curated studio.” You can keep it minimal with paper and glue, or go full craft goblin and add compartments, handles, tags, fabric lining, and enough trim to make it look like it belongs in a boutique.
How to Turn an Oatmeal Container Into a Hair Accessory Organizer
Step 1: Clean and prep the container
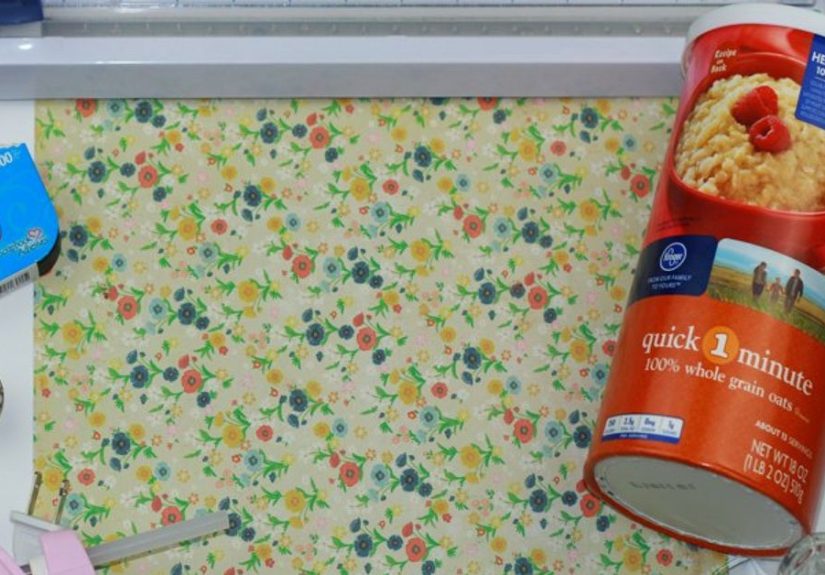
Start by emptying the oatmeal container completely. Wipe out any dust or crumbs and let the canister dry all the way. If the outside has a glossy label, lightly sanding it can help paint or glue stick better, but this step is optional. If you plan to wrap the entire container in paper or fabric, you usually do not need to sand much at all.
If you are using decoupage or decorative paper, measure the height and circumference of the container before cutting. This saves you from the classic DIY experience of being almost done and discovering your paper is somehow both too short and too crooked.
Step 2: Decide how the organizer will function
Before decorating, think about what you actually need to store. This is where the project becomes useful instead of just adorable. For example:
- Use the full container for headbands, brushes, and claw clips.
- Add inner cardboard dividers for scrunchies, bows, and barrettes.
- Glue smaller tubes inside to separate hair ties, bobby pins, and mini clips.
- Use the lid as a shallow tray for daily essentials.
If the organizer is for a child, you may want fewer compartments and wider sections. If it is for your own vanity, you might prefer more categories so you can separate everyday basics from “special occasion” hair accessories that mostly exist for optimism.
Step 3: Decorate the outside
This is the fun part. Wrap the outside of the oatmeal canister with fabric, scrapbook paper, wallpaper scraps, or peel-and-stick vinyl. If you like paint, apply a base coat first and let it dry before adding patterns, labels, or stencils. A clean, neutral finish works well for modern spaces, while floral paper, pastel paint, or gingham fabric can make the organizer feel playful and handmade.
If you want a polished look, trim the top and bottom edge with ribbon, washi tape, ric-rac, or twine. If you want a kid-friendly look, add large labels or picture icons that show what belongs inside. If you want a “this cost me fifteen dollars at a cute shop” vibe, keep the palette simple and consistent.
Step 4: Build the inside compartments
For a basic organizer, you can leave the canister open and let it hold larger accessories. For a more structured organizer, cut cardboard pieces to create sections. A simple cross divider can split the container into four compartments. Smaller cardboard rolls can be glued upright inside to hold hair ties or pins.
Line the inside with felt or decorative paper if you want a softer finish. Felt is especially helpful if you are storing metal clips or barrettes and want to reduce noise, scratching, or that annoying clink-clink sound that says, “Yes, your life is held together by twelve tiny pieces of hardware.”
Step 5: Label it so it stays organized
Labels make a surprising difference. A cute organizer becomes a functional organizer the moment every category has a place. Add simple labels like “scrunchies,” “clips,” “headbands,” or “bobby pins.” You can use sticker labels, mini tags, handwritten paper labels, or vinyl lettering. This is especially useful in shared spaces where family members need visual cues to put things back where they belong.
Best Ways to Organize Hair Accessories Inside the Container
The smartest hair accessory storage systems are not the prettiest. They are the easiest to maintain. That usually means grouping similar items together, keeping the most-used pieces easy to reach, and not stuffing every square inch like you are packing for a long-haul flight.
Organize by type
This is the easiest method. Keep hair ties together, clips together, headbands together, and bows together. It is simple, intuitive, and low-maintenance.
Organize by person
If the organizer is shared, divide sections by family member. This works especially well for siblings who both own pink things and are prepared to litigate over them.
Organize by frequency of use
Put daily-use accessories near the top or in the easiest compartment. Special occasion pieces can live at the bottom or in the back. Your weekday ponytail elastics deserve premium real estate.
Organize by size
Larger items like headbands and claw clips should go in open sections. Tiny items like bobby pins need smaller cups, trays, or mini envelopes so they do not vanish into the void.
Creative Design Ideas for an Oatmeal Container Organizer
One of the best things about this upcycled oatmeal container project is how easy it is to customize. You can make it match a bedroom, a bathroom, a vanity, or a playroom without spending much at all.
- Minimalist organizer: White paint, black label, simple shape, no fuss.
- Boho organizer: Linen fabric, twine, wooden beads, warm neutrals.
- Kid-friendly organizer: Bright colors, patterned paper, large category labels.
- Glam vanity organizer: Metallic paper, blush tones, satin ribbon, pearl accents.
- Seasonal organizer: Swap outer wraps by season or holiday for a fun refresh.
You can also turn one container into a small matching set. Use one for hair ties, one for clips, and one for headbands. Suddenly your recycled breakfast packaging has become a storage collection. Take that, impulse-buy acrylic bins.
Common Mistakes to Avoid
Skipping the planning step. If you decorate first and organize later, you may end up with a container that looks lovely but does not fit what you own.
Using flimsy dividers. Thin inserts bend quickly. Reinforce cardboard with double layers if you want compartments to last.
Overfilling it. The point is easier access, not creating a pressurized tube of hair ties.
Using it for damp items. Oatmeal canisters are best for dry accessories only. Wet combs, damp elastics, or anything moisture-heavy can wear down the container faster.
Storing it in a steamy bathroom. If possible, keep a cardboard-based organizer on a dresser, vanity, shelf, or bedroom station instead of right beside a hot shower. Humidity is not the best roommate for paperboard, adhesives, or certain beauty products.
Where This Organizer Works Best
This DIY hair accessory organizer is small-space gold. It works well on bathroom shelves, bedroom dressers, closet cubbies, playroom carts, and inside larger drawer systems. It is especially good for spaces that need vertical storage rather than wide trays. If you are short on drawer space, a decorated canister can hold an impressive amount without spreading clutter horizontally.
For kids, keep it low enough to reach and simple enough to use independently. For teens or adults, pair it with a mirror tray or small basket to create a tidy “get ready” station. For shared bathrooms, label clearly and keep only daily essentials inside to prevent overcrowding.
Why This DIY Is Better Than You Might Expect
Some upcycling projects are noble in theory and questionable in execution. This is not one of them. The oatmeal container hair accessory organizer works because it solves a very ordinary problem with a very ordinary object in a genuinely practical way. It is not trying to become a chandelier. It is not pretending cardboard is marble. It is just a smart container doing its best, which frankly is relatable.
It is also easy to update. If your style changes, rewrap it. If your storage needs change, adjust the dividers. If the container wears out after long use, you can make another one in an afternoon. That flexibility makes this a useful, forgiving DIY, especially for homes that need budget-friendly organization more than one more decorative object with no actual job.
Experience: What It Is Really Like to Use an Upcycled Oatmeal Container Hair Accessory Organizer
The first thing I noticed after making an upcycled oatmeal container to store hair accessories was not how cute it looked, though it did look pretty great sitting on a dresser instead of hiding in a drawer like a guilty secret. What stood out most was how much easier the morning routine became. Before the organizer, hair ties seemed to live in twelve different places at once: one on the nightstand, three in a random cup, two on a wrist, five in the car, and at least one forming a long-term relationship with the vacuum cleaner. After the organizer, there was an actual home base.
That changed the rhythm of getting ready. Instead of digging through a drawer and accidentally finding old lip balm, a single earring, and a receipt from some mysterious purchase, it became possible to grab exactly what was needed in seconds. The scrunchies had one section. The claw clips had another. Bobby pins no longer behaved like stealth ninjas slipping under every object in sight. Even headbands, those dramatic queens of awkward storage, finally had a place where they were visible and not bent into odd shapes.
Another surprising benefit was that the organizer encouraged editing. Once everything had to fit into one container, it became much easier to tell which accessories were useful and which ones were just taking up emotional real estate. That stretched-out elastic from 2019? Retired. The glitter bow that shed craft debris like a tiny disco hazard? Farewell. The clips that pinched, slipped, or looked cute but had the structural integrity of overcooked pasta? Gone. The organizer quietly turned into a decluttering tool, which is not bad for something that used to hold oats.
It also became easier to maintain than expected. Because the container was vertical and compact, it never invited the kind of dumping behavior that happens with wide baskets or open drawers. There was less temptation to throw things in like confetti after a parade. The smaller footprint made it feel manageable. A quick reset at the end of the day only took a minute, which meant the system was much more likely to survive real life.
In a shared space, the project was even more useful. One container can be divided by person, color, or category, which helps reduce the low-level household drama that somehow erupts over hair ties. It also gives kids a visual system they can follow. If they know bows go in one section and elastics go in another, cleanup becomes easier and a little less theatrical.
There is also something deeply satisfying about using an organizer that does not feel disposable. It started as packaging, became decor, and ended up as a practical everyday tool. That kind of transformation gives the project personality. It feels creative without being fussy. It feels resourceful without looking cheap. And unlike many store-bought organizers, it can be adapted as needs change. Add another divider. Wrap it in new paper. Make a matching second one. No commitment ceremony required.
If there is one lesson from the experience, it is this: good organization is less about buying the perfect product and more about creating a simple system you will actually use. The upcycled oatmeal container works because it is visible, compact, easy to customize, and just structured enough to keep little items from going feral. It will not magically make every countertop spotless, and it will not stop bobby pins from pursuing a life of mystery altogether, but it does make the daily mess far easier to manage. For a humble cardboard canister, that is a pretty strong résumé.
Conclusion
An upcycled oatmeal container to hair accessory organizer is proof that smart storage does not have to be expensive, complicated, or boring. With a little creativity, a basic cardboard canister can become a useful organizer that keeps clips, scrunchies, elastics, and headbands tidy and easy to reach. It works in small spaces, fits a range of decorating styles, and gives new life to something that might otherwise be tossed away.
Best of all, this project is realistic. It is quick enough for a weekend craft, practical enough for everyday use, and customizable enough to feel personal. Whether you want a neat vanity, a kid-friendly hair station, or a budget-friendly way to reduce clutter, this simple upcycled organizer can do the job beautifully. Not bad for something that started its life helping you make breakfast.