Table of Contents >> Show >> Hide
- Why Extend Kitchen Cabinets to the Ceiling?
- Tools and Materials You May Need
- Way 1: Add Crown Molding or Stacked Trim
- Way 2: Build a Cabinet Extension Box
- Way 3: Add a Second Row of Cabinets or Decorative Panels
- How to Pick the Best Method for Your Kitchen
- Common Mistakes to Avoid
- Design Ideas for a More Custom Look
- Real-World Experience: What It Is Like to Extend Cabinets to the Ceiling
- Conclusion
Note: This article is written for publication and synthesizes practical U.S. home improvement, cabinetry, and finish-carpentry guidance into original, reader-friendly content.
That awkward space above kitchen cabinets is a mysterious place. It collects dust, random serving bowls, holiday tins from 2009, and occasionally your hopes of having a cleaner-looking kitchen. The good news? You do not always need a full kitchen remodel to make upper cabinets look taller, more custom, and more expensive. You can extend cabinets to the ceiling in a few smart ways, depending on your budget, ceiling height, cabinet style, and tolerance for sawdust in your hair.
In this guide, we will walk through 3 easy ways to extend cabinets to the ceiling: adding crown molding, building a cabinet extension box, and installing a second row of cabinets or decorative panels. Each method can make your kitchen feel more finished, reduce dust-catching gaps, and create the built-in look designers love. Even better, these ideas work for many kitchen styles, from simple Shaker cabinets to traditional raised-panel cabinetry.
Why Extend Kitchen Cabinets to the Ceiling?
Before grabbing a nail gun like a contestant on a renovation show, it helps to understand why ceiling-height cabinets are so popular. Extending kitchen cabinets upward draws the eye toward the ceiling, which can make the room feel taller and more intentional. It also removes the “floating box” effect that happens when standard wall cabinets stop short and leave a shadowy gap above them.
The space above cabinets can be practical, too. If you add real storage, you gain a home for rarely used items like turkey platters, cake stands, punch bowls, and that waffle maker you swear is about to make a comeback. If you choose a decorative extension instead, you still get a cleaner, more custom appearance without paying for all-new cabinetry.
Best Candidates for Cabinet Extensions
This project works especially well when your existing cabinets are structurally sound, level enough to build from, and worth keeping. Painted cabinets are often easier to modify because new trim, MDF, or plywood can be primed and painted to match. Stained wood cabinets can also be extended, but matching wood grain and finish takes more patience and usually more money.
Before choosing a method, measure the gap between the top of the cabinets and the ceiling in several places. Do not assume the ceiling is perfectly level. It is a ceiling, not a laser beam. Many homes have slight waves, slopes, or dips, and those tiny differences become obvious when trim meets the ceiling.
Tools and Materials You May Need
Your exact supply list depends on the method you choose, but most cabinet-to-ceiling projects use common DIY materials. Plan ahead so you are not standing on a step ladder at 9 p.m. wondering whether wood filler can replace mathematics. Spoiler: it cannot.
- Tape measure and pencil
- Stud finder
- Level or laser level
- Miter saw or miter box
- Brad nailer or finish nails
- Construction adhesive, where appropriate
- Wood screws
- 1x boards, plywood, or MDF panels
- 2×2 blocking or cleats
- Crown molding, cove molding, or flat trim
- Wood filler and paintable caulk
- Primer and cabinet-grade paint
- Safety glasses, hearing protection, and a sturdy ladder
If electrical wiring, ventilation, sprinkler systems, or hidden plumbing may be inside a soffit or wall cavity, stop and consult a professional. Cabinet extensions are fun. Accidentally discovering a pipe with a screw is not.
Way 1: Add Crown Molding or Stacked Trim
The easiest way to extend cabinets to the ceiling is to use crown molding, stacked molding, or a combination of trim pieces. This method works best when the gap above the cabinets is relatively small, usually a few inches to around eight inches. It does not create usable storage, but it creates a polished transition between cabinet and ceiling.
Crown molding is especially effective in traditional, transitional, farmhouse, and classic kitchens. For modern kitchens, use a simpler flat trim, square molding, or clean cove profile instead of ornate crown. The goal is to match the mood of your kitchen, not make your cabinets look like they are wearing a fancy hat to a casual dinner.
How This Method Works
First, install a mounting strip or blocking along the top of the cabinets. This gives the molding something solid to attach to. Then cut the crown molding to length, miter outside corners, and cope or carefully miter inside corners. Attach the molding with brad nails, keeping the bottom edge aligned with the cabinet top or face frame. Fill nail holes, caulk seams, prime raw material, and paint everything to match the cabinets.
If your cabinets are full-overlay or frameless, you may need a sub-crown or wood backing strip before attaching the visible molding. Without it, the molding may not have enough surface to fasten securely. A simple strip of wood hidden behind the crown can solve the problem and make the final trim look much cleaner.
Best For
- Small gaps between cabinets and ceiling
- Homeowners who want a quick visual upgrade
- Kitchens with traditional or transitional styling
- Painted cabinets that are easy to touch up
- Budgets that do not allow for new upper cabinets
Pro Tips for Crown Molding Success
Measure every cabinet run separately. Walls and ceilings are rarely perfectly square, so copying one measurement across the kitchen can create gaps. When cutting crown molding, remember that it sits at an angle. Many DIYers cut it upside down and backward on the miter saw, which sounds ridiculous until you realize that is actually the correct method for many crown profiles.
Use paintable caulk where trim meets the ceiling or cabinet, but do not use caulk to hide huge mistakes. Caulk is a finishing touch, not a construction strategy. For wider gaps, use scribe molding or an additional flat trim piece before caulking.
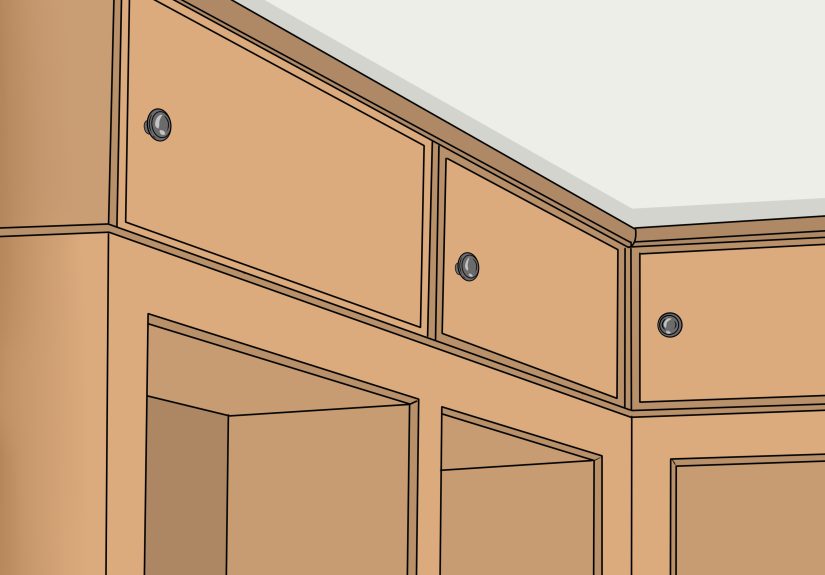
Way 2: Build a Cabinet Extension Box
If the gap above your cabinets is too large for crown molding alone, build a cabinet extension box. This is one of the most popular DIY methods because it creates the appearance of taller cabinets without replacing the original boxes. Think of it as giving your cabinets platform shoes, but tasteful ones.
This approach uses plywood, MDF, or 1x boards to fill the vertical space between the cabinet tops and the ceiling. Once painted to match the cabinets and finished with trim, the extension looks like part of the original cabinet design. It is a strong option for gaps around 8 to 18 inches, depending on the scale of your kitchen.
Step-by-Step Overview
Start by measuring the height from the top of the cabinets to the ceiling at multiple points. Use the smallest measurement as your guide, then plan for trim or scribe molding to cover minor ceiling variation. Cut panels from plywood, MDF, or dimensional lumber to form the front faces and exposed sides of the extension.
Next, install 2×2 blocking or cleats along the cabinet tops and, when needed, along the ceiling. The blocking gives the extension panels a secure fastening surface. Attach the front board so it sits flush with the cabinet face frame or door plane, depending on the look you want. Add side pieces where cabinet ends are exposed.
Once the extension panels are in place, add crown molding at the top and a small trim strip where the new panel meets the old cabinet. This lower trim helps hide the seam and makes the extension look intentional. Fill nail holes, sand smooth, caulk seams, prime the new wood, and paint everything to match.
Choosing the Right Material
MDF is smooth and paint-friendly, making it a good choice for painted cabinets. It does not have visible grain, so it blends well after primer and paint. Plywood is stronger and more resistant to bumps, but its edges need finishing with trim, edge banding, or careful sanding. Solid 1x boards can work beautifully, especially when their thickness lines up with the existing cabinet face frame.
For stained cabinets, use matching wood species when possible. If your cabinets are oak, maple, cherry, or hickory, a random painted MDF panel will not blend unless you plan to paint the entire cabinet run. When in doubt, take a cabinet door or drawer front to a paint or cabinet shop for color-matching help.
Best For
- Medium gaps above cabinets
- Painted cabinets
- DIYers comfortable with basic carpentry
- Kitchens where new cabinets are not in the budget
- Creating a built-in look without changing the cabinet layout
Way 3: Add a Second Row of Cabinets or Decorative Panels
The most functional way to extend cabinets to the ceiling is to install a second row of upper cabinets, small cubbies, glass-front cabinets, or decorative panels above the existing cabinets. This method costs more than trim or simple extension boxes, but it can add real storage and a high-end stacked-cabinet look.
Stacked cabinets work well in kitchens with nine-foot ceilings or taller ceilings, although they can also work in some eight-foot rooms if the proportions are right. The upper row is often shallower or shorter than the main wall cabinets. Some homeowners use glass doors with interior lighting for display, while others choose solid doors for hidden storage.
How This Method Works
Measure the open space above the existing cabinets and determine whether stock cabinets, custom boxes, or decorative panels will fit. If using real cabinets, they must be securely fastened to wall studs or structural blocking. Do not rely only on the cabinets below to carry the load, especially if you plan to store heavy items.
After installation, use filler strips, face-frame trim, and crown molding to connect the upper row visually to the original cabinets. Painting or staining everything to match is the secret to making stacked cabinets look original rather than added later. Hardware should also be coordinated. If the lower cabinets have knobs or pulls, decide whether the top row needs matching hardware or a cleaner touch-latch style.
Decorative Panels as a Budget Alternative
If real cabinets are too expensive or the gap is not deep enough for practical storage, install decorative panels instead. These panels can mimic cabinet doors without functioning as storage. They are lighter, simpler, and often less expensive. Once painted and trimmed, false panels create the illusion of stacked cabinets while avoiding the complexity of hanging new cabinet boxes.
Best For
- Larger gaps above cabinets
- Kitchens where extra storage is useful
- High ceilings
- Homeowners who want a premium custom look
- Cabinets with available matching doors, panels, or finishes
How to Pick the Best Method for Your Kitchen
Choosing the right cabinet extension method depends on three main factors: gap height, cabinet style, and budget. A tiny gap may only need crown molding. A medium gap may look best with a boxed extension. A large gap may justify stacked cabinets or decorative panels.
| Gap Size | Best Method | Main Benefit |
|---|---|---|
| 1 to 6 inches | Crown molding or stacked trim | Fast, affordable, polished finish |
| 6 to 18 inches | Cabinet extension box | Custom built-in appearance |
| 12 inches or more | Second row of cabinets or panels | Extra storage or high-end style |
Also consider your ceiling. If it is noticeably uneven, a perfectly straight cabinet extension may highlight the problem. In that case, use scribe molding, flexible caulk lines, or a slightly stepped trim profile to disguise small variations. If the ceiling is extremely wavy, consult a carpenter before committing to a rigid, ceiling-tight design.
Common Mistakes to Avoid
Ignoring the Cabinet Doors
Make sure the new trim or extension does not block cabinet doors from opening. This is especially important near corners, refrigerator panels, range hoods, and microwave cabinets. Open every door before final installation. It is much easier to adjust trim before it is nailed, caulked, painted, and emotionally committed.
Skipping Blocking
Trim and extension panels need a secure base. Blocking, cleats, or mounting strips make the difference between a long-lasting upgrade and a wobbly piece of wood performing interpretive dance above your dishes.
Using the Wrong Caulk or Filler
Use wood filler for nail holes and paintable caulk for seams where two surfaces meet. Wood filler dries hard and sands smooth, but it can crack in flexible joints. Caulk moves slightly, which makes it better for seams between trim, cabinets, walls, and ceilings.
Forgetting Primer
Raw MDF, plywood, and pine absorb paint differently than finished cabinets. Primer helps create an even surface and improves paint adhesion. For the most seamless result, use a durable cabinet-grade paint or trim enamel rather than basic wall paint.
Design Ideas for a More Custom Look
Once the cabinets reach the ceiling, the details matter. In a traditional kitchen, use layered crown molding with a small base cap or dentil detail. In a modern kitchen, keep the extension flat and minimal, then paint it the same color as the cabinets. In a farmhouse kitchen, simple Shaker-style panels or vertical beadboard can add charm without becoming too fussy.
Lighting can also change the entire mood. Glass-front stacked cabinets with small interior lights create a display area for pretty dishes or glassware. If you are not adding real cabinets, consider subtle above-cabinet lighting only if the extension still leaves a shadow line or tray space. Avoid lighting that emphasizes dust, uneven ceilings, or random snack baskets. Nobody needs dramatic uplighting on a forgotten cereal box.
Real-World Experience: What It Is Like to Extend Cabinets to the Ceiling
Extending cabinets to the ceiling is one of those projects that looks simple on social media and then immediately reminds you that homes are built by humans, gravity, and occasionally mystery. The first experience many DIYers have is discovering that the ceiling gap is not the same across the room. One side might measure 11 inches, the middle 10 5/8 inches, and the far end 11 1/4 inches. This is normal. Annoying, yes, but normal. The best approach is to measure in several places, plan trim coverage, and avoid cutting every board from one “perfect” measurement.
Another common experience is realizing that paint matching matters more than expected. If your cabinets are white, you may think white paint is white paint. Then you place a new bright-white extension next to slightly warm existing cabinets and suddenly your kitchen has fifty shades of “almost.” A good paint match can make the difference between custom and cobbled together. Taking a door or drawer front to a paint store for matching is worth the extra trip.
For beginners, crown molding is usually the trickiest part. The angles can feel backward, and corners rarely behave. A smart move is to buy extra molding for practice cuts. Make small sample pieces and label them for inside corners, outside corners, left cuts, and right cuts. Those little samples become your cheat sheet. They also save you from sacrificing an expensive eight-foot piece of molding to the renovation gods.
Working above cabinets also teaches patience. You are often standing on a ladder, reaching over a cabinet face, holding a board in place, and trying not to drop a nail set into the toaster. Having a helper makes a huge difference, especially when installing long trim pieces or holding extension panels flush. Even a non-carpenter helper can hold one end of a board, check a pencil line, or remind you where you set the caulk gun.
One of the most satisfying moments comes after caulk and paint. Before that stage, the project may look patchy, with nail holes, seams, raw edges, and a general “what have I done?” energy. Then primer evens out the surfaces, paint blends the old and new parts, and the cabinets suddenly look taller, cleaner, and more expensive. That final transformation is why this project is so popular. It is not just about filling a gap; it is about making the entire kitchen feel more deliberate.
In daily use, ceiling-height cabinets also change cleaning habits. No more greasy dust landing on top of the upper cabinets. No more decorative baskets that looked cute for three months and then became storage for takeout menus. If you add real top cabinets, use them for seasonal or occasional items. Keep everyday dishes within easy reach, because climbing a step stool for coffee mugs every morning is not charming; it is a tiny obstacle course before caffeine.
The biggest lesson is to choose the method that fits your actual kitchen, not just the inspiration photo. A dramatic stacked cabinet design may look beautiful online, but if your kitchen has low ceilings, limited light, or narrow walkways, simple crown molding may be the better choice. On the other hand, if you have tall ceilings and a large open kitchen, a second row of cabinets can make the space feel balanced and upscale. Good design is not about doing the most. It is about doing what looks intentional.
Conclusion
Learning how to extend cabinets to the ceiling can turn an ordinary kitchen into a cleaner, taller, more custom-looking space. For a small gap, crown molding or stacked trim may be all you need. For a medium gap, a cabinet extension box offers a built-in look without replacing your cabinets. For a larger gap, stacked cabinets or decorative panels add storage, style, and serious visual impact.
The secret is not rushing the finishing work. Measure carefully, install solid blocking, choose trim that matches your cabinet style, and use primer, caulk, filler, and paint to blend everything together. Done well, your cabinet extension will look like it was always part of the kitchen. Done poorly, it may look like your cabinets are wearing a cardboard crown. Choose wisely, measure twice, and keep the caulk within reach.