Table of Contents >> Show >> Hide
- What Makes a Cherry Cobbler Actually Great (Not Just “Fruit + Random Dough”)
- Pick Your Cherries: Sweet, Tart, Fresh, Frozen, or Canned
- Homemade Cherry Cobbler Recipe (Classic Biscuit-Topped)
- Flavor Upgrades (Small Effort, Big Payoff)
- Three Fast Variations (Because Life Happens)
- Serving Ideas (Beyond “Ice Cream on Top”)
- Troubleshooting: Fix the Usual Cobbler Problems
- Storage and Reheating (Because Leftovers Are a Gift)
- Conclusion: Your New Go-To Homemade Cherry Cobbler
- Experiences Home Bakers Share (The Good, The Messy, and the “Why Is My Counter Pink?”)
Cherry cobbler is what happens when pie decides it’s tired of “being so put-together” and shows up in sweatpantsstill delicious, just significantly more relaxed.
It’s bubbly fruit, a golden topping, and the kind of dessert that makes people hover near the oven like it’s a campfire.
This guide gives you a foolproof homemade cherry cobbler recipe with a tender biscuit-style topping (the classic American “cobbled” look),
plus smart shortcuts and troubleshooting so you don’t end up with Cherry Soup & Sad Dough. We’ll cover fresh vs. frozen vs. canned, how to get that
glossy, thick filling, and a few playful variations for busy nights.
What Makes a Cherry Cobbler Actually Great (Not Just “Fruit + Random Dough”)
A great cobbler is a balancing act between juicy and set:
you want the cherries to bubble and look dramatic, but you also want the spoon to lift a cohesive scoop instead of spilling lava down the plate.
The difference usually comes down to three things:
1) The filling needs a thickener
Cherries release a lot of juice. A small amount of cornstarch (or flour) turns that juice into a silky sauce that clings to fruit instead of running away.
Think “spoonable” not “beverage.”
2) The topping needs the right texture
Traditional cobbler toppings range from cake-like batters to drop biscuits. In this recipe, we’re going for a tender, biscuit-style topping:
buttery, lightly crisp on top, and soft underneath where it meets the fruit.
3) The bake must go long enough to bubble
Cobbler isn’t done when it’s “kind of golden.” It’s done when the filling is bubbling (that bubbling is what activates and “sets” your thickener)
and the topping is cooked through.
Pick Your Cherries: Sweet, Tart, Fresh, Frozen, or Canned
Sweet vs. tart: what changes?
Sweet cherries (often labeled like Bing or Rainier) are snackable and naturally sugary, so the filling needs a lighter hand with added sugar.
Tart cherries (often Montmorency) bring the “cherry pie” vibebright, tangy, and dessert-forwardso they usually need more sugar for balance.
Fresh cherries
- Best for: peak flavor and texture
- Heads-up: pitting takes the most time (and will turn your fingertips into a crime scene if you’re not careful)
- Tip: if you bake often, a cherry pitter is a sanity purchase, not a luxury
Frozen cherries
- Best for: year-round cobbler cravings
- How to use: you can bake from frozen, but expect a few extra minutes; if you have time, thaw partially so you can judge juiciness
- Pro move: if they’re extremely juicy after thawing, add an extra teaspoon or two of cornstarch
Canned cherry pie filling
- Best for: “I need dessert in 30 minutes and I’m not negotiating” nights
- How to use: it’s already sweetened and thickened, so you mainly focus on the topping
- Tip: brighten it with a squeeze of lemon or a tiny splash of almond extract if you like that bakery aroma
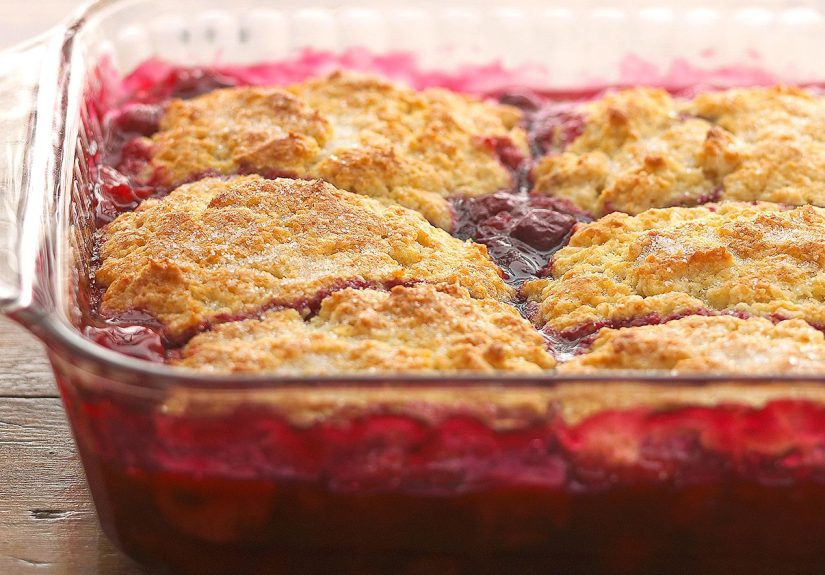
Homemade Cherry Cobbler Recipe (Classic Biscuit-Topped)
This is the crowd-pleaser: bubbling cherry filling + tender biscuit topping, baked until golden and dramatic.
Serve warm with vanilla ice cream and enjoy the 8–12 seconds of silence that follow the first bite.
Yield, timing, and pan
- Serves: 8 (generous scoops)
- Time: ~20 minutes prep + 45–55 minutes bake
- Pan: 9×13-inch baking dish (or a deep 9-inch square dish; cast iron also works)
- Oven: 375°F
Ingredients
Cherry filling
- 6 cups pitted cherries (fresh or frozen)
- 1/2 to 3/4 cup granulated sugar (use less for sweet cherries, more for tart)
- 2 1/2 tablespoons cornstarch (or 3 tablespoons all-purpose flour)
- 1 tablespoon lemon juice
- 1 teaspoon vanilla extract
- 1/4 teaspoon almond extract (optional, but it screams “bakery” in the best way)
- 1/4 teaspoon kosher salt
- Optional: 1/8 teaspoon cinnamon (very subtle; don’t turn this into “Christmas cherry” unless you mean to)
Biscuit topping
- 1 3/4 cups all-purpose flour
- 1/3 cup granulated sugar
- 2 teaspoons baking powder
- 1/2 teaspoon kosher salt
- 8 tablespoons (1 stick) cold unsalted butter, cut into small cubes
- 3/4 cup buttermilk (or heavy cream for extra tenderness; or whole milk in a pinch)
- 1 teaspoon vanilla extract (optional)
- Optional topping: 1 tablespoon coarse sugar (turbinado) for sparkle + crunch
Equipment
- Cherry pitter (nice) or a sturdy straw/chopstick (works, just messier)
- Large mixing bowl + medium bowl
- Pastry cutter or your fingertips (cold hands help; warm hands also work, just faster-meltier)
- Baking dish
Step-by-step instructions
-
Preheat the oven to 375°F. Place a rack in the middle.
Lightly butter your baking dish (or spray it). -
Make the cherry filling: In a large bowl, combine cherries, sugar, cornstarch, lemon juice, vanilla, salt,
and almond extract (if using). Stir until the cherries look evenly coated and there are no dry starch pockets.
Pour into the baking dish and spread into an even layer. - Start the topping: In a medium bowl, whisk flour, sugar, baking powder, and salt.
-
Cut in the butter: Add cold butter cubes and cut them into the flour mixture until it looks like coarse crumbs
with some pea-sized bits remaining. Those butter bits are your future flaky, tender moments. -
Add liquid: Pour in buttermilk (and vanilla if using). Stir gently just until a shaggy dough forms.
Do not overmixtough cobbler topping is a tragedy and also a bicep workout you didn’t ask for. -
Top the cherries: Drop spoonfuls of dough over the cherries. It does not need to cover every inch.
Cobbler is rustic; little gaps are normal and honestly kind of charming. - Finish: Sprinkle coarse sugar on top if you want crunch. (Optional, but delightful.)
-
Bake for 45–55 minutes, until the topping is deep golden and the filling is actively bubbling around the edges
(and ideally in at least a few spots in the center). -
Cool briefly: Let it rest 15–20 minutes. This is when the filling thickens from “volcanic”
to “scoopable.” Serve warm with vanilla ice cream or whipped cream.
How to know it’s done (without guessing)
- Visual: bubbly filling + golden top
- Texture: biscuits should feel set, not wet or gummy in the middle
- Optional temperature check: the center of the biscuit topping should read about 200°F if you’re a thermometer person
Flavor Upgrades (Small Effort, Big Payoff)
Make it brighter
Add lemon zest (1/2 teaspoon) to the filling. It makes the cherry flavor taste “turned up” without adding more sugar.
Make it deeper
Add 1–2 teaspoons of brown sugar to the topping for a subtle caramel note.
Make it “bakery cherry”
Almond extract is powerful. Keep it tiny (1/4 teaspoon) so it whispers, not shouts.
Three Fast Variations (Because Life Happens)
1) The “magic” batter cobbler (rise-to-the-top style)
This old-school approach is famous for its simplicity: you melt butter in the pan, pour in a simple batter, add fruit,
and bake until the topping rises and browns. It’s not biscuit-styleit’s more cake-like, cozy, and very “grandma’s kitchen.”
- Best with: canned cherry pie filling or fresh/tart cherries
- Why it works: the fat + batter create a crisp edge and a tender center
2) Bisquick + pie filling (five ingredients, no drama)
If you want a shortcut that still feels homemade, this is it: cherry pie filling, baking mix, a splash of milk, and a quick bake.
It’s shockingly good for the amount of effort involved, and nobody needs to know it took 10 minutes.
3) Cinnamon roll dough + pie filling (the weekend-brunch hero)
For a super-fast “dessert that pretends it’s breakfast,” cut cinnamon roll dough into pieces, nestle it over cherry pie filling,
bake, then drizzle with the icing packet. It’s sweet, sticky, and extremely popular with anyone holding coffee.
Serving Ideas (Beyond “Ice Cream on Top”)
- Classic: vanilla ice cream + pinch of flaky salt
- Bright: Greek yogurt + honey (yes, it’s still dessert)
- Fancy: whipped cream + shaved dark chocolate
- Summer mode: a scoop of lemon sorbet on warm cobbler (the hot-cold tart-sweet thing is elite)
Troubleshooting: Fix the Usual Cobbler Problems
“My filling is runny.”
- It may not have baked long enough to bubble and activate the thickener.
- Let it rest longer after bakingthickening continues as it cools.
- If using frozen cherries, you may need slightly more cornstarch next time.
“My topping is doughy in the middle.”
- Drop smaller spoonfuls so heat reaches the center.
- Don’t press the dough into one thick blanket.
- If the top is browning too fast, tent with foil and keep baking until cooked through.
“The top is pale and sad.”
- Add coarse sugar for color + crunch.
- Move the dish slightly higher in the oven for the last 5–8 minutes.
- If you like, brush the biscuits lightly with cream before baking.
“The edges burned.”
- Use a slightly deeper dish so the bubbling filling doesn’t climb and scorch.
- Place the dish on a sheet pan to catch drips and soften harsh bottom heat.
- Check your oven tempmany run hot.
Storage and Reheating (Because Leftovers Are a Gift)
- Room temp: up to 1 day, lightly covered
- Refrigerator: 3–4 days, covered
- Reheat: 300–325°F oven for 10–15 minutes to re-crisp the top (microwave works, but the topping softens)
- Freeze: you can freeze baked cobbler; thaw overnight in the fridge and warm in the oven
Conclusion: Your New Go-To Homemade Cherry Cobbler
If you remember only one thing: bake until bubbly. That’s the secret handshake of cobbler success.
From there, cherry cobbler is wonderfully flexiblefresh cherries in summer, frozen in winter, canned when you need speed.
Keep the filling bright with lemon, keep the topping tender by not overmixing, and alwaysalwaysconsider ice cream.
Experiences Home Bakers Share (The Good, The Messy, and the “Why Is My Counter Pink?”)
Homemade cherry cobbler has a funny way of becoming a “tradition” dessert, even if you only meant to make it once.
It starts innocently: you see cherries on sale, you remember that cobbler is easier than pie, and you think,
“How hard can it be?” Then ten minutes later you’re learning that cherry juice can travel farther than glitter
and stain faster than a bad decision.
The first big shared experience is pitting. If you’ve never pitted fresh cherries, the process is equal parts satisfying and chaotic.
There’s a rhythm to itpress, pop, pit, repeatuntil you look down and realize your cutting board resembles modern art.
Many home bakers end up wearing an apron not for fashion, but for self-preservation, because cherries don’t “drip,” they
commit. And once you’ve made a cobbler with fresh cherries, you understand why people swear by a cherry pitter:
not because it’s fancy, but because it’s faster, cleaner, and reduces the odds of finding a pit later (a surprise nobody enjoys).
Another common moment: the oven soundtrack. Cherry cobbler is one of the few desserts that announces itself as it bakes.
You’ll hear gentle sizzling, then the more confident burble of fruit juices bubbling at the edges. That sound is reassurance.
It tells you the thickener is doing its job and the filling is turning from “watery” to “glossy sauce.”
Bakers often describe the smell as a mix of jammy fruit and warm butterbasically, the aroma equivalent of a cozy blanket.
Then there’s the “is it done?” anxiety. Lots of people pull cobbler too early because the top looks golden and they’re hungry.
But experienced cobbler-makers learn to wait for visible bubbling, especially near the center. The first time you let it rest
for 15–20 minutes after baking, you’ll notice the difference: scoops hold their shape better, the sauce thickens, and the topping
goes from fragile to confidently spoon-worthy. The waiting feels annoying… right up until the first perfect scoop lands in a bowl.
Homemade cherry cobbler also tends to create unexpected social moments. It’s a dessert that travels well to potlucks,
and it’s forgiving if it cools on the counter while everyone chats. People hover around it because it looks invitinggolden topping,
ruby filling, little cracks where the fruit peeks through like it’s waving. Someone inevitably asks for the recipe, and the funniest
part is that your answer can be either “I made biscuit dough” or “I opened a can,” and both versions still win.
Finally, there’s the seasonal nostalgia piece. Many bakers associate cherry cobbler with early summerfarmers’ markets,
roadside fruit stands, and that short window when cherries are at their peak. But frozen cherries extend the experience into colder months,
which is how cherry cobbler becomes a year-round comfort dessert. It’s not rare to hear someone say, “I make this when I need a mood reset,”
because the process is simple, the reward is warm, and the results feel celebratory even on a random Tuesday.
And if you’ve ever served it with ice cream and watched it melt into the bubbling fruit, you know the truth:
cobbler isn’t just dessertit’s an edible victory lap.