
Table of Contents >> Show >> Hide
- Why You’ll Love These Homemade Pizza Roll-ups
- Ingredients for Homemade Pizza Roll-ups
- How to Make Homemade Pizza Roll-ups
- Recipe Card: Homemade Pizza Roll-ups
- Tips for Perfect Pizza Roll-ups Every Time
- Flavor Variations to Try
- What to Serve with Pizza Roll-ups
- How to Store, Reheat, and Freeze Pizza Roll-ups
- Common Mistakes and How to Fix Them
- Make-Ahead Tips for Busy Days
- Experience Notes: What I’ve Learned Making Homemade Pizza Roll-ups
- Conclusion
There are snacks, and then there are snacks that make everyone in the kitchen suddenly “just happen” to wander by. Homemade pizza roll-ups belong firmly in the second category. They are warm, cheesy, saucy, golden around the edges, and dangerously easy to eat while standing over the baking sheet pretending you are “checking doneness.” Sure, frozen pizza bites have their place, usually next to a late-night craving and a questionable microwave beep. But homemade pizza roll-ups? They bring the pizza-party energy with fresher flavor, better texture, and the glorious freedom to add exactly what you love.
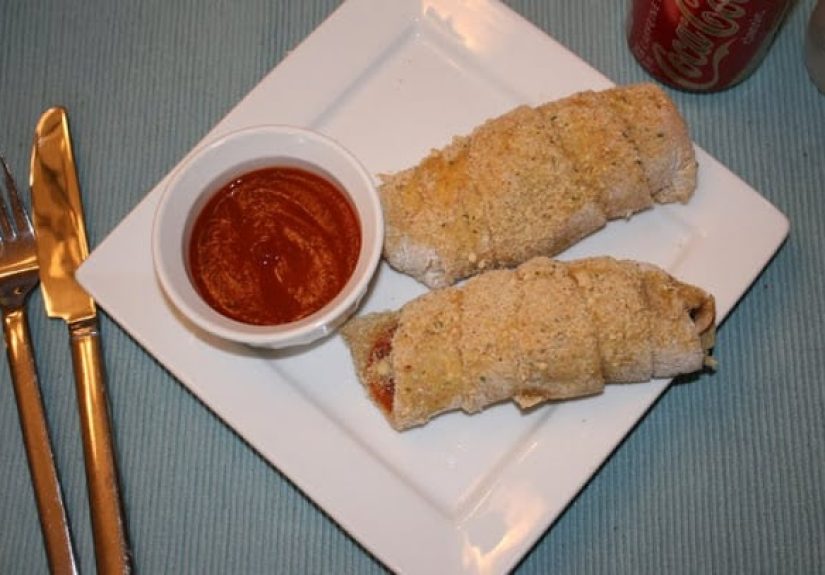
This homemade pizza roll-ups recipe is designed for busy families, game-day snack tables, after-school hunger emergencies, casual dinners, and anyone who believes pepperoni and melted mozzarella should be treated with respect. You can make them with refrigerated pizza dough for speed, homemade pizza dough for bragging rights, or crescent dough for a softer, buttery bite. The method is simple: spread, sprinkle, roll, slice, bake, dip, repeat. The result is a tray of mini pizza spirals that look fun, taste fantastic, and disappear faster than you can say, “Save me one.”
Why You’ll Love These Homemade Pizza Roll-ups
The best thing about pizza roll-ups is that they feel playful without being fussy. They have all the familiar flavors of classic pepperoni pizzatomato sauce, mozzarella cheese, Italian seasoning, and savory meatbut they are easier to serve, easier to pack, and easier to customize. Unlike a full pizza, there is no need to argue over slices. Everyone gets their own golden little roll, which is good news for peacekeeping and bad news for leftovers.
They’re quick, flexible, and crowd-friendly
These easy pizza roll-ups are perfect when you need a fast appetizer or a casual dinner that does not require a culinary degree, a pizza stone, or a dramatic flour cloud across the kitchen. Store-bought dough makes the process fast, while homemade dough gives a chewier, more bakery-style finish. You can keep the filling classic with pepperoni and mozzarella or branch out with cooked sausage, mushrooms, olives, bell peppers, spinach, or jalapeños.
They’re better than frozen pizza rolls
Frozen pizza rolls are convenient, but homemade pizza roll-ups win on flavor and texture. The cheese melts more naturally, the dough bakes up with real golden edges, and the sauce tastes brighter because you control the amount and seasoning. Best of all, you can avoid the classic frozen-snack tragedy: biting into something that is somehow frozen in the middle and molten lava on the outside. Homemade roll-ups are more predictable, more satisfying, and much more fun to make.
Ingredients for Homemade Pizza Roll-ups
This recipe keeps the ingredient list simple, but every item has a job. Think of it as a tiny pizza construction crew: dough for structure, sauce for moisture, cheese for joy, toppings for personality, and garlic butter for the grand finale.
Main ingredients
- 1 pound pizza dough: Use homemade pizza dough, refrigerated pizza dough, or thawed frozen dough.
- 1/2 cup pizza sauce: Use a thick sauce so the roll-ups do not become soggy.
- 1 1/2 cups shredded low-moisture mozzarella: Low-moisture cheese melts well without watering down the dough.
- 3/4 cup chopped pepperoni: Chopped pepperoni distributes better than whole slices.
- 1/4 cup grated Parmesan cheese: Adds salty, nutty flavor.
- 1 teaspoon Italian seasoning: A classic blend for pizza-shop aroma.
- 1/2 teaspoon garlic powder: Because pizza without garlic is like a movie without snacks.
- 1 tablespoon olive oil: Helps the dough bake up golden.
- 2 tablespoons melted butter: For brushing the tops after baking.
- Extra marinara or pizza sauce: For dipping.
Optional add-ins
Pizza roll-ups are very forgiving, but use add-ins wisely. Too much filling can cause the rolls to burst open or bake unevenly. Good options include cooked crumbled sausage, diced ham, chopped bacon, sliced black olives, sautéed mushrooms, roasted red peppers, banana peppers, fresh basil, or a pinch of crushed red pepper flakes. If using vegetables with a lot of moisture, cook or pat them dry first. Nobody wants a soggy pizza spiral. Nobody.
How to Make Homemade Pizza Roll-ups
This recipe makes about 16 to 20 roll-ups, depending on how thick you slice them. It serves 4 as a light meal or 6 to 8 as an appetizer. The total time is about 35 to 45 minutes if using prepared dough.
Step 1: Prepare the dough
Let the pizza dough rest at room temperature for about 20 to 30 minutes before rolling. Cold dough tends to spring back like it has trust issues. A short rest relaxes the gluten, making the dough easier to stretch into a rectangle. Lightly flour your work surface and roll or gently press the dough into a rectangle about 10 by 14 inches. It does not need to be perfect. Pizza roll-ups are rustic, which is kitchen code for “delicious even when slightly lopsided.”
Step 2: Add the sauce
Spread a thin layer of pizza sauce over the dough, leaving about a 1/2-inch border around the edges. Do not drown the dough in sauce. A thick, even smear is enough to bring flavor without making the roll-ups leak. Save the extra sauce for dipping after baking.
Step 3: Layer the cheese and toppings
Sprinkle mozzarella evenly over the sauce, then add chopped pepperoni, Parmesan, Italian seasoning, and garlic powder. Keep the toppings spread out so each bite gets a little of everything. If you are adding vegetables, make sure they are finely chopped and not watery. Large chunks can make the roll-ups harder to slice and more likely to unravel.
Step 4: Roll it up tightly
Starting from the long side, roll the dough into a snug log. Do not squeeze so hard that the filling escapes, but keep it firm enough to hold its shape. Pinch the seam gently to seal. If the dough feels too soft to slice neatly, place the log in the refrigerator for 10 to 15 minutes. Chilling helps the roll hold together and makes slicing easier.
Step 5: Slice and arrange
Use a sharp knife or unflavored dental floss to cut the log into 1-inch slices. Place the roll-ups cut-side up on a parchment-lined baking sheet, leaving a little space between each one. Brush lightly with olive oil for better browning.
Step 6: Bake until golden and bubbly
Bake at 400°F for 15 to 20 minutes, or until the dough is golden brown and the cheese is melted and bubbling. If the tops brown too quickly, move the pan to a lower oven rack. When the pizza roll-ups come out of the oven, brush them with melted butter and sprinkle with a little extra Parmesan or Italian seasoning if desired.
Step 7: Serve with warm dipping sauce
Let the roll-ups cool for 5 minutes before serving. This gives the cheese time to settle, and it also protects everyone from the infamous “pizza cheese burn,” a tiny but memorable kitchen villain. Serve with warm marinara, ranch dressing, garlic butter, or spicy arrabbiata sauce.
Recipe Card: Homemade Pizza Roll-ups
Prep time, cook time, and servings
- Prep Time: 20 minutes
- Cook Time: 15 to 20 minutes
- Total Time: 35 to 40 minutes
- Yield: 16 to 20 pizza roll-ups
- Serving Style: Appetizer, snack, party food, or casual dinner
Ingredients
- 1 pound pizza dough, homemade or store-bought
- 1/2 cup thick pizza sauce, plus more for dipping
- 1 1/2 cups shredded low-moisture mozzarella cheese
- 3/4 cup chopped pepperoni
- 1/4 cup grated Parmesan cheese
- 1 teaspoon Italian seasoning
- 1/2 teaspoon garlic powder
- 1 tablespoon olive oil
- 2 tablespoons melted butter
- Optional: crushed red pepper, fresh basil, cooked sausage, olives, mushrooms, or peppers
Instructions
- Preheat the oven to 400°F. Line a baking sheet with parchment paper.
- Let the dough rest at room temperature for 20 to 30 minutes if it is cold.
- Roll or press the dough into a 10-by-14-inch rectangle on a lightly floured surface.
- Spread pizza sauce over the dough, leaving a small border around the edges.
- Top evenly with mozzarella, pepperoni, Parmesan, Italian seasoning, and garlic powder.
- Roll the dough tightly from the long side and pinch the seam to seal.
- Slice into 1-inch pieces and place cut-side up on the prepared baking sheet.
- Brush lightly with olive oil.
- Bake for 15 to 20 minutes, until golden brown and bubbling.
- Brush with melted butter, cool for 5 minutes, and serve with warm dipping sauce.
Tips for Perfect Pizza Roll-ups Every Time
Use low-moisture mozzarella
Fresh mozzarella is wonderful on pizza, but it can release too much water in roll-ups. Low-moisture mozzarella melts smoothly while keeping the dough from getting soggy. Shredded cheese works well, but freshly shredded mozzarella usually melts better than pre-shredded cheese because it does not contain as much anti-caking coating.
Go light on the sauce
The most common mistake in homemade pizza roll-ups is using too much sauce inside the roll. Sauce is delicious, yes, but it can also create steam, leaks, and soft dough. Use a modest amount inside and serve more on the side. This gives you all the flavor without turning your baking sheet into a tomato slip-and-slide.
Chop the toppings small
Small toppings roll more evenly and make each slice easier to cut. Whole pepperoni slices are fine, but chopped pepperoni helps prevent the filling from sliding out in one dramatic sheet. If using sausage, cook it first and drain any excess grease. If using mushrooms, onions, or peppers, sauté them briefly and pat them dry.
Let them rest before serving
Freshly baked pizza roll-ups smell irresistible, but give them a few minutes before digging in. The cheese will be extremely hot, and the filling sets better after a short rest. This small pause creates neater bites and fewer “I regret nothing, but my tongue does” moments.
Flavor Variations to Try
One of the biggest advantages of this pizza roll-ups recipe is how easy it is to adapt. Once you know the basic method, you can turn the same dough into several different snacks.
Classic pepperoni pizza roll-ups
Use pizza sauce, mozzarella, Parmesan, pepperoni, Italian seasoning, and garlic powder. This is the most familiar version and the one most likely to vanish before kickoff, movie night, or dinner actually begins.
Three-cheese pizza roll-ups
Replace some of the pepperoni with a blend of mozzarella, provolone, and Parmesan. Add a little ricotta for a lasagna-inspired filling, but use it sparingly so the dough does not become too wet.
Veggie pizza roll-ups
Fill the dough with mozzarella, sautéed mushrooms, bell peppers, spinach, onions, and black olives. The key is removing moisture before baking. Cook the vegetables first and let them cool slightly before adding them to the dough.
Buffalo chicken pizza roll-ups
Swap the pizza sauce for a thin layer of buffalo sauce and add cooked shredded chicken, mozzarella, and a little blue cheese or ranch seasoning. Serve with ranch or blue cheese dressing for dipping.
Breakfast pizza roll-ups
Use scrambled eggs, cooked bacon or sausage, cheddar, and a light spread of cream cheese or gravy. Bake until golden and serve with hot sauce. Breakfast pizza roll-ups are excellent for brunch, though they may cause guests to “accidentally” take three.
What to Serve with Pizza Roll-ups
Pizza roll-ups are hearty enough to stand alone as a snack, but they also work beautifully as part of a meal. For dinner, serve them with a crisp Caesar salad, chopped Italian salad, roasted vegetables, or a simple bowl of tomato soup. For parties, pair them with mozzarella sticks, wings, garlic knots, vegetable trays, and a few dipping sauces.
Good dipping options include marinara, ranch, garlic butter, pesto, spicy tomato sauce, barbecue sauce, or hot honey. A small sauce bar makes pizza roll-ups feel more festive and lets everyone customize their plate. It is also a clever way to distract guests while you quietly claim the crispiest roll-up for yourself.
How to Store, Reheat, and Freeze Pizza Roll-ups
Storing leftovers
Let leftover pizza roll-ups cool completely, then store them in an airtight container in the refrigerator. For best quality and food safety, enjoy refrigerated leftovers within 3 to 4 days. Keep your refrigerator at 40°F or below, and do not leave perishable foods sitting at room temperature for more than 2 hours.
Reheating
The oven or air fryer is the best way to bring back the crisp edges. Reheat pizza roll-ups at 350°F until warmed through. A microwave works in a hurry, but the dough will be softer. If reheating for children, cut one open first and check the temperature, because melted cheese can hide heat like a tiny dairy volcano.
Freezing
To freeze, bake the roll-ups first and let them cool completely. Arrange them in a single layer on a baking sheet and freeze until firm. Transfer to a freezer-safe bag or container. Reheat from frozen in the oven or air fryer until hot in the center and crisp on the outside. This makes homemade pizza roll-ups a smart meal-prep snack for busy weeks.
Common Mistakes and How to Fix Them
The roll-ups are soggy
Too much sauce or watery toppings are usually the problem. Use thick pizza sauce, keep the layer thin, and cook moisture-heavy vegetables before adding them. Also make sure the oven is fully preheated before baking.
The dough keeps shrinking
If the dough snaps back while you are rolling it out, let it rest for 10 to 15 minutes. Dough needs time to relax. Cover it with a clean towel, take a deep breath, and remind the dough that this is a team effort.
The filling leaks out
A little cheese leakage is normal and, honestly, delicious. But if the roll-ups are bursting open, you may be overfilling them or rolling too loosely. Use moderate filling, pinch the seam, and place the slices with enough space on the baking sheet.
The centers are underbaked
Slice the roll-ups evenly and avoid making them too thick. If the tops brown before the centers bake, lower the oven temperature slightly or move the pan to a lower rack. You can also loosely cover the pan with foil for a few minutes, then uncover to finish browning.
Make-Ahead Tips for Busy Days
Homemade pizza roll-ups are excellent for planning ahead. You can assemble the log, wrap it tightly, and refrigerate it for a few hours before slicing and baking. This is especially helpful for parties, because you can do the messy part earlier and bake right before guests arrive. Warm pizza roll-ups have a way of making people believe you are far more organized than you actually feel.
You can also prep the fillings in advance. Chop pepperoni, shred cheese, cook sausage, sauté vegetables, and portion the sauce. When it is time to assemble, everything is ready. This reduces kitchen chaos and makes the recipe easy enough for weeknights.
Experience Notes: What I’ve Learned Making Homemade Pizza Roll-ups
The first thing experience teaches you about homemade pizza roll-ups is that they are not as delicate as they look. The first time you roll the dough, you may worry that the rectangle is uneven, the cheese is escaping, or the spiral looks more “abstract art” than appetizer. Relax. Once they bake, the edges puff, the cheese bubbles, and the whole tray becomes charmingly golden. Pizza roll-ups are wonderfully forgiving, which is one reason they are such a reliable recipe for home cooks.
Another useful lesson is that less sauce inside really does make a better roll-up. It is tempting to spread sauce generously because pizza sauce is delicious and because your brain says, “More pizza flavor, obviously.” But too much sauce makes the dough slippery and can cause the rolls to uncoil or bake up soft. A thin layer inside plus warm sauce on the side gives the best balance. You get clean spirals, crispier edges, and plenty of tomato flavor when you dip.
Chopping the pepperoni is also worth the extra minute. Whole slices can create layers that slide around when you cut the roll. Chopped pepperoni behaves better, spreads evenly, and gives every bite a salty, savory hit. If you like extra crispy bits, save a spoonful of chopped pepperoni to sprinkle on top before baking. Those little pieces crisp at the edges and taste like pizza confetti, which should absolutely be a recognized food group.
When making pizza roll-ups for kids, I have found that simple fillings usually win. Mozzarella, pepperoni, and mild sauce are the classic trio for a reason. For adults, a few upgrades can make the recipe feel more special without adding much work. Try a brush of garlic butter, a drizzle of hot honey, fresh basil after baking, or a sprinkle of red pepper flakes. A little Parmesan on top before baking also creates a salty crust that makes the roll-ups taste more like something from a neighborhood pizza shop.
For parties, pizza roll-ups are best served warm but not straight-from-the-oven dangerous. Let them rest for 5 to 10 minutes, then transfer them to a platter with a bowl of marinara in the center. If you are serving a crowd, make two batches with different fillings. Labeling them is helpful, especially if one batch includes spicy ingredients or vegetables. People appreciate knowing whether they are grabbing classic pepperoni or jalapeño surprise.
Finally, homemade pizza roll-ups are one of those recipes that improve your confidence in the kitchen. They teach dough handling, filling balance, baking judgment, and flavor customization in one low-pressure project. Even when they are not perfect, they are still warm, cheesy bread filled with pizza toppings. That is not failure. That is dinner with a good attitude.
Conclusion
Homemade pizza roll-ups are the kind of recipe that makes everyday cooking feel instantly more fun. They are easy enough for a weeknight, festive enough for a party, and flexible enough to satisfy picky eaters, adventurous snackers, and anyone who believes melted cheese should be considered a love language. With soft pizza dough, rich sauce, mozzarella, pepperoni, and a buttery finish, these roll-ups deliver classic pizza flavor in a neat, snackable spiral.
Whether you serve them for game day, lunch boxes, movie night, after-school snacks, or a casual family dinner, this homemade pizza roll-ups recipe is a keeper. Start with the classic version, then experiment with your favorite toppings and dipping sauces. Just remember: make more than you think you need. The tray will empty quickly, and someone will absolutely ask, “Are there any more?”
Note: This article is based on widely accepted U.S. recipe practices and food-safety guidance, including tested approaches for pizza dough handling, baked pizza snacks, refrigerator storage, reheating leftovers, and safe serving temperatures.





 Close
Close