Table of Contents >> Show >> Hide
- Before You Start: Storage vs. Memory (Quick Sanity Check)
- The 11 Steps to Check Your Android Storage
- Step 1: Open the Settings app
- Step 2: Find the Storage menu (or Device Care > Storage)
- Step 3: Read the “Used” vs. “Available” storage numbers
- Step 4: Tap a category to see what’s taking up space
- Step 5: Review your apps list and sort by size
- Step 6: Check an app’s Storage details (and know what “Clear cache” actually means)
- Step 7: Use the built-in “Free up space” tools (Pixel and many Android phones)
- Step 8: Open Files by Google and check storage across internal, SD, and USB
- Step 9: Use cleanup cards for duplicates, junk, and old files
- Step 10: Check Downloads and move big files to SD card, cloud, or a computer
- Step 11: Archive or uninstall unused apps to reclaim space
- Troubleshooting Tips When Storage Still Looks “Wrong”
- Real-World Experiences and Lessons Learned
- Conclusion
If your Android phone has ever hit you with the dreaded “Storage space running out” message right when you’re trying to take a photo, install an app, or download a video, welcome to the club. The good news: checking your storage is easy once you know where to look, and it only takes a few taps to figure out what’s hogging your space.
In this guide, I’ll walk you through 11 practical steps to check your Android storage, understand what the numbers actually mean, and clean things up safely without deleting something important (like your favorite memes folder… or that one blurry concert video you swear you’ll edit someday).
I also include real-world tips for Samsung, Pixel, Motorola, and carrier-labeled Android menus, because Android is wonderful and chaotic and sometimes the same setting has three different names depending on your phone.
Sources: Android and Pixel help explain storage vs memory and storage cleanup basics; Asurion and carrier tutorials reflect menu label variations on Android devices.
Before You Start: Storage vs. Memory (Quick Sanity Check)
Android help docs make an important distinction that many people miss:
- Storage is where your files live (photos, videos, apps, downloads, documents).
- Memory (RAM) is what your phone uses to run apps right now.
If you’re trying to install an app and getting errors, you usually need to free up storage, not memory. Think closet space vs. table space: one is where you keep your stuff, the other is where you spread it out.
Sources: Google Android Help and Pixel Help define storage vs memory and note that steps vary by device/version.
The 11 Steps to Check Your Android Storage
-
Step 1: Open the Settings app
Start with the obvious-but-necessary move: open Settings. On most Android phones, you can swipe down from the top and tap the gear icon.
If you’re following a carrier or manufacturer tutorial and the wording looks slightly different, don’t panic. The general path is the same; labels just vary by brand and Android version.
Sources: Pixel Help, Motorola, AT&T, Asurion, and Tom’s Guide all begin storage/cache workflows in Settings.
-
Step 2: Find the Storage menu (or Device Care > Storage)
On many phones, the path is simply: Settings > Storage.
On Samsung devices, you may see: Settings > Battery and device care > Storage (sometimes shown as Device care depending on the version).
On some Motorola models, the menu may be labeled slightly differently, but you’re still looking for a Storage section in Settings.
Sources: Pixel Help shows Settings > Storage; Samsung US and Asurion reference Device Care/Battery and device care > Storage; Motorola support confirms storage paths vary but are in Settings. AT&T and Verizon device pages also surface device-specific storage screens.
-
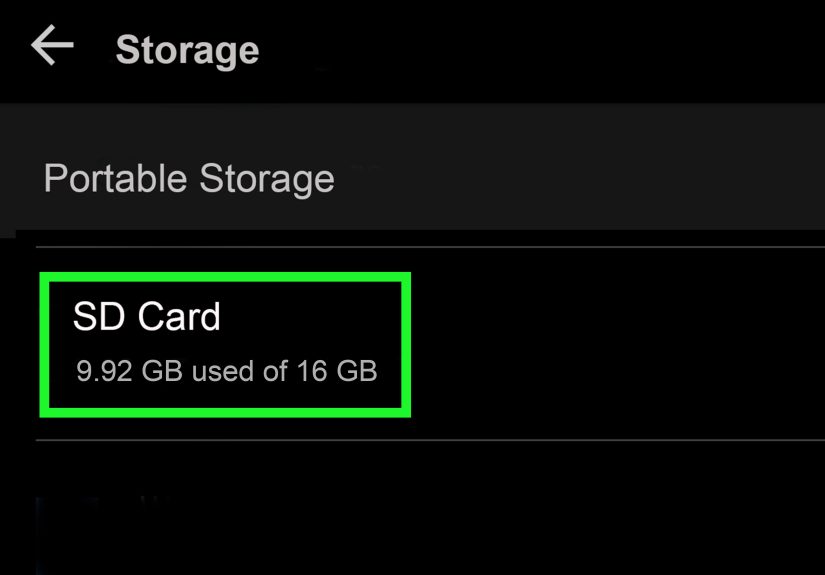
Step 3: Read the “Used” vs. “Available” storage numbers
Once you’re in the Storage screen, look for the high-level summary: used space and available/free space.
This is your “how bad is it?” moment. If you have less than 10–15% free, performance can start feeling sluggish, updates may fail, and your camera app may become dramatic.
Many Android screens also show a category breakdown (Apps, Photos, Videos, Audio, Documents, System, etc.), which helps you see where the bloat lives.
Sources: Pixel Help and Android guidance explain viewing storage categories; Files by Google and Android Central also describe storage breakdown views.
-
Step 4: Tap a category to see what’s taking up space
The magic happens when you tap into a category. For example:
- Apps shows which apps use the most space
- Images/Videos shows your media load
- Downloads reveals old files you forgot existed
On Pixel phones, Google explicitly walks users through tapping Storage and then a category to see what’s using space. This is one of the fastest ways to troubleshoot before deleting anything.
Sources: Pixel Help explicitly instructs Settings > Storage > tap a category; Android Help and Files by Google support reinforce category-based review.
-
Step 5: Review your apps list and sort by size
The biggest storage culprits are often apps you don’t expect: messaging apps, social apps, video editors, and browsers can quietly grow huge over time.
Open your app list from the Storage screen (or go to Settings > Apps), then check which apps use the most internal storage. Many Android interfaces show the storage amount under each app name, which makes it easier to spot the heavyweights.
Pro tip: If you haven’t opened an app in months and it takes up gigabytes, that app is now officially a tenant and needs to start paying rent.
Sources: Asurion advises checking the app list ranked by size; Tom’s Guide notes app lists often display storage amounts and shows the Apps > Storage flow. Google Android Help also recommends uninstalling unused apps.
-
Step 6: Check an app’s Storage details (and know what “Clear cache” actually means)
Tap a large app and open its Storage or Storage & cache page. You’ll usually see options like:
- Clear cache = removes temporary files (generally safe)
- Clear storage / Clear data = wipes the app’s stored data (logs you out, resets app data)
This is a big one: clearing cache can free some space and fix glitches, but clearing storage is more like pressing a reset button on the app.
If an app is laggy or crashing, clearing cache is usually the first move. Save “Clear storage” for when you really mean it.
Sources: Android Help and Pixel Help define clear cache vs clear storage; Tom’s Guide and Lifewire also explain the same distinction and Android cache-clearing steps.
-
Step 7: Use the built-in “Free up space” tools (Pixel and many Android phones)
Many Android devices include a built-in cleanup shortcut such as Free up space. On Pixel, Google provides a direct flow like: Settings > Storage > Free up space.
This tool typically suggests older files, large items, and content you can remove safely. It’s especially useful if you want guidance instead of manually hunting through folders like a digital archaeologist.
Pixel phones also support Smart Storage, which can automatically remove backed-up photos and videos when space gets low (after they’re safely backed up).
Sources: Pixel Help documents Settings > Storage > Free up space and Smart Storage; Consumer Reports snippet also notes a “Free up space” button on many Android devices.
-
Step 8: Open Files by Google and check storage across internal, SD, and USB
If you want a cleaner view than your phone’s Settings menu, open Files by Google. Google’s Files app is excellent for quick storage checks and cleanup recommendations.
In Files by Google, go to: Menu > Clean. At the top, you’ll see used and available space. If your phone has an SD card, Files can show that too.
Google also notes that Files by Google can help you see space on your device, SD card, and even USB storage, which is super handy if you use external drives.
Sources: Files by Google Help provides the exact Menu > Clean path and notes SD card storage visibility; Play Store listing and Files site describe device/SD/USB storage visibility and cleanup recommendations. Android Central also explains the Clean tool and storage breakdown.
-
Step 9: Use cleanup cards for duplicates, junk, and old files
Once you’re in Files by Google’s Clean tab, you’ll often see cleanup suggestions such as duplicate files, old screenshots, and junk files.
One especially useful option is the Duplicate files card. Google’s Files help center walks through deleting duplicates and even marks the original file so you don’t accidentally delete the better copy.
This step is low-effort and high-rewardexactly the kind of cleanup we love.
Sources: Files by Google Help documents duplicate-file cleanup flow and recommends keeping the file marked “Original”; Android Central and Files site/Play listing describe suggested cleanup cards and recommendations.
-
Step 10: Check Downloads and move big files to SD card, cloud, or a computer
Your Downloads folder is often a graveyard of PDFs, installers, screenshots, memes, and random files you needed once in 2023.
Review Downloads and delete anything you don’t need. For files you want to keep, move them somewhere else:
- SD card (if your phone supports one)
- Cloud storage (Google Drive, OneDrive, etc.)
- A computer via USB cable
Samsung’s My Files app also makes moving files easy (internal storage, SD card, Google Drive, OneDrive, and network storage). Just note: Samsung specifically warns that apps themselves can’t be moved to SD card using My Filesyou can move files, not app packages, from there.
If your SD card shows up in Settings but not in Files by Google, Google says it may be formatted as internal storage, which can change how it appears.
Sources: Android Help and Android Learning Center recommend deleting downloads and copying files to a computer via USB; Samsung US My Files supports moving files to internal/SD/cloud/network storage and notes app move limitations; Files by Google Help covers SD-card detection behavior. Asurion also recommends cloud backup for media.
-
Step 11: Archive or uninstall unused apps to reclaim space
If you want to save space without losing app data, app archiving is a great option on supported Android devices. Google Play’s archive feature removes the app software and temporary files but keeps your app icon and data so you can restore it later.
You can also enable automatic app archiving in the Play Store settings, which is perfect for people who install apps “just to try them” and then never touch them again (you know who you are).
Keep in mind that some archiving features depend on Android version and device support. Google’s Play help notes that certain steps only work on newer versions (including Android 15+ for some features).
If archiving isn’t available on your device, the classic fix still works: uninstall apps you don’t use.
Sources: Google Play Help explains manual archiving, automatic archiving behavior, and Android-version limitations; Android Help shows Play Store > Settings > General > Automatically archive apps; Wired explains manual and automatic Android app archiving in plain language.
Troubleshooting Tips When Storage Still Looks “Wrong”
Why storage doesn’t drop immediately after deleting files
Sometimes you delete a bunch of stuff and the number barely moves. Annoying, yes. Common reasons include:
- Files are in a Trash/Recycle Bin and not permanently deleted yet
- The app needs a minute to recalculate storage
- Cloud-backed items were removed from one app but still exist elsewhere
- Cached data rebuilds as you keep using apps
The fix is usually simple: empty the trash (if applicable), restart the phone, and recheck storage after a few minutes.
Sources: Android Central discusses Trash in Files by Google; Asurion explains cache behavior and cloud/media cleanup realities.
How often should you check Android storage?
A quick monthly check is enough for most people. If you take a lot of videos, download offline content, or use messaging apps with large attachments, check it every week or two.
It takes less time than deciding what to watch on a streaming appand it prevents those “Can’t install update” surprises.
Sources: General guidance aligns with Android/Google cleanup tools and Asurion storage maintenance practices.
Real-World Experiences and Lessons Learned
One of the most common experiences people have with Android storage is the “but I already deleted stuff!” problem. A lot of users clear out a few photos, remove one or two apps, and expect to instantly recover several gigabytes. Then they look at the Storage screen and it barely changes. In real life, the issue is usually that the biggest space users were never the obvious ones. It’s often cached app data, duplicate media in chat apps, offline downloads, or a giant Downloads folder filled with forgotten files. The moment people start checking categories one by one, the mystery usually solves itself.
Another very common experience happens on Samsung phones: users follow a tutorial for “Settings > Storage,” but their phone says Battery and device care first. That makes people think the tutorial is outdated, when really it’s just Samsung using its own menu structure. The same thing happens across Motorola, Pixel, and carrier-branded support pages. The core steps are still the sameopen Settings, find Storage, check the breakdownbut the menu labels may be slightly different. Once people understand that Android instructions are more like “same road, different street signs,” they get less frustrated and move through the process much faster.
Files by Google is another area where people have a good “aha” moment. Many users don’t realize the app can show storage usage at the top of the Clean tab and can surface easy wins like duplicate files, old screenshots, and junk files. The duplicate-file cleanup feature is especially helpful because it marks the original, which reduces the fear of deleting the wrong photo. For people who don’t want to manually dig through folders, this feels like having a polite assistant clean the room instead of dumping everything on the floor and asking you to sort it.
App cache is also misunderstood all the time. A lot of people assume “Clear cache” and “Clear storage” are basically the same button with different fonts. Then they tap the wrong one and get logged out of everything. In practice, once users learn that cache is temporary data and storage/data is the app’s saved information, they become much more confident. They’ll use cache clearing for browsers, social apps, or a glitchy app, and save full storage clearing for troubleshooting or apps they’re okay resetting.
Finally, one of the best long-term experiences people report is switching from emergency cleanup to routine maintenance. Instead of waiting until the phone is full, they check storage once a month, move big videos to cloud storage or a computer, archive apps they rarely use, and clear out Downloads regularly. It’s not flashy, but it works. The phone stays faster, updates install more smoothly, and there’s always room for the things you actually care aboutphotos, messages, and yes, the occasional totally essential 2GB game you’ll play for three days and never open again.
Sources: This experience-based section synthesizes patterns from Google Android/Pixel help, Files by Google help, Samsung/AT&T/Motorola menu variations, Asurion support guidance, and app-cache explanations from Tom’s Guide and Lifewire.
Conclusion
Checking your Android storage is one of those tiny habits that saves you a lot of future headaches. Start in Settings, find Storage, review what categories are using space, and then clean smartnot random. Use Files by Google for quick cleanup recommendations, clear app cache when needed, move large files off the phone, and archive or uninstall apps you no longer use.
The best part? Once you’ve done it a couple of times, the whole process takes just a few minutes. Your phone runs better, updates are less annoying, and you stop living in fear of the “Storage full” notification popping up at the worst possible moment.
Sources: Closing recommendations are based on Google Android/Pixel/Files/Play guidance, Samsung and manufacturer file-management options, and mainstream Android cleanup walkthroughs.