Table of Contents >> Show >> Hide
- Before You Start: Pick a Tree “Game Plan” (So You Don’t End Up With 11 Clashing Themes)
- Step 1: Set Up the Tree (Placement, Fluffing, and a Tiny Bit of Safety)
- Step 2: Add the Lights (The Layer That Makes Everything Look Magical)
- Step 3: Add Ribbon and Garland (The “Designer Layer” That Makes the Tree Look Styled)
- Step 4: Hang Ornaments Like You Mean It (A Simple Formula for Balance)
- Step 5: Add Picks, Sprays, and “Filler” (The Secret Weapon for a Full Tree)
- Step 6: Put on the Tree Topper (And Make It Look Secure, Not Nervous)
- Step 7: Finish the Base (Because the Bottom Counts, Too)
- Common Christmas Tree Decorating Mistakes (And Easy Fixes)
- Quick “Pro Look” Checklist
- Real-Life Decorating Experiences ( of “Yep, That Happens”)
- Conclusion
Decorating a Christmas tree is basically the Super Bowl of home decorating: everybody has an opinion, somebody always
loses the hook for the “special ornament,” and no matter what you do, the cat will attempt a field goal with your tree topper.
But here’s the good news: a beautiful tree isn’t about having designer ornaments or an advanced degree in ribbon physics.
It’s about layers, a little planning, and a few pro tricks that make your tree look full, balanced, and “effortless”
(even if you did, in fact, whisper “why won’t you STAY” at a string of lights for 12 minutes).
This guide walks you through how to decorate a Christmas tree step by stepfrom fluffing branches to placing
ornaments with intentionso your final result looks cohesive, cozy, and photo-ready. Whether you’re styling a real tree,
an artificial tree, a slim pencil tree, or a pre-lit tree that promises “easy” and delivers “mysterious dark patch on the left,”
you’ll get a method that works.
Before You Start: Pick a Tree “Game Plan” (So You Don’t End Up With 11 Clashing Themes)
The fastest way to make a Christmas tree look expensive is not buying expensive ornamentsit’s having a clear direction.
Think of your tree like an outfit: you can mix textures and sparkles, but you don’t want every pattern you’ve ever loved
in the same look. Decide on:
1) A simple style statement
- Pick 2–4 adjectives: cozy, classic, glam, playful, rustic, modern, nostalgic, minimal, candy-colored, woodland, etc.
- Choose a “hero” moment: the ribbon, the ornaments, the topper, or a special theme (like travel ornaments or family memories).
- Match the room: a tree doesn’t need to “match” your sofa, but it should look like it lives there on purpose.
2) A color palette that won’t fight itself
For most trees, a cohesive palette means 2–3 main colors plus 1 metal (gold, silver, champagne, or bronze).
Examples:
- Classic: red + green + gold
- Wintery: white + icy blue + silver
- Warm neutral: cream + taupe + gold + wood tones
- Modern: black + white + metallic (or one bold color)
- Playful: bright multicolor ornaments with one unifying element (like all matte finishes)
3) A quick inventory check
Lay out what you have before you start. It saves time and prevents the “I swear we own more hooks” mystery.
Group items into categories:
- Lights
- Ribbon/garland
- Large ornaments (statement)
- Medium ornaments (main set)
- Small ornaments (fillers)
- Picks/sprays/florals/berries
- Tree topper
- Tree skirt or collar
Step 1: Set Up the Tree (Placement, Fluffing, and a Tiny Bit of Safety)
Choose the best spot
Place your tree where you’ll actually enjoy it. If possible, keep it away from heat sources (vents, fireplaces, radiators)
and make sure it doesn’t block walkways or exits. Practical can still be pretty.
Fluff firstyes, even if you’re impatient
If you have an artificial tree, fluffing is the difference between “freshly delivered from a warehouse” and “straight out of a holiday movie.”
Start from the bottom and work upward. Separate branches, fan tips outward, and bend them in slightly different directions for a natural look.
If your tree is pre-lit, turn the lights on while fluffing so you can see sparse areas and make the glow feel even.
Real tree quick prep
If you have a live Christmas tree, keep the water reservoir filled. A hydrated tree holds needles longer and stays safer and fresher.
Bonus: it smells like winter instead of “dry pine potpourri sadness.”
Step 2: Add the Lights (The Layer That Makes Everything Look Magical)
Lights are not just decorationthey’re the “foundation makeup” of the tree. Good lighting makes inexpensive ornaments look charming,
and bad lighting makes even gorgeous ornaments look… confusing.
How many lights do you need?
A common rule of thumb is about 100 lights per foot of tree height for a bright, full glow. If you like a softer look,
you can use fewer. If you love a “twinkle-from-space” tree, you can use more. The goal is even coverage, not a spotlight interrogation.
Pick your lighting style
- Warm white: cozy, classic, flattering (excellent for traditional or neutral themes)
- Cool white: crisp, modern, “snowy” (great for silver/blue palettes)
- Multicolor: nostalgic, playful, kid-friendly
- LED vs incandescent: LEDs run cooler and are energy-efficient; incandescents have a warm glow but produce more heat
Two easy ways to put lights on a Christmas tree
Method A: The classic wrap (fast and reliable)
- Plug in the lights first to confirm they work. Nothing tests your holiday spirit like dead bulbs.
- Start at the top or near the top (especially if your topper needs power). Tuck the plug end inside the branches to hide it.
-
Work downward in a gentle spiral, weaving lights slightly in and outdon’t only wrap the outer tips.
You want depth, like the tree is glowing from within. - Step back every minute or so to check for dark patches, then adjust.
Method B: The “wrap the branches” look (more time, more wow)
- Instead of spiraling around the tree, wrap lights around individual main branches as you move downward.
- This hides wires better and creates a richer, more dimensional glowespecially on sparse trees.
- It’s slower, but it looks like you hired someone with a ladder and a vision board.
Light safety without killing the vibe
- Inspect strands for damaged wires or loose bulbs before use.
- Use certified lights and follow manufacturer limits for connecting strands.
- Turn off tree lights when you leave the house or go to bed.
- Skip real candles on the tree. Pretty? Yes. Wise? No.
Step 3: Add Ribbon and Garland (The “Designer Layer” That Makes the Tree Look Styled)
If ornaments are the jewelry, ribbon and garland are the tailored coat that makes the outfit look intentional.
This is where you add movement, texture, and that “wow, your tree looks full” illusion.
Ribbon: the easiest upgrade
Wired ribbon is beginner-friendly because it holds shape. You can do ribbon in long swags, vertical cascades,
loops, or big bows. A simple approach:
- Cut ribbon into manageable lengths (3–6 feet) or work with one long pieceyour choice.
-
Starting near the top, tuck ribbon inward toward the trunk, then bring it back out a few inches lower.
This creates a billowy, layered look rather than a flat “gift wrap stripe.” - Repeat around the tree, aiming for consistent spacing.
- If you want a “pro” look, vary the depth: some ribbon loops closer to the trunk, some closer to the tips.
Garland: choose your vibe
- Bead garland: classic, easy, great with most ornament styles
- Flocked garland: snowy, cozy, winter wonderland energy
- Tinsel garland: retro sparkle (use lightly unless you’re going full vintage)
- Natural garland: rustic charm (just keep it away from hot bulbs)
Pro tip: ribbon and garland can work together. Pair a soft ribbon (velvet, linen, satin) with a textured garland
(pom-poms, beads, greenery) for depth.
Step 4: Hang Ornaments Like You Mean It (A Simple Formula for Balance)
This is where people often go rogue: they start at eye level, hang everything they love on the front,
then wonder why the tree looks lopsided. The fix is easy: build in layers and spread the visual weight.
Start with the largest ornaments
Large ornaments are your anchors. Place them first so you can distribute them evenly. A quick method:
- Put a large ornament on the left… then one on the right… then one in the back… then repeat.
- Vary heights and depths.
- If an ornament is heavy, hang it closer to the trunk on a sturdy branch so it doesn’t droop.
Work from inside out
Hang some ornaments deeper in the branches to create visual depth. This is especially helpful if your tree is sparse,
slim, or just having a “bad branch day.”
Fill with medium ornaments
Medium ornaments make up the main “look.” Spread colors and finishes around the tree:
matte, shiny, glittery, textured. Variety adds richnessbut keep it within your palette so it feels cohesive.
Finish with small ornaments (the gap-fillers)
Small ornaments are perfect for filling empty spots near the ends of branches. They’re also great for maintaining spacing
so no two big shiny balls are awkwardly touching like they’re trying to merge into one super-ornament.
A simple trick for visual balance
Step back and look at your tree in thirds: top, middle, bottom. If one section looks heavier, move a few statement ornaments
to the lighter area. Your eyes want balanceeven if your family insists “it’s fine.”
Step 5: Add Picks, Sprays, and “Filler” (The Secret Weapon for a Full Tree)
Floral picks, berry stems, faux pine, eucalyptus, snow-dusted branches, and sparkly sprays are what designers use to make a tree
feel layered and luxuriousespecially when the tree itself is thin or the ornament collection is small.
Where filler works best
- In visible gaps between ornaments
- Near the top where branches are smaller
- Deep inside the tree to add color and dimension
How to use filler without overdoing it
Use it like seasoning. Add a little, step back, then add more if needed. If your tree starts looking like it’s auditioning
for a botanical garden exhibit, pull back.
Step 6: Put on the Tree Topper (And Make It Look Secure, Not Nervous)
The tree topper is your finale: star, angel, bow, finial, santa hat, or something delightfully weird (a disco ball? a giant snowflake?
a vintage-inspired topper?). Whatever you choose, make sure it matches the scale of the tree.
How to choose the right topper size
- 6–7.5 ft tree: medium toppers usually look best
- 9+ ft tree: go bigger, or it’ll look like your tree is wearing a tiny hat
- Slim/pencil tree: choose a topper with vertical shape (finial, starburst) to match the silhouette
If the topper wobbles, secure it with floral wire or pipe cleaners and anchor it to a sturdy branch. Confidence matterseven for stars.
Step 7: Finish the Base (Because the Bottom Counts, Too)
A tree base is like shoes: you might think nobody notices, but it can absolutely make or break the look.
Choose one:
- Tree skirt: traditional, cozy, great for hiding cords and stands
- Tree collar: clean and modern (metal, wicker, wood)
- Basket or crate: rustic and charming (make sure it’s stable)
- Blanket wrap: ultra cozy, especially for farmhouse or neutral trees
Common Christmas Tree Decorating Mistakes (And Easy Fixes)
Mistake 1: Lights only on the outside
If your tree looks flat, weave lights deeper into the branches. A little depth makes the whole tree glow instead of glare.
Mistake 2: Ornaments clumped together
Spread your statement ornaments evenly. Think “sprinkled,” not “piled.”
Mistake 3: No texture variety
Mix finishes: matte + shiny + glitter + natural texture (wood, fabric, felt). Even a monochrome tree looks better with contrast.
Mistake 4: The tree looks great up top… and chaotic at the bottom
The bottom third needs love. Add a few large ornaments low and deep, then fill with medium and small pieces to balance the weight.
Quick “Pro Look” Checklist
- Tree is fluffed and shaped before decorating
- Lights have even coverage with some depth
- Ribbon/garland adds movement (not a flat spiral only)
- Large ornaments are evenly distributed
- Some ornaments are tucked deeper for dimension
- Filler picks cover gaps and add texture
- Topper is scaled and secured
- Base is finished (skirt/collar/basket)
- Final step: step back, tweak, take a photothen tweak again
Real-Life Decorating Experiences ( of “Yep, That Happens”)
Here’s the part nobody puts in the glossy “perfect tree” photos: decorating a Christmas tree is an emotional journey.
It starts with optimism (“This year, I’m doing a cohesive theme!”), climbs into mild confusion (“Why are there only 19 hooks in this entire universe?”),
and ends with pride… plus a small pile of ornaments you didn’t use but absolutely refuse to put away because you might “work them in” later.
One of the most common real-life scenarios is the inheritance mix: you’ve got a set of matching ornaments you bought on sale,
a sentimental third-grade salt dough ornament shaped like a blob (beloved), and one random glitter pineapple from 2016 that keeps resurfacing like a festive boomerang.
The trick isn’t to pretend everything matchesit’s to give the chaos a container. Pick a palette (say, red + gold + green),
then let the sentimental ornaments live within that world. If Aunt Linda’s ornament is neon purple and doesn’t go with anything, congratulations:
it’s now a “statement ornament,” placed intentionally where people will see it and ask about it. That’s not mismatch. That’s storytelling.
Another classic experience: the tree that looks “fine”… until you turn off the overhead lights.
Suddenly the tree feels dark in spots and bright in others, like it’s broadcasting in patchy Wi-Fi. That’s usually a lighting depth issue.
We’ve all done the quick outer wrap because it’s faster. Then the room lighting changes, and the tree looks flat. The fix is annoyingly simple:
pull a few sections of lights inward. Five minutes of “weave and tuck” can take your tree from “holiday-ish” to “glowy masterpiece.”
If you decorate with kids, you may recognize the ornament height phenomenon: everything ends up in the bottom three feet because
that’s where tiny arms can reach. Instead of fighting it, lean in. Make the bottom third the “fun zone” with durable ornamentsfelt, plastic, wood,
shatterproof ballsthen style the upper two-thirds with breakables and statement pieces. This gives you a tree that looks designed and also survives December.
If you have pets, especially cats, the same logic applies, plus one extra rule: nothing irresistible (tinsel, dangling beads) at “pounce level.”
And then there’s ribbon. Ribbon can make you feel like a holiday wizard or like you’re wrestling an elegant fabric snake.
The easiest real-world method is cutting ribbon into sections, forming loose loops, and tucking the ends into the branches.
No perfection required. If it looks awkward, adjust the loop size and angleribbon wants movement. Think “gentle waves,” not “tight spiral.”
And if you step back and realize you used too little ribbon (which happens to basically everyone on their first try),
don’t panic. Add a second ribbon in a complementary texturelike velvet plus a sheer sparkle. Suddenly it’s not “I ran out,” it’s “layered design.”
Finally, a truth that applies to every tree styleclassic, modern, rustic, maximalist, minimalist, “we own seven different kinds of ornaments for no reason”:
the best-looking trees usually get two rounds. Round one is building the structure (lights, ribbon/garland, big ornaments).
Round two is the “walk-by tweaks”moving one ornament that’s too close to another, filling one gap, turning a branch slightly so it catches the light.
That’s not overthinking. That’s finishing. And when you’re done, turn off the room lights, plug in the tree, and enjoy the moment.
You made winter sparkle in your living room. That’s kind of a big deal.
Conclusion
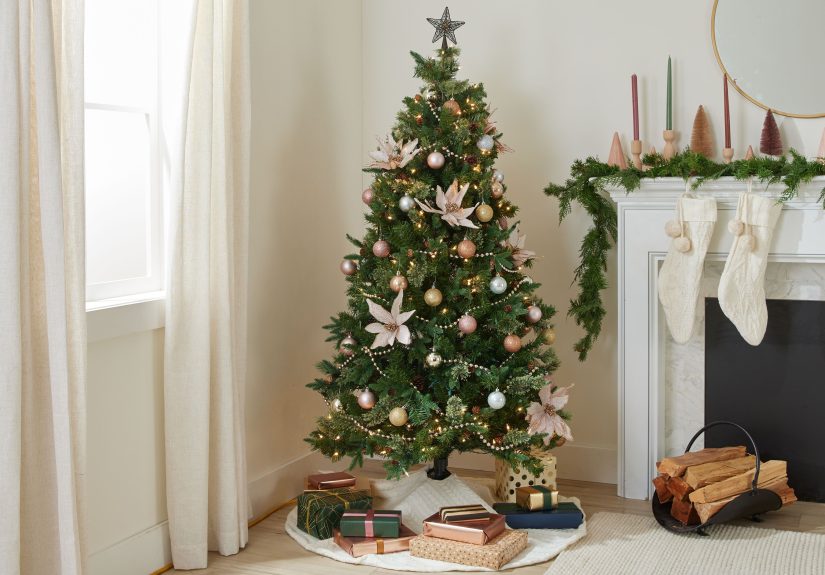
If you remember only one thing: a gorgeous Christmas tree is built in layers. Fluff the tree, add lights with depth,
bring in ribbon or garland for movement, distribute ornaments in sizes from large to small, and finish with texture and a secure topper.
Do a final step-back check, tweak the balance, and let the tree shineliterally and emotionally. Your tree doesn’t have to be perfect.
It just has to feel like your holiday.