Table of Contents >> Show >> Hide
- Why a Wooden Bucket Is a Great Project
- Choose the Right Bucket Design Before You Cut Anything
- Best Wood for a Wooden Bucket
- Tools and Materials
- How to Make a Wooden Bucket Step by Step
- Can a Wooden Bucket Actually Hold Water?
- Common Mistakes to Avoid
- Final Thoughts on Making a Wooden Bucket
- Hands-On Experiences: What Making a Wooden Bucket Really Feels Like
There is something wonderfully stubborn about a wooden bucket. It is not the fastest way to carry things, not the cheapest thing to build, and definitely not the easiest weekend project if you decide to get fancy. But it is satisfying in a way that plastic can only dream about. A well-made wooden bucket looks timeless, smells like a workshop should, and teaches you more about joinery, grain direction, and patience than a dozen flat boards ever could.
If you want to learn how to make a wooden bucket, the smart move is to start with a straight-sided design. Traditional coopers made tapered, watertight vessels with specialized tools and years of experience. You, on the other hand, probably have a table saw, a sander, a healthy respect for sharp blades, and a coffee that has already gone cold. That is enough to build a beautiful wooden bucket for decor, storage, flowers, kindling, gardening tools, or light-duty household use.
This guide walks you through the practical version: a staved wooden bucket with a solid bottom, clean bevels, sturdy bands, and a finish that helps it survive real life. We will also cover the best wood for the job, the math behind the staves without turning this into geometry detention, and the common mistakes that make first-time buckets look like stressed-out polygons.
Why a Wooden Bucket Is a Great Project
A wooden bucket sits in that sweet spot between furniture and shop project. It is small enough to build in a home workshop, but complex enough to make you feel like you joined a secret guild. It teaches several skills at once:
- Cutting accurate bevels
- Working with grain direction
- Dry-fitting multiple parts
- Gluing and clamping a circular form
- Adding hardware or hoops cleanly
And unlike a practice joint that ends up forgotten in a drawer, a wooden pail actually has personality. Set it by a fireplace, use it as a planter sleeve, store hand tools in it, or let it sit on a porch pretending it has opinions about the weather.
Choose the Right Bucket Design Before You Cut Anything
Before you grab a board and start making confident mistakes, decide what kind of wooden bucket you want.
Straight-Sided Bucket
This is the best option for most DIY builders. The staves are rectangular, the bevels are consistent, and the math is simple. It gives you the classic coopered look without requiring traditional barrel-making skills.
Tapered or Bulged Bucket
This is more advanced. The staves are trapezoidal, the angles get trickier, and the assembly becomes less forgiving. It looks more authentic, but it is not the right place to begin unless you already enjoy solving problems with jigs, scraps, and dramatic sighing.
For a first project, build a straight-sided bucket about 8 to 10 inches tall and roughly 8 inches in diameter. That size is practical, attractive, and much easier to clamp than a giant statement bucket that immediately tries to become modern art.
Best Wood for a Wooden Bucket
If you want your bucket to look good and behave itself, wood choice matters. A lot.
Best Overall: White Oak
White oak is the top pick for a traditional-style wooden bucket. It is strong, durable, and historically associated with cooperage for a reason. It also has a reputation for handling moisture better than many other hardwoods, which makes it a smart choice if you want a bucket that feels serious.
Good Alternatives
- Cedar: lightweight, aromatic, and naturally rot resistant
- Cypress: good for rustic outdoor style
- Pine: easy to work with and budget-friendly, though softer and more prone to dents
- Walnut: beautiful for decorative indoor buckets
Woods to Avoid
Skip red oak if your goal is moisture resistance. It is strong, but its open pores make it a poor choice for a bucket that might encounter water. Also avoid badly twisted, green, or poorly dried lumber. A bucket made from unstable wood may look great on day one and like a breakup letter by day ten.
Tools and Materials
You do not need a historic cooper’s shop. You just need the usual woodworking lineup and a little accuracy.
Tools
- Table saw or band saw
- Miter gauge or bevel jig
- Router or table saw for bottom groove
- Clamps, band clamp, or ratchet strap
- Sander
- Drill and bits
- Measuring tape and combination square
- Block plane or hand plane
Materials
- Dry, straight lumber for staves
- Wood for the bottom panel
- Water-resistant or waterproof wood glue
- Metal bands, steel strapping, or decorative hoops
- Handle hardware or wood for a shop-made handle
- Finish such as spar varnish, oil, or exterior-grade clear coat depending on use
How to Make a Wooden Bucket Step by Step
1. Plan the Bucket Size and Number of Staves
A simple first bucket can use 12 staves. That gives you a rounder shape than 8 while staying easy enough to cut and assemble. With 12 staves, each edge gets a 15-degree bevel. That number is the secret sauce that makes the circle close up neatly instead of leaving you with a sad wooden crown.
Example beginner size:
- Height: 9 inches
- Stave thickness: 1/2 inch to 5/8 inch
- Number of staves: 12
- Bottom diameter: around 7 inches
Draw the bucket full size if you can. It sounds old-school, but laying it out on paper helps you catch design problems before the saw starts making expensive decisions.
2. Mill the Staves
Rip your stock into equal-width blanks. Joint and plane them so every stave has the same thickness and straight, clean faces. Consistency matters here. A wooden bucket is basically a team project, and one badly milled stave is the coworker who replies-all at 11:48 p.m.
Cut the staves slightly oversized in width and length first. It is easier to sneak up on a perfect fit than to apologize to a board you already cut too small.
3. Cut the Bevels
Set the table saw blade or jig to the proper bevel and cut both long edges of each stave. For a straight bucket with 12 staves, 15 degrees per edge is the classic starting point. Label the faces and keep the orientation consistent so you do not accidentally create a geometry puzzle halfway through assembly.
After cutting, line the staves edge to edge in a dry run. If the circle closes smoothly, you are in business. If there are gaps, tune the bevels with a plane or make a test piece before recutting the whole batch. Your future self will appreciate this grown-up behavior.
4. Cut the Groove for the Bottom
A bucket needs a bottom that locks in mechanically, not just one that hopes for the best. Cut a groove around the inside face of each stave near the bottom edge. A groove about 1/4 inch up from the bottom and 1/4 inch deep is a practical starting point for a small bucket.
This groove will hold the bottom panel. Keep the groove location identical on every stave, or the bottom will sit crooked and your bucket will develop character you did not ask for.
5. Make the Bottom Panel
Glue up a flat panel or use a single wider board if you have one. Cut the bucket bottom into a circle or 12-sided shape sized to fit the groove. Test-fit it before final assembly.
A slightly undersized bottom is better than one you need to hammer in with medieval enthusiasm. You want a snug fit, not a dramatic scene.
6. Dry-Fit Everything
This step is not optional. Tape the staves together edge to edge, wrap them around the bottom, and tighten with a band clamp or strap. Check for:
- Even joints
- A flat base
- A clean circular shape
- No major gaps at the seams
If the bucket rocks on a flat surface, true the ends of the staves before glue-up. If one stave stands proud, trim it now. Dry-fitting is where you solve problems while your blood pressure is still reasonable.
7. Glue and Clamp the Bucket
Apply glue to the beveled edges, assemble the staves around the bottom panel, and tighten the clamp slowly. Do not rush. Multi-piece glue-ups are not the time to discover that your phone, sandwich, and attention span all live in different rooms.
Use enough pressure to close the joints firmly, but do not overdo it. Too much clamp pressure can force parts to slide or distort the shape. Wipe away squeeze-out and confirm that the bottom is seated properly in the groove all the way around.
Let the assembly cure fully. Yes, fully. Not “probably good enough.” Not “it feels solid.” Fully.
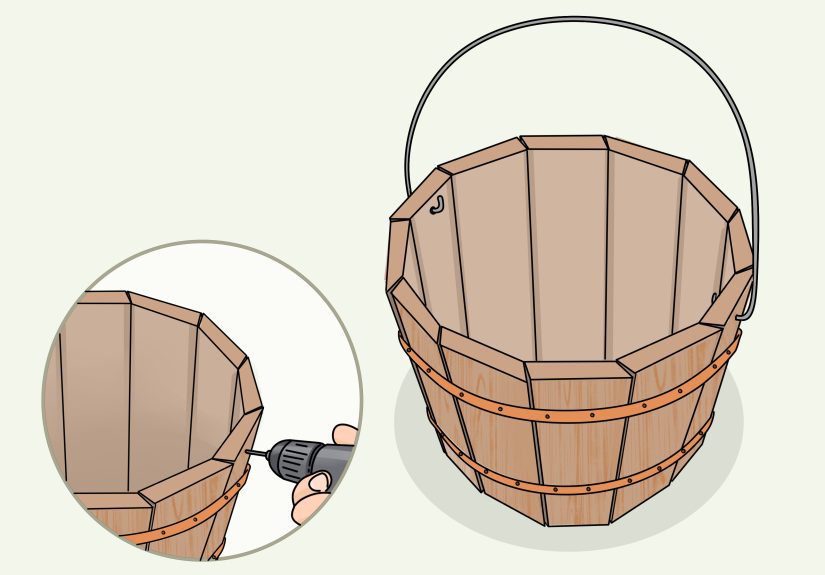
8. Add Hoops, Bands, or Decorative Straps
Once the glue has cured, reinforce the bucket with bands. Traditional coopers used fitted hoops that compress the staves. In a home shop, you can use steel strapping, custom metal bands, blackened hardware, or decorative iron-style hoops fastened carefully.
Place one band near the top and one near the bottom. For a taller bucket, add a third in the middle. These bands improve the look and help the bucket feel intentionally built rather than merely assembled.
9. Add the Handle
You can install a bent wooden handle, a simple dowel-style yoke, or metal swing handle hardware. A wooden handle looks great on rustic pieces, while metal hardware is often easier and stronger for utility use.
Drill handle holes only after the bucket body is fully cured and reinforced. Keep the holes aligned. A crooked handle will annoy you forever because your eye goes straight to it every single time.
10. Sand and Finish
Sand the outside smooth, soften the rim, and ease any sharp corners. You can leave tool marks if you want a handmade look, but there is a difference between handmade and “I lost interest halfway through.” Aim for the charming version.
Choose finish based on use:
- Decorative indoor bucket: oil, wax, or clear satin finish
- Outdoor display bucket: spar varnish or an exterior clear finish
- Planter sleeve: finish the outside and use a liner inside
If you plan to use the bucket around food or water, be careful. A homemade wooden bucket is not automatically a food-safe container just because it looks adorable and rustic. Use food-safe materials where appropriate, avoid questionable finishes, and clean and sanitize responsibly.
Can a Wooden Bucket Actually Hold Water?
Yes, but there is a difference between can hold water and will hold water well for daily use. Traditional watertight wooden vessels depend on precise joinery, suitable wood species, compression from hoops, and the wood swelling slightly when wet. That is real coopering.
A beginner DIY wooden bucket can be made more water friendly with white oak, accurate bevels, tight joints, waterproof glue, and good banding, but it still may not behave like a hand-made professional pail. If your goal is constant wet service, you are building an advanced project. If your goal is a beautiful, sturdy wooden bucket for decor or light utility, you are in excellent territory.
Common Mistakes to Avoid
- Using wet or unstable wood: the bucket may shrink, split, or warp
- Ignoring the bevel math: small angle errors become big gaps
- Skipping the dry-fit: because chaos loves surprise assembly
- Making the bottom too tight: it can distort the body during glue-up
- Relying on glue alone: hoops or bands add strength and improve appearance
- Choosing the wrong finish: match the finish to actual use, not wishful thinking
Final Thoughts on Making a Wooden Bucket
Learning how to make a wooden bucket is one of those projects that looks simple from across the room and surprisingly sophisticated once you start. That is part of the appeal. You are not just cutting boards and gluing up a cylinder. You are learning how geometry, wood movement, grain direction, and restraint all work together.
The best first bucket is not the most historically accurate one. It is the one you actually finish. Start with a straight-sided design. Use dry stock. Cut the bevels carefully. Respect the dry-fit. Add clean bands. Then step back and admire the fact that you turned a stack of boards into something that looks like it wandered out of a better century.
And when someone asks where you bought it, you get the deep satisfaction of saying, “I made it,” which is one of the best sentences in the English language.
Hands-On Experiences: What Making a Wooden Bucket Really Feels Like
The experience of making a wooden bucket is half woodworking and half personality test. On paper, it sounds straightforward: cut staves, bevel edges, glue them into a circle, add a bottom, and finish it nicely. In the shop, though, the project has a way of exposing every little habit you bring to the bench. If you measure carefully, it rewards you. If you rush, it turns into a very expensive lesson in why circles are less forgiving than rectangles.
One of the first things people notice when building a wooden bucket is how small errors multiply. A bevel that is just a little off does not stay little for long. By the time you bring the last stave around, the gap can look like it belongs in a fence, not a bucket. That is why the dry-fit becomes such a memorable part of the process. You lay all the staves out, pull them together with tape or a strap, and suddenly you see whether your math was smart or merely optimistic.
There is also a surprising emotional arc to the project. In the early stage, the parts look underwhelming. They are just narrow boards with angled edges, not exactly the kind of pieces that inspire applause. Then the moment you wrap them into a ring, the whole project changes. It stops looking like lumber and starts looking like an object. That shift is incredibly satisfying. It feels a little like magic and a little like vindication.
Another experience many builders have is learning patience during glue-up. A wooden bucket is not the kind of thing you can casually clamp while also checking messages, reheating pizza, and pretending you are good at multitasking. Once glue hits those bevels, the project wants your full attention. You tighten the clamp, nudge the staves, check the bottom, wipe squeeze-out, and hope the assembly does not slide like a toddler in socks on a hardwood floor. It is exciting, mildly stressful, and deeply educational.
Then comes the tactile reward. After the glue cures and you sand the surface, the bucket starts to feel real. The rim softens. The staves blend together. The grain begins to show. If you used white oak, cedar, or walnut, the wood has a richness that no factory-made container can fake. Running your hand over a finished bucket is one of those quiet workshop moments that reminds you why handmade objects matter.
People also tend to remember the little design choices. Maybe you added dark metal hoops and the bucket suddenly looked old-world. Maybe you shaped a wooden handle and realized one tiny curve changed the whole personality of the piece. Maybe you left a few subtle tool marks because they looked honest. These details become stories built into the object.
Most of all, making a wooden bucket teaches respect for traditional craft. Even a simplified version hints at how skilled real coopers had to be. After building one, you start looking at barrels, pails, churns, and firkins with completely different eyes. What once looked quaint now looks brilliant. And that may be the best part of the experience: you finish the project with a bucket, sure, but you also finish with sharper skills, better judgment, and a stronger appreciation for what careful hands can do with wood.