
Table of Contents >> Show >> Hide
- What Are Floating Farmhouse Shelves?
- Step 1: Plan Your Floating Farmhouse Shelves
- Step 2: Gather Tools and Materials
- Step 3: Build the Inner Frame
- Step 4: Attach the Frame to the Wall
- Step 5: Build the Shelf Box (The Pretty Part)
- Step 6: Sand, Stain, and Finish for Farmhouse Style
- Step 7: Slide the Shelf Box Onto the Frame
- Styling Your Floating Farmhouse Shelves
- Common Mistakes to Avoid
- Real-Life Experiences: What Builders and DIYers Learn Making Floating Farmhouse Shelves
- Wrapping Up
If your walls are staring at you like, “Hey, do something with us,” floating farmhouse shelves are the perfect answer.
They’re simple, rustic, budget-friendly, and look like you hired a custom carpenter who accepts payment in coffee.
In true Hometalk style, this guide walks you through exactly how to build and install floating farmhouse shelves that are strong, straight, and seriously stylish.
We’ll cover everything from planning and measuring to building the hollow “floating” shelf box and locking it into the wall like a pro.
Then we’ll talk stain colors, farmhouse finishes, and styling tricks so your shelves look magazine-readynot like a 2 a.m. impulse project with a nail gun.
What Are Floating Farmhouse Shelves?
Floating shelves are wall shelves with no visible brackets or supports. The secret is a hidden cleat or metal bracket that’s attached to the wall and then wrapped with a hollow wooden box.
The farmhouse twist comes from the materials and finish:
- Chunky wood (1×8, 1×10, or 2× lumber) for a solid, rustic feel.
- Warm stains like walnut, special walnut, or weathered oak.
- Softly distressed edges or a matte topcoat for that “old barn but make it pretty” vibe.
They’re perfect in kitchens, bathrooms, living rooms, and laundry roomsanywhere you want open storage with character.
Design pros and DIY bloggers alike use floating shelves to replace upper cabinets, frame range hoods, or turn a blank wall into a display moment.
Step 1: Plan Your Floating Farmhouse Shelves
Decide where your shelves go
Before you even touch a saw, grab a tape measure and painter’s tape. Mark on the wall where you want your shelves so you can visualize:
- Height: In kitchens, 18–22 inches above the countertop is typical. For stacked shelves, leave 12–16 inches between them.
- Length: Common lengths run from 24 to 48 inches. Longer than that is possible, but you’ll need more supports and sturdier construction.
- Depth: 8 to 10 inches is idealdeep enough for plates, not so deep that they eat the room.
Find the studs (non-negotiable!)
Floating shelves are only as strong as what they’re attached to. Almost every pro guidefrom big-box stores to specialty shelf brandssays the same thing:
you must hit studs for reliable support, especially for heavy farmhouse-style wood.
Use this process:
- Use a stud finder to locate studs along the wall.
- Mark each stud lightly with a pencil at shelf height.
- Use a long level or laser level to draw a straight line where your cleat or bracket will go.
If you only remember one thing from this article, let it be this:
no studs = sad, sagging shelves and broken decor.
Step 2: Gather Tools and Materials
Exact dimensions depend on your wall and design, but this is a solid farmhouse-style starting point inspired by popular DIY floating shelf projects.
Typical lumber and sheet goods
- 1×8 or 1×10 pine board (front face of the shelf)
- 1×2 or 2×2 boards (inner frame/cleat)
- 1/4″ or 1/2″ plywood for the top and bottom panels (optional if you’re not using solid boards)
Hardware & consumables
- 3–4″ construction screws or lag screws (for studs)
- Wood screws (1 1/4″ to 2″) for assembling the frame
- Wood glue
- Wood filler (optional, for nail or screw holes)
- Sandpaper (120, 180, 220 grit)
- Stain of your choice + clear sealer (polyurethane, water-based poly, or matte topcoat)
Tools
- Miter saw or circular saw
- Drill/driver and drill bits
- Stud finder
- Level (2′ or 4′)
- Clamps (helpful but not mandatory)
- Measuring tape and pencil
- Safety gear (glasses, hearing protection, mask)
Step 3: Build the Inner Frame
Most farmhouse-style floating shelves use a hollow “torsion box” design: an inner frame attached to the wall and a wooden shell that slips over it.
This approach gives you a thick, substantial-looking shelf that’s still relatively lightweight and very strong.
Cut the frame pieces
- Cut a long 1×2 or 2×2 board to the same length as your finished shelf. This will be the back cleat.
- Cut several short 1×2 or 2×2 pieces (spacers) to match the shelf depth minus about 1″ (so they don’t hit the drywall).
For example, for a 36″ long × 9 1/4″ deep shelf, you might use:
- One 36″ back cleat
- Five or six 8″ spacers
Assemble the frame
- Lay the back cleat flat on a work surface.
- Attach the spacers perpendicular to the cleat with wood screws and glue, spacing them evenly (and aligning at least two with your stud locations).
- Check everything for squareif it looks like a drunken ladder, adjust before the glue dries.
This frame will slide inside your finished shelf box and also act as the main support, so take your time here.
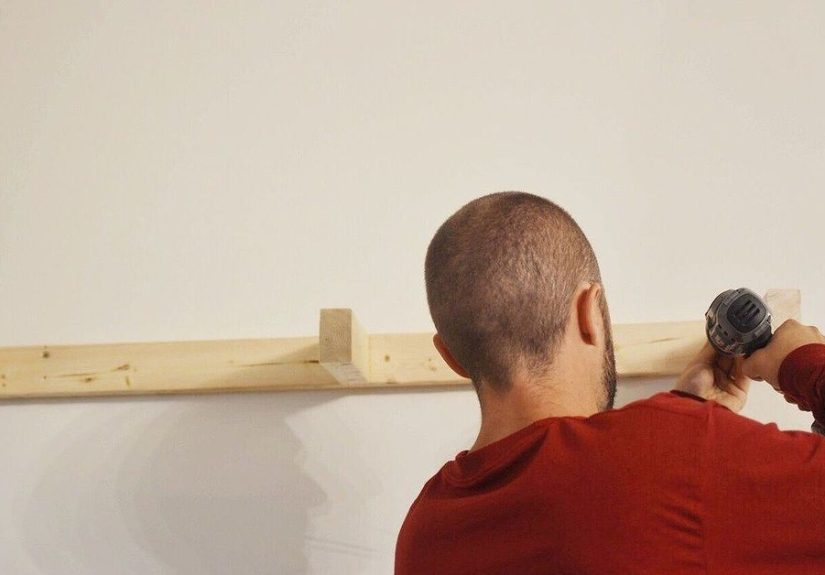
Step 4: Attach the Frame to the Wall
Now you’re going to mount the cleat/frame directly into the studs. This is where big-box tutorials and specialty hardware companies agree: long screws into solid studs are the key to shelves that don’t move.
Mounting the cleat
- Hold the frame up to the wall along your level line.
- Drive a couple of temporary screws into studs to hold it in place while you adjust.
- Check level againand again. This is not the time for “good enough.”
- Once level, drill pilot holes through the cleat at every stud location.
- Drive 3–4″ structural or lag screws into each stud. Tighten them until the frame is rock solid.
Give the frame a good tug. If it wiggles, you either missed a stud, used too-short screws, or angered the DIY gods. Fix it nowonce the shelf box is on, it’s much harder.
Step 5: Build the Shelf Box (The Pretty Part)
With the frame on the wall, you can build the hollow box that slides over it.
Many DIYers use plywood for the top and bottom and a solid board for the front to get a chunky farmhouse style without the weight of a huge slab.
Cut the top, bottom, and sides
- Cut the top and bottom panels to the full length and depth of the shelf.
- Cut two side pieces to match the depth and desired thickness of your shelf.
- Cut a front board (1×8 or 1×10) to match the shelf length.
Assemble the box
- Lay the bottom panel flat.
- Glue and nail/screw the side pieces and front board to the bottom panel, forming a U-shaped channel.
- Dry-fit the box over the wall frame to make sure it slides on easily. Adjust as needed.
- Attach the top panel with glue and brad nails or screws.
You’ve just made a hollow box that slips over the cleat. Think of it as a wooden sleeve that hides all the support hardware but carries the farmhouse look.
Step 6: Sand, Stain, and Finish for Farmhouse Style
This is where your floating shelves shift from “wood project” to “Pinterest board material.” Popular farmhouse tutorials use simple stain and a matte topcoat to keep the wood looking natural but finished.
Prep the wood
- Sand all visible surfaces starting with 120 grit and finishing with 180–220 grit.
- Soften sharp edges with a light pass of sandpaper for a hand-worn feel.
- Fill any nail holes with wood filler and sand smooth after it dries.
Stain and seal
- Apply pre-stain conditioner if you’re using softwoods like pine to reduce blotchiness.
- Brush or wipe on your stain, following the grain. Wipe off excess.
- Let the stain fully dry, then add 2–3 coats of clear finish, sanding lightly between coats.
Classic farmhouse finishes include warm medium browns, gray-washed tones, and even layered stain + whitewash for a weathered look.
Step 7: Slide the Shelf Box Onto the Frame
Once the finish is dry, it’s time for the most satisfying moment of the whole project.
- Carefully slide the hollow shelf box onto the wall frame.
- Push it all the way back until it sits flush with the wall.
- From underneath or above, drive a few screws through the box into the frame to lock it in place (toward the back where they’ll be hidden).
Give the front edge a gentle push and pull. It should feel solid, not springy. If it moves, add more screws into the frame or double-check that the cleat is tight to the wall.
Styling Your Floating Farmhouse Shelves
Now for the fun part: filling those shelves without making them look like a clearance aisle. Designers often suggest mixing texture, height, and negative space so the shelves feel curated, not cluttered.
- Mix materials: Wood, ceramic, glass, and wicker baskets play well together.
- Use odd numbers: Group items in threes and fivesit’s weirdly pleasing to the eye.
- Add greenery: Small plants or faux stems instantly soften the hard lines.
- Layer items: Stack plates, lean cutting boards, and prop framed art behind smaller pieces.
- Leave breathing room: Empty space is your friend; not every inch needs stuff.
Look at photos of farmhouse kitchens and bathrooms with floating shelves and you’ll see the common thread: warm wood, useful items, and just enough decor to feel styled but not fussy.
Common Mistakes to Avoid
1. Ignoring weight and hardware
Heavy wood + stacks of dishes + no studs = disaster. Use long screws or lag screws into studs, and don’t rely on basic drywall anchors for deep, farmhouse-style shelves. Specialty floating shelf brackets or well-built wooden cleats are worth the small extra cost for safety and peace of mind.
2. Skipping the level
Your eye can spot a crooked shelf from across the room. Check level when marking, when mounting the cleat, and when sliding on the box. A few extra minutes with a level beats staring at a slanted shelf forever.
3. Going too shallow or too deep
Shallow shelves (under 7″) are frustrating for plates and larger décor, while extra-deep shelves (over 12″) can feel like half a cabinet sticking out of the wall. That 8–10″ sweet spot comes up again and again in pro guides for everyday use.
4. Using unsealed wood in kitchens and bathrooms
Kitchens and bathrooms are splash zones. Unsealed pine will stain from water rings, oils, and steam. A few coats of clear finish give you the farmhouse look and wipeable surfaces.
Real-Life Experiences: What Builders and DIYers Learn Making Floating Farmhouse Shelves
If you talk to people who’ve made more than one set of floating farmhouse shelves (or scroll enough project posts and comment sections), a few themes repeat. Consider this your “I learned the hard way so you don’t have to” section.
Lesson 1: Your first shelf is slowthen it gets easy
The first time you build floating shelves, you’ll probably triple-check every measurement and walk back and forth between the wall and the saw what feels like a thousand times. That’s normal.
Once you’ve built one box and mounted one cleat, the next shelves go dramatically faster because all the math and guesswork are done.
Many DIYers suggest building and finishing all the shelf boxes at once while the tools and stain are already out. It’s a little more chaotic in the short term, but it saves you from turning your living room into a workshop three separate weekends in a row.
Lesson 2: Hitting studs is half technique, half patience
In theory, you just wave a stud finder, mark, and drill. In reality, walls hide all sorts of surprises: double studs by doors, missing studs where you expect them, or old patchwork that confuses your stud finder.
DIYers often end up confirming stud locations the old-school wayby drilling small test holes or measuring from cornersespecially when the stud finder gives conflicting signals. The key is to find at least two studs for each shelf and to use long, quality fasteners. Once you feel how solid a properly mounted cleat is, you’ll never go back to guessing with anchors.
Lesson 3: Slight design tweaks make a big difference
After living with their shelves for a while, people often wish they had:
- Made them slightly deeper, so dinner plates or cereal bowls fit comfortably.
- Stopped one shelf short of the wall edge so curtains or doors could move freely.
- Aligned shelves with something architecturallike a window, range hood, or doorwayfor a more intentional look.
Before you cut anything, step back and look at the wall as a whole. Use painter’s tape to “draw” the shelves on the wall and live with it for a day. It sounds fussy, but it’s one of the best design tricks out there.
Lesson 4: Farmhouse doesn’t mean messy
A lot of people picture farmhouse style as chippy paint and cluttered shelves, but the most beautiful floating farmhouse shelves are actually edited and balanced.
Home decorators and designers often recommend treating your shelves like a rotating display: keep the everyday basics (plates, bowls, mugs) and a few favorite decor pieces, then swap seasonal items in and out as the year goes on.
Over time, you’ll figure out what naturally lives on your shelves and what you always move out of the way. That’s your cue to simplify. The bonus? Fewer items on the shelf mean less dusting and more impact from the pieces you truly love.
Lesson 5: Good prep makes them look custom
The difference between “DIY” and “custom” is usually in the small details: smooth sanding, tight joints, carefully filled nail holes, a stain that’s fully wiped offnot left in streaksand a topcoat that doesn’t drip.
Many woodworkers recommend taking time to test stain colors on scrap pieces from the same boards you’re using, because pine, poplar, and oak all grab color differently. Doing this small test avoids the heartbreak of realizing the “perfect” stain looks almost black in your actual space.
The beautiful thing about floating farmhouse shelves is that they age well. Small dings and scuffs only add to the charm. Build them solid, finish them thoughtfully, and style them with pieces you love, and they’ll feel like they’ve always belonged in your home.
Wrapping Up
Building floating farmhouse shelves is one of those projects that looks advanced but is completely doable with basic tools, patient measuring, and a little stain under your fingernails.
With a sturdy hidden frame, solid attachment into studs, and a farmhouse-style wood box, you’ll have shelves that are strong enough for daily use and pretty enough to star in every room photo you ever post.
Whether you’re following a Hometalk-inspired tutorial, blending ideas from big-box guides, or putting your own spin on the design, the formula stays the same:
plan carefully, build square, attach securely, and style with intention. Do that, and your floating farmhouse shelves will look like they came straight out of a designer’s portfoliowithout the designer price tag.


