Table of Contents >> Show >> Hide
- What Are Potions in Minecraft?
- Items You Need Before Brewing Potions
- How to Make Potions in Minecraft: Basic Brewing Steps
- Essential Minecraft Potion Recipes
- Negative Potions and When to Use Them
- How to Make Splash and Lingering Potions
- How to Upgrade Potions
- Newer Minecraft 1.21 Potion Effects
- Best Potions for Different Minecraft Situations
- Common Potion Brewing Mistakes
- Practical Experiences From Brewing Potions in Minecraft
- Conclusion
- SEO Tags
Learning how to make potions in Minecraft is one of those skills that separates the “I built a dirt hut and hoped for the best” player from the “I walked through lava like I owned the Nether” player. Potions can help you breathe underwater, survive fire, heal quickly, move faster, hit harder, see in the dark, prank friends, cure zombie villagers, and generally behave like the overprepared wizard your survival world deserves.
The funny thing is that Minecraft brewing looks more confusing than it really is. The brewing stand has odd slots, the ingredients sound like a grocery list from a haunted swamp, and nobody naturally guesses that a fermented spider eye is a perfectly normal thing to keep next to the sugar. But once you understand the orderwater bottle, base ingredient, effect ingredient, optional modifierthe entire system becomes much easier.
This guide explains how to make potions in Minecraft step by step, including the tools you need, the best ingredients to gather, beginner-friendly recipes, advanced potion upgrades, and practical advice for survival, PvP, Nether trips, ocean exploration, and boss fights.
What Are Potions in Minecraft?
Potions are drinkable or throwable items that give temporary status effects. Some effects help you, such as Healing, Strength, Fire Resistance, Water Breathing, Night Vision, Regeneration, and Swiftness. Others are meant for enemies, such as Poison, Slowness, Weakness, and Harming. A few are situational, weird, or wonderfully chaotic, which is basically Minecraft’s love language.
Most potions begin as a simple water bottle. From there, you place the bottle in a brewing stand, add an ingredient, wait for the bubbling magic to happen, and then modify the result if needed. You can drink regular potions yourself, turn them into splash potions to throw, or upgrade splash potions into lingering potions that leave a cloud of effect in an area.
Items You Need Before Brewing Potions
Before you can become the potion master of your server, you need a few key items. Some are easy to craft, while others require a trip into the Nether. In other words, pack food, armor, and emotional support.
Brewing Stand
The brewing stand is the main workstation for making potions. To craft one, you need one Blaze Rod and three cobblestone, blackstone, or cobbled deepslate blocks. Place the Blaze Rod in the top middle slot of the crafting grid and the three stone blocks across the middle row.
You can also find brewing stands naturally in some village churches, but most players craft their own after defeating Blazes in a Nether Fortress.
Blaze Powder
Blaze Powder is the fuel for your brewing stand. Craft it from Blaze Rods, which drop from Blazes. You will also use Blaze Powder as an ingredient for Strength potions, so collect more than you think you need. Minecraft has a talent for making you run out of important items at the worst possible moment.
Glass Bottles and Water
Craft glass bottles using three glass blocks in a V shape on a crafting table. Fill them by using the bottles on a water source or cauldron. Since each brewing stand can brew up to three bottles at once, always use three water bottles per batch. Brewing one bottle at a time works, but it also says, “I enjoy wasting Nether Wart,” and nobody wants that energy.
Nether Wart
Nether Wart is the most important base ingredient for standard potion brewing. It grows in Nether Fortresses and Bastion Remnants, usually on soul sand. Adding Nether Wart to water bottles creates Awkward Potions, which are the base for many useful potions.
How to Make Potions in Minecraft: Basic Brewing Steps
Once your brewing station is ready, the process is simple. Follow this order carefully, because potion brewing is not a “throw everything in and hope” system. That is how you get disappointment in a bottle.
Step 1: Place the Brewing Stand
Put your brewing stand somewhere safe and easy to access. A dedicated brewing room is ideal, especially if you store ingredients nearby in labeled chests. You do not need a fancy wizard tower, but it helps the vibe.
Step 2: Add Blaze Powder
Open the brewing stand and place Blaze Powder in the fuel slot on the upper left. Without fuel, the brewing stand will do absolutely nothing, much like a furnace with no coal or a teammate who “forgot” to bring blocks.
Step 3: Add Water Bottles
Place up to three water bottles in the bottom slots. Brewing three at a time is more efficient because one ingredient affects all bottles in the stand.
Step 4: Add Nether Wart
Place Nether Wart in the top ingredient slot. After brewing finishes, your water bottles become Awkward Potions. Awkward Potions do not do anything by themselves, but they are the foundation for most useful potion recipes.
Step 5: Add an Effect Ingredient
Now add the ingredient that creates the potion effect. For example, sugar makes Swiftness, Blaze Powder makes Strength, Magma Cream makes Fire Resistance, and a Golden Carrot makes Night Vision.
Step 6: Modify the Potion If Needed
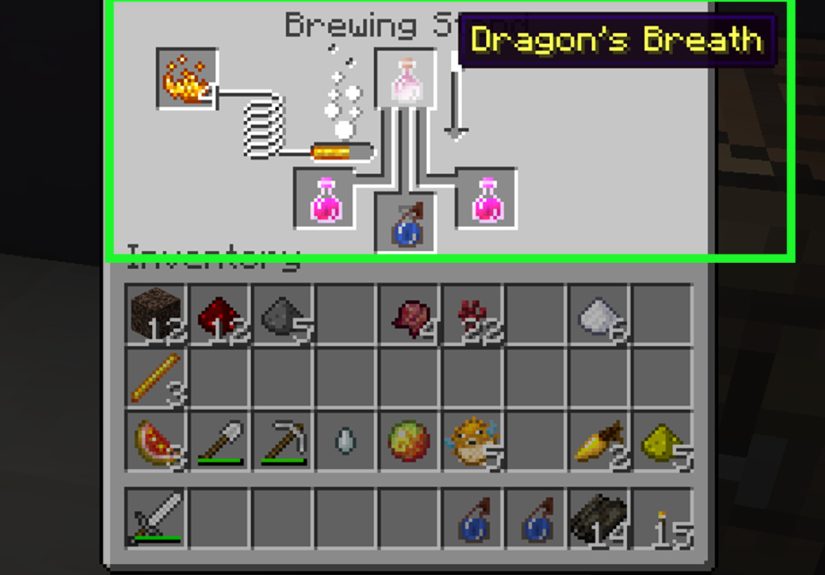
After creating the potion, you can modify it. Redstone Dust usually extends duration. Glowstone Dust usually increases strength but shortens duration. Gunpowder turns a drinkable potion into a splash potion. Dragon’s Breath turns a splash potion into a lingering potion. Fermented Spider Eye corrupts certain potions into different effects.
Essential Minecraft Potion Recipes
Here are some of the most useful potion recipes for survival players. These are the recipes you will actually use, not the ones that sit in a chest forever like that suspicious stack of poisonous potatoes.
Potion of Fire Resistance
Recipe: Water Bottle + Nether Wart + Magma Cream
Fire Resistance is one of the best potions in Minecraft, especially in the Nether. It protects you from lava and fire damage, making it perfect for mining ancient debris, fighting Blazes, crossing lava lakes, or recovering from a very bad bridge-building decision.
Potion of Healing
Recipe: Water Bottle + Nether Wart + Glistering Melon Slice
The Potion of Healing restores health instantly. Add Glowstone Dust to make it stronger. Turn it into a splash potion if you want quick emergency healing or if you enjoy dramatically throwing medicine at your own feet.
Potion of Strength
Recipe: Water Bottle + Nether Wart + Blaze Powder
Strength increases melee damage, making it excellent for boss fights, raids, caves, and PvP. Use Redstone Dust for longer duration or Glowstone Dust for a stronger version.
Potion of Swiftness
Recipe: Water Bottle + Nether Wart + Sugar
Swiftness helps you move faster. It is useful for exploring, escaping mobs, traveling long distances, and pretending you are more organized than you are when you sprint back home at night.
Potion of Night Vision
Recipe: Water Bottle + Nether Wart + Golden Carrot
Night Vision lets you see clearly in dark areas. It is amazing for mining, underwater exploration, ancient cities, caves, and building at night without placing torches every six blocks like a nervous interior designer.
Potion of Water Breathing
Recipe: Water Bottle + Nether Wart + Pufferfish
Water Breathing is essential for ocean monuments, underwater ruins, shipwrecks, and deep-sea building projects. Add Redstone Dust to extend the duration and save yourself from panicked bubble-watching.
Potion of Regeneration
Recipe: Water Bottle + Nether Wart + Ghast Tear
Regeneration restores health over time. It is especially helpful during boss fights or difficult raids. Ghast Tears can be annoying to collect because Ghasts have a habit of dying over lava, which feels personal.
Potion of Slow Falling
Recipe: Water Bottle + Nether Wart + Phantom Membrane
Slow Falling reduces fall speed and helps prevent fall damage. Use it while fighting the Ender Dragon, exploring End cities, building tall structures, or recovering from your own confidence.
Negative Potions and When to Use Them
Not every potion is made for drinking. Some are better thrown at enemies, hostile mobs, or that one friend who keeps “accidentally” opening your chest room.
Potion of Poison
Recipe: Water Bottle + Nether Wart + Spider Eye
Poison slowly reduces health but does not usually finish the target by itself. It is useful for weakening enemies before combat. Turn it into a splash potion to make it practical.
Potion of Weakness
Recipe: Water Bottle + Fermented Spider Eye
Weakness lowers attack damage and is famous for one very important use: curing zombie villagers. Throw a Splash Potion of Weakness at a zombie villager, then give it a golden apple. After a few minutes, you get a regular villager and, potentially, better trades.
Potion of Harming
Recipe: Corrupt a Potion of Healing or Poison with Fermented Spider Eye
Harming deals instant damage, making it useful in combat. However, be careful with undead mobs, because Minecraft likes to keep you humble: Healing and Harming interact differently with undead enemies than with living ones.
Potion of Slowness
Recipe: Corrupt certain movement potions, such as Swiftness or Leaping, with Fermented Spider Eye
Slowness is great for controlling enemies, slowing players in PvP, or creating traps. It is less glamorous than Strength or Fire Resistance, but strategy does not always sparkle.
How to Make Splash and Lingering Potions
Once you have a regular potion, you can change how it is used. This is where brewing becomes more tactical.
Splash Potions
To make a splash potion, add Gunpowder to a finished potion. Splash potions can be thrown, affecting players, mobs, or an area near the impact. They are ideal for harmful effects like Poison and Weakness, but they can also be used for team support, such as throwing Healing or Strength at allies.
Lingering Potions
To make a lingering potion, add Dragon’s Breath to a splash potion. Lingering potions leave a cloud that applies the effect to entities inside it. They are useful for traps, area control, and crafting tipped arrows.
Dragon’s Breath is collected during the Ender Dragon fight by using glass bottles on the purple breath clouds. Yes, collecting dragon breath in a bottle sounds like a terrible idea. In Minecraft, it is called progress.
How to Upgrade Potions
Modifiers let you customize your potions for different situations. Knowing when to extend or strengthen a potion matters.
Use Redstone Dust for Longer Duration
Redstone Dust extends many potion effects. This is usually best for exploration potions like Fire Resistance, Night Vision, Water Breathing, and Swiftness. Longer duration means fewer interruptions and fewer moments where you realize your potion expired while standing in lava.
Use Glowstone Dust for Stronger Effects
Glowstone Dust increases the level of certain potions. For example, you can create stronger Healing, Strength, Swiftness, and Regeneration potions. The trade-off is that stronger potions often last for a shorter time.
Use Fermented Spider Eye to Corrupt Effects
Fermented Spider Eye changes certain potions into different effects. This ingredient is used for potions like Weakness, Harming, Slowness, and Invisibility. It is made from a spider eye, sugar, and a brown mushroom, which is somehow both disgusting and useful.
Newer Minecraft 1.21 Potion Effects
Minecraft 1.21 introduced newer potion effects connected to the Tricky Trials update. These effects are more unusual than classic potions because several of them trigger when an affected entity dies.
Potion of Infestation
Infestation is brewed with an Awkward Potion and stone. When an affected entity takes damage, there is a chance for silverfish to spawn. It is chaotic, strange, and exactly the kind of potion that makes multiplayer servers feel like a science experiment with consequences.
Potion of Oozing
Oozing is brewed with an Awkward Potion and a slime block. If an affected entity dies while the effect is active, slimes can appear. This is useful for pranks, mob interactions, or creating absolute nonsense in controlled conditions.
Potion of Weaving
Weaving is brewed with an Awkward Potion and a cobweb. It can cause cobwebs to appear when the affected entity dies and also changes how the entity interacts with cobwebs. It is a niche effect, but clever players can use it creatively in traps and challenges.
Potion of Wind Charging
Wind Charging is brewed with an Awkward Potion and a Breeze Rod. When the affected entity dies, it releases a burst of wind. This connects to the Breeze mob and wind charge mechanics introduced with the Tricky Trials update.
Best Potions for Different Minecraft Situations
Best Potions for the Nether
Bring Fire Resistance, Strength, Healing, and Regeneration. Fire Resistance is the star of the show because lava is everywhere and gravity is rude. Strength helps against Wither Skeletons and Piglin Brutes, while Healing and Regeneration provide backup when things go wrong.
Best Potions for the Ender Dragon
Bring Slow Falling, Strength, Regeneration, Healing, and Night Vision if you like clearer visibility. Slow Falling is especially helpful because the dragon and Endermen can launch you into the air. Falling gracefully is better than becoming a crater with boots.
Best Potions for Mining
Night Vision, Fire Resistance, and Swiftness are excellent mining potions. Night Vision makes caves easier to navigate, Fire Resistance protects against lava pockets, and Swiftness helps you move through tunnels quickly.
Best Potions for Ocean Exploration
Water Breathing and Night Vision are the perfect ocean combo. Add Depth Strider boots and you are basically an underwater tourist with suspiciously good equipment.
Best Potions for PvP
Strength, Swiftness, Healing, Regeneration, Poison, Slowness, and Weakness are strong PvP choices. Splash potions are especially important because timing matters. Drinking a potion slowly while someone charges you with an enchanted axe is not a strategy; it is a documentary about regret.
Common Potion Brewing Mistakes
Forgetting Blaze Powder
If the brewing stand is not working, check the fuel slot. This is the most common mistake. The second most common mistake is blaming the game before checking the fuel slot.
Using the Wrong Order
Most useful potions need Nether Wart first. If you add random ingredients directly to water bottles, you may get a base potion that does not do what you wanted. Start with Awkward Potions unless the recipe specifically says otherwise.
Brewing Only One Bottle at a Time
Always brew three bottles at once when possible. The ingredient cost is the same, so filling all three bottom slots gives you more value.
Confusing Redstone and Glowstone
Redstone usually extends duration. Glowstone usually strengthens the effect. Remember it like this: redstone is for longer adventures; glowstone is for stronger drama.
Practical Experiences From Brewing Potions in Minecraft
The first time many players use potions seriously is usually after a disaster. Maybe you fell into lava while mining ancient debris. Maybe a Guardian ruined your ocean monument plans. Maybe the Ender Dragon launched you sky-high and you had enough time to think about every decision that led to that moment. Potions often feel optional until Minecraft teaches you, with great enthusiasm, that preparation matters.
One of the best habits is building a small brewing station near your main storage area. Place a brewing stand on a counter, keep a water source nearby, and store Nether Wart, Blaze Powder, Redstone, Glowstone, Gunpowder, and common effect ingredients in labeled chests or barrels. This setup saves time and prevents the classic “Where did I put the Magma Cream?” spiral that somehow ends with you reorganizing your entire base instead of playing the game.
For Nether trips, Fire Resistance is the potion that changes everything. Without it, every lava lake looks like a lawsuit. With it, you can explore more confidently, bridge across dangerous areas, mine near lava, and survive accidents that would normally send your diamonds into the world’s hottest lost-and-found. The experience is so different that after using Fire Resistance once, going back into the Nether without it feels like driving without brakes.
Water Breathing and Night Vision also create a memorable upgrade in gameplay. Exploring underwater ruins without them can feel stressful because you constantly watch your air bubbles and visibility. With both effects active, the ocean becomes calm, bright, and surprisingly beautiful. You can loot shipwrecks, search for buried treasure maps, build underwater bases, and explore ocean monuments with far less panic. Add doors or conduits later, and you become less of a visitor and more of a landlord.
Potions also teach resource planning. Ghast Tears are valuable, Phantom Membranes require dealing with Phantoms, and Blaze Rods require Nether Fortress runs. This means a good potion supply reflects a well-rounded survival world. You are not just brewing; you are connecting farming, combat, exploration, and storage into one useful system.
In multiplayer, potions become even more interesting. Splash Healing can save teammates. Strength can help during raids. Weakness can cure zombie villagers and transform a struggling trading hall into an emerald-making machine. Meanwhile, newer effects like Oozing or Weaving can turn friendly experiments into absolute comedy, as long as everyone involved has agreed to the chaos.
The biggest lesson is simple: do not wait until you need potions to start brewing them. Keep a few essentials ready. A chest with Fire Resistance, Healing, Strength, Night Vision, Water Breathing, and Slow Falling can save hours of recovery. Minecraft rewards creativity, but it also rewards players who prepare like the caves are actively plotting against thembecause they are.
Conclusion
Making potions in Minecraft is easier once you understand the basic formula: fuel the brewing stand, add water bottles, brew Awkward Potions with Nether Wart, add an effect ingredient, and modify the result when needed. From Fire Resistance in the Nether to Water Breathing in ocean monuments and Slow Falling in the End, potions can completely change how you explore, fight, build, and survive.
Start with the essentials, brew three bottles at a time, organize your ingredients, and keep backup potions ready before major adventures. You do not need to memorize every recipe overnight. Learn the core potions first, experiment with modifiers, and soon your brewing room will become one of the most valuable places in your base. Also, it will make you look very smart, which is half the fun.