Table of Contents >> Show >> Hide
- What you’ll see
- Why Monica’s kitchen is so iconic (and why it’s fun to recreate)
- Planning the build: scale, layout, and my “tiny detective” process
- Materials and tools I used (aka: tiny construction, big snacks)
- The build (11 Pics)
- Pic 1: The blueprint moment (aka “me vs. geometry”)
- Pic 2: Walls go up (instant tiny apartment energy)
- Pic 3: The cabinet boxes (the unglamorous backbone)
- Pic 4: Countertops and the “L” shape
- Pic 5: Painting the cabinets (the “oh wow” transformation)
- Pic 6: The fridge wall (hello, white rectangle of destiny)
- Pic 7: Open shelves and “lived-in” layering
- Pic 8: The table moment (the heart of the room)
- Pic 9: Floors and baseboards (the underrated realism)
- Pic 10: The tiny accessories explosion
- Pic 11: The final reveal (tiny sitcom energy achieved)
- Tiny details that make it feel like Monica’s kitchen (not just a miniature kitchen)
- Mistakes I made (so you don’t have to)
- Wrap-up: How I’d display (and photograph) it for maximum “Friends” nostalgia
- Extra: The real experience of building a tiny Monica’s kitchen
- SEO Tags
There are two kinds of people in this world: the ones who watch Friends and think “aw, cozy,” and the ones who watch Friends and think
“I need to live inside Monica’s kitchen immediately.” I’m the second kind. Since moving to a sitcom soundstage isn’t an option (rude),
I built the next best thing: a tiny, detailed miniature model of Monica Geller’s iconic kitchen.
This wasn’t just a craft projectit was a full-on tiny interior design investigation. I wanted the recognizable “feel”:
the bold color choices, the lived-in clutter, the mismatched charm, and that warm, open-plan layout that basically says,
“Come in, ignore the emotional chaos, and have a cookie.”
Why Monica’s kitchen is so iconic (and why it’s fun to recreate)
Production design is basically visual psychology. Monica’s apartmentespecially the kitchenworks because it’s bold enough to be memorable,
but “real” enough to feel like a place you could actually hang out. The show’s production designer, John Shaffner, has talked about how color
choices were part of giving the series a strong identity (the apartment’s purple walls are a famous example), and how the sets were designed to
feel layered and lived-in rather than showroom-perfect.
Monica’s kitchen hits a sweet spot between practical and quirky. You’ve got bright cabinet color, open shelving vibes, an easy social layout,
and enough everyday objects to make it feel like someone truly cooks here (and also stress-cleans here… aggressively).
That combination makes it perfect for a miniature build because the “wow” isn’t one single propit’s the whole atmosphere.
The miniature challenge
The trick isn’t building “a kitchen.” The trick is building that kitchen: recognizable shapes, color relationships, and clutter placement.
In miniature, your brain forgives missing detailsif the big visual cues are right.
- Color cues: bold wall color + distinctive cabinet color = instant recognition
- Layout cues: open-plan kitchen/living area feeling (even if you only build the kitchen slice)
- Story cues: mismatched, secondhand-ish objects that look collected over time
Planning the build: scale, layout, and my “tiny detective” process
I treated this like a miniature architecture project. First I decided on scale, then I mapped the footprint, then I built “big shapes”
before I touched any tiny props. That order saved me from the classic miniature trap: spending three hours making a microscopic spatula
before your walls are even straight.
Picking a scale (and not losing your mind)
I used a classic dollhouse scale: 1:12 (one inch in miniature equals one foot in real life). It’s popular because it’s big
enough for satisfying detail, and small enough to fit on a shelf without your family staging an intervention.
Layout strategy
Monica’s apartment kitchen reads as an L-shaped workspace connected to the living area. I focused on a “camera-friendly” angle:
the cabinet run, the refrigerator wall, and the little zone that implies the rest of the apartment continues off-stagejust like TV.
Reference without obsessing
I pulled screenshots for overall proportions and color relationships, then used behind-the-scenes set design interviews to understand why the space
feels the way it feels. That let me prioritize: I didn’t need every single label on every jarI needed the visual rhythm of a real, busy kitchen.
Materials and tools I used (aka: tiny construction, big snacks)
Miniature building is mostly about choosing materials that cut cleanly, glue reliably, and paint without warping.
I leaned on common scale-model and dollhouse methods: foamboard for structure, wood or styrene for crisp edges,
and acrylics for color control.
Core materials
- Foamboard / foam-core: walls, cabinet carcasses, backing panels
- Balsa or basswood strips: trim, face frames, shelves
- Thin styrene sheet: “appliance” panels and smooth surfaces
- Acrylic paint: mixable, fast-drying, beginner-friendly
- PVA (white glue) + tacky glue: most assembly
- Super glue (sparingly): quick bonds for tiny hardware
Tools that actually mattered
- Sharp craft knife + extra blades (dull blades are how foamboard gets emotionally damaged)
- Metal ruler + cutting mat
- Mini clamps or painter’s tape for clean glue-ups
- Fine sandpaper / sanding sticks
- Tweezers (because fingers are basically wrecking balls at 1:12)
The build (11 Pics)
Here’s the story of the build in 11 “pics.” These are structured like captions you can pair with your actual photos when you publish.
Each one highlights what changed, what I focused on, and what made the miniature feel more like Monica’s kitchen instead of “generic tiny cabinets.”
Pic 1: The blueprint moment (aka “me vs. geometry”)

I drew the footprint on paper, then taped it to my cutting mat so I could “test-fit” cabinet boxes before gluing anything.
This is the part where you feel very professional… until you realize your ruler is upside down.
Pic 2: Walls go up (instant tiny apartment energy)

I sealed and painted the walls before adding cabinetscleaner edges, fewer touch-ups. The bold wall color is one of the fastest ways to signal “Friends”
without needing a single prop.
Pic 3: The cabinet boxes (the unglamorous backbone)

I built simple boxes, then added face frames and doors later. It’s the same logic as real kitchens: the structure matters more than the knobsat first.
Pic 4: Countertops and the “L” shape

I cut counters slightly oversized, then sanded them down until the corners looked intentional. Tiny sanding is basically meditation with dust.
Pic 5: Painting the cabinets (the “oh wow” transformation)

I mixed paint to land in that bright, cheerful blue-green family without turning it neon. In miniatures, colors often need to be slightly muted,
because glossy surfaces can make everything look like a toy.
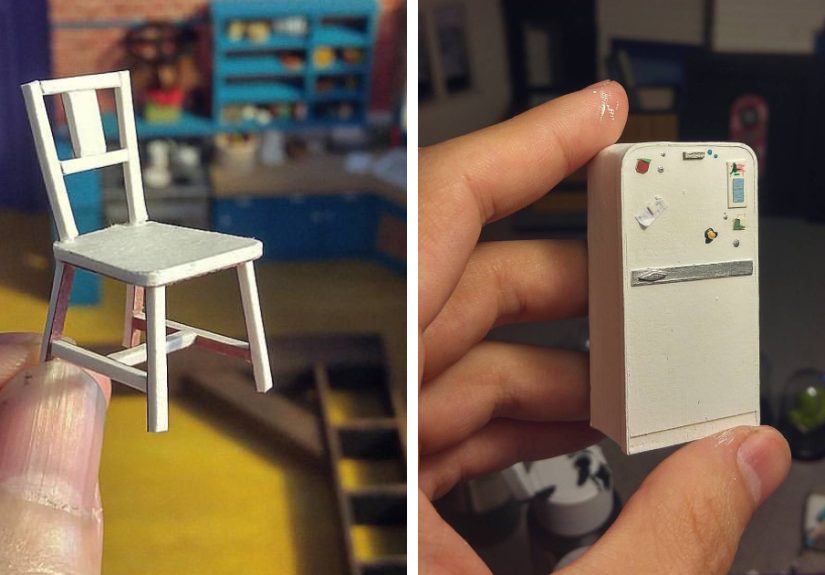
Pic 6: The fridge wall (hello, white rectangle of destiny)

Appliances are sneaky: if the proportions are even a little off, your brain immediately knows. I kept the detailing simple but crisp.
Pic 7: Open shelves and “lived-in” layering

Monica’s space feels curated-but-used. The easiest way to mimic that is to vary heights, add color pops, and leave tiny “imperfect” spacing
like a real person put things away while thinking about ten other things.
Pic 8: The table moment (the heart of the room)

A kitchen table in a sitcom isn’t just furnitureit’s a plot delivery system. I chose slightly mismatched chair shapes to get that secondhand,
collected vibe that production designers love because it tells a story without dialogue.
Pic 9: Floors and baseboards (the underrated realism)

Trim work is where miniature builds quietly level up. It’s also where you realize you have been holding your breath for no reason.
Pic 10: The tiny accessories explosion

I grouped accessories like real kitchens: functional clusters near counters, display items on shelves, and a few “oops I left this here” pieces
that make the space feel real.
Pic 11: The final reveal (tiny sitcom energy achieved)

The “done” moment is when you step back and your brain completes the set: you can almost hear the laugh track, the footsteps, and someone yelling,
“Could I be any more hungry?”
Tiny details that make it feel like Monica’s kitchen (not just a miniature kitchen)
1) Color relationships, not just color matches
Even if your paint isn’t a perfect match, you can nail the vibe by matching the relationships:
bold wall + bright cabinets + warm wood tones + pops of color in objects. Sitcom sets are designed to read clearly on camera,
so contrast is part of the “recipe.”
2) “Secondhand but loved” styling
Production design notes about Monica’s place often emphasize an eclectic, thrifty feel: mismatched items that still look intentional.
In miniature, I did that by mixing texturessome glossy ceramics, some matte paper “cookbooks,” some wood grainwithout making anything look brand-new.
3) Realistic clutter rules (the Monica edition)
- Keep counters mostly usable: a few objects, not a landfill
- Use “stacks”: plates, bowls, or books look believable when grouped
- Add one quirky focal prop: something that makes viewers lean in
Mistakes I made (so you don’t have to)
I painted too early… then realized I forgot holes
If you want cabinet knobs, shelf pins, or hanging hooks, drill or poke those before final paint. I learned this the hard way and invented a new technique:
“carefully pretending the mess was intentional.”
My first cabinet doors were too thick
In miniature, thickness reads as clunky fast. Thin materials (or layered paper/wood) look more realistic than chunky slabs.
I over-lit the final photos
Bright lighting can make a miniature look like a toy. Softer, angled light creates tiny shadows that read as “real room,” not “craft project.”
Wrap-up: How I’d display (and photograph) it for maximum “Friends” nostalgia
If you’re publishing this online, treat the miniature like a set. Frame shots from slightly above counter height, keep backgrounds simple,
and shoot a few angles that imply the rest of the apartment. Sitcom sets are designed for camera blockingyour miniature should be too.
- Best angle: 30–45° into the corner to show two walls at once
- Best storytelling shot: the table with a few “in-progress” items
- Best detail shot: open shelves with layered objects
Building this tiny model scratched a very specific pop-culture itch: the desire to hold a fictional comfort space in your hands.
It’s weirdly satisfying. Also, it’s the only time I’ve ever been able to “clean Monica’s kitchen” in under five minutes.
Extra: The real experience of building a tiny Monica’s kitchen
The funniest part about building a miniature of Monica’s kitchen is realizing you start thinking like a production designer without meaning to.
At first, I thought the project was about accuracymatching colors, copying shapes, recreating specific objects. But somewhere around the moment I spent
an unreasonable amount of time deciding how “shiny” a tiny countertop should be, I realized the real goal was believability.
Believability is weirdly emotional. When you get the big cues right (a bold wall color, bright cabinets, open shelving, and that friendly layout),
your brain fills in the rest. You don’t need to replicate every single jar label for someone to instantly feel like they’re back in the show.
That’s the same magic a TV set uses: it’s not a real apartment, but it feels like one. In miniature, you’re building a tiny version of that illusion,
and the illusion is the point.
I also learned that miniatures punish impatience with the confidence of a strict middle-school math teacher. If you rush a cut, the edge shows.
If you use too much glue, it oozes out and turns into a shiny fossil. If you don’t square a cabinet box, every door looks like it’s avoiding eye contact.
There’s no “I’ll fix it later” in miniaturelater is just you, sanding in silence, thinking about your life choices.
The most satisfying moments weren’t the big steps. They were the tiny “oh, that works!” moments:
when baseboards hid a gap that had been mocking me for days; when a second coat of paint suddenly made the cabinets look like wood instead of foam;
when I added a couple of stacked items to a shelf and the whole kitchen stopped looking staged. Those are the moments that make you understand why
real set designers obsess over texture and layeringbecause a space doesn’t feel lived-in until it has history, even if that history is fake.
I also got much pickier about scale than I expected. In real rooms, a slightly oversized mug just looks like a big mug.
In miniature, a slightly oversized mug looks like a circus prop. I started “auditioning” objects the way casting directors audition actors:
too tall, too shiny, too chunky, too modern, too perfect. The pieces that finally worked usually had one thing in commonthey weren’t flawless.
A slightly uneven stack, a handle that wasn’t perfectly centered, a book that looked a little worn: suddenly it felt real.
And yes, I absolutely took photos like I was filming a scene. I tried angles that suggested people had just walked out of frame.
I moved tiny objects around to see what felt most “Monica”: neat but not sterile, organized but not museum-like, colorful but not chaotic.
That balancing act is the charm of the kitchen and the charm of building it.
If you’re thinking about building your own miniature TV set replica, my biggest takeaway is this:
don’t chase perfectionchase recognition. Get the visual cues right, then add a handful of details that make you smile.
The point isn’t to prove you can copy a set. The point is to recreate the feeling you get when you see it. And if you can do that at 1:12 scale,
congratulations: you’ve basically built nostalgia you can dust.